Showing posts with label Easter. Show all posts

Tuesday, April 12, 2022

Hoppy Easter Bunny!!

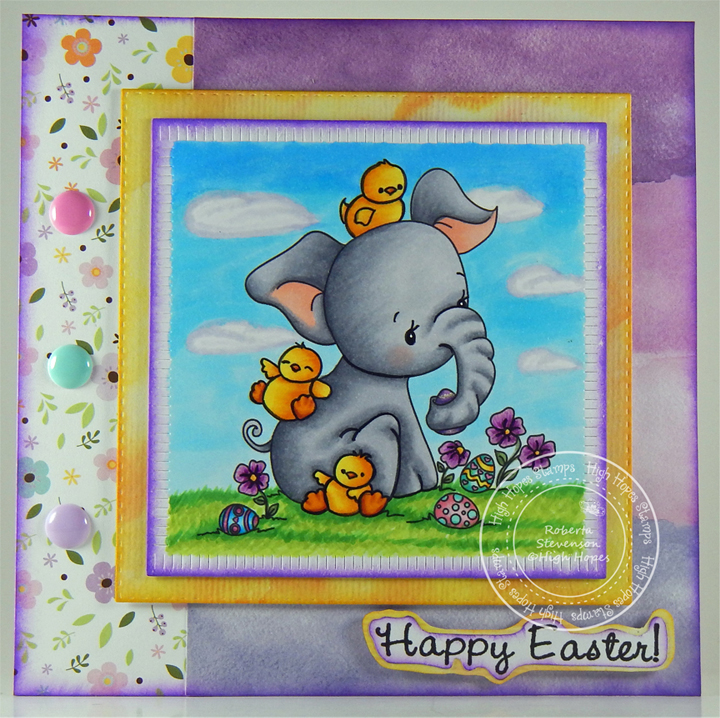
It’s Wednesday, and this week, I made an Easter card using High Hopes Rubber Stamps Carrot Patch - TDG029 for the image and Hoppy Easter! - E038 for the sentiment. We always looked forward to Easter time every year because we knew we would be colouring all of the Easter eggs with our mom in all different colours. It was always such a fun time!


To make my card this week, I began with a card base of Hammermill - Premium Colour 100 lb., cut and scored to be 5.5" x 4.25". I die cut the background papers from Echo Park - Welcome Easter cardstock using My Creative Time - Rectangle Frame Dies and my Cuttlebug. Tim Holtz Distress Ink - Spiced Marmalade was used to ink around all of the edges of both die cuts. I applied U-Line double-double sided tape and popped both papers onto the base card. Using the same set of dies, I die cut Copic Marker X-Press It Blending Card cardstock. I stamped the main image onto this die cut and the sentiment onto Copic Marker X-Press It Blending Card using my MISTI and Memento - Tuxedo Black. The image was coloured in with Copic Markers. I used a black marker to add in more details to the butterflies and also to add a couple of antennas. U-Line double-side tape was applied to the back of the coloured image and it was popped up into the centre of the orange rectangle. Lastly, to finish it off, I added in a few YNS Tropical Paradise Gumdrops.

Card Recipe:

Stamps: Carrot Patch - TDG029 (High Hopes Rubber Stamps)

Sentiment: Hoppy Easter! - E038 (High Hopes Rubber Stamps)

Inks: Memento - Tuxedo Black, Tim Holtz Distress Ink - Spiced Marmalade

Paper: Copic Marker X-Press It Blending Card, Echo Park - Welcome Easter (6" x 6"), Hammermill - Premium Colour 100 lb.

Die Cuts: My Creative Time - Rectangle Frame Dies

Tools: MISTI - Most Incredible Stamping Tool, U-Line double-sided tape, Cuttlebug, YNS Tropical Paradise Gumdrops

Image coloured with Copic Markers:

Rabbit: B60, C1, C0, R30, R20 (Eyes - Sakura Glaze - Black, Gelly Roll Sakura #8 Pen)

Carrots: E07, YR18, YR16, YR15, TR14, YR12

Leaves: G99, YG67, YG17, G21

Flowers: V12, V06, V04, Y17, Y08

Egg: BG72, BG57, BG32, BG11, RV06, RV04, RV02, Y15, Y08, Y02

Butterflies: YR27, Y38, Y17, Y08, E47

Grass: YG67, YG63, YG45, YG41

Sky: B60, B02, B01, B00, B000, C0

Hope you like it and have a fantastic week!

Check out more adorable images in the new "Spring Fever Release" at High Hopes Rubber Stamps!

You can find lots of inspiration from the Design Team Divas at the High Hopes blog, and the High Hopes Rubber Stamps Facebook Fan page plus you can also follow us on
Instagram, Twitter and Pinterest.


Thursday, April 7, 2022

Happy Easter

  Easter is just around the corner but I had to sneak in an extra card when I saw the "Carrot Patch" stamp in the "Spring Fever" re-release at High Hopes Rubber Stamps. 

While I was colouring the stamp, I had lots of memories come flooding back of Easter preparations as a child. My brothers and I got to dye eggs and often had contests - like most colourful, most funky, most silly etc. We always had a lot of fun and our fingers were just as colourful as the eggs when we were done. After that, we had to find our favourite hat and leave it on the table so the "Easter Bunny" knew where to put our treats and then he would hide them for us to find the next morning. So many fun memories......all coming back from colouring a stamp.. <smile>


After stamping this cutie on alcohol marker friendly paper, I coloured him with Copic markers and hand fussy cut him leaving a thin white edge. I wasn't planning on fussy cutting this one but it went better with my design to fussy cut it so I did. I combined patterned paper from Recollections and Craft Consortium to create the design and added them to the 5"x 5" card base.

Next I used a die to cut a grass strip, tulips and a fence to help add a spring feel to the card. All of the paper edges are inked with antique linen distress ink to help them stand out. I stamped and cut the sentiment and added some enamel dots to finish off the card. 

Card Recipe 

Stamp: Carrot Patch (TDG029) - High Hopes Rubber Stamps

Sentiment - Happy Easter (FDG034) - High Hopes Rubber Stamps

Patterned Paper: Whitewash Wood - Recollections, Grunge Light Tones - Craft Consortium


Tuxedo Black Memento ink, Hammermill 100lb digital cover stock, tulip die - Whimsy Stamps, fence die - Your Next Stamp, grass die - Dress My Craft, antique linen distress ink, circle die, enamel dots 


 Copic Markers:

Bunny - E41 E42 E57 RV0000 RV10

Carrots - Y21 Y35 Y38 YG01 YG03 YG17

Flowers -Y15 Y17 YG03 YG17 Y00 Y11 Y15

Butterflies - E34 E35 E29 Y00 Y11 Y15

Egg - Y00 Y11 B0000 B000 B00

Grass - YG01 YG03 YG17


Thanks for stopping by! Have a super fantastic day!


Wednesday, April 6, 2022

Ellie & Friends!!

It’s Wednesday, and this week, I made an Easter card using High Hopes Rubber Stamps Ellie & Friends - TDG025 for the image and Happy Easter! - F096 for the sentiment. We are celebrating our new "Spring Fever Release" this month and who couldn't love this adorable image!

To make my card this week, I began with a card base of AC Cardstock - White, cut and scored to be 6" x 6". I cut the flower cardstock from Echo Park - Welcome Easter at 6" x 1.75" and Lawn Fawn - Watercolor Wishes Rainbow paper to 6" x 4.5". I applied double-side tape and adhered both pieces directly to the base. Tim Holtz Distress Ink - Wilted Violet ink was used to ink around all of the edges of the base card. Using My Creative Time -Stitched Squares Inside and Out and my Cuttlebug, I die cut Momenta - Cardstock and inked around the edges with Tim Holtz Distress Ink - Fossilized Amber. 3M double-sided tape was applied to the back of this and it was popped up onto the base card.

Using PinkFresh Studios - Essentials: Blanket Stitched Square Die Set and my Cuttlebug, I die cut Copic Marker X-Press It Blending Card. I stamped the main image onto this die cut and sentiment onto Copic Marker X-Press It Blending Card using my MISTI and Memento - Tuxedo Black. The image was coloured in with Copic Markers and then U-Line double-side tape was applied to the back of it. This was popped up over top of the yellow square.

I fussy cut around the sentiment and inked around the edges with Tim Holtz Distress Ink - Wilted Violet. I ran it through my Xyron Create a Sticker and applied it to the Momenta - Cardstock and fussy cut around it again. I applied Scrapbook Adhesives - 3D Foam Strips to the back of the sentiment layers and added it to the bottom right of the card. Lastly, I added in 3 DoodleBug Design Inc. - Sprinkles Spring Assortment to complete the card.

Card Recipe:

Stamps: Ellie & Friends - TDG025 (High Hopes Rubber Stamps)

Sentiment: Happy Easter! - F096 (High Hopes Rubber Stamps)

Inks: Memento - Tuxedo Black, Tim Holtz Distress Ink - Wilted Violet, Tim Holtz Distress Ink - Fossilized Amber

Paper: Copic Marker X-Press It Blending Card, Lawn Fawn - Watercolor Wishes Rainbow - 6" x 6", Echo Park - Welcome Easter (6" x 6"), Momenta - Cardstock, AC Cardstock - White

Die Cuts: My Creative Time -Stitched Squares Inside and Out, PinkFresh Studios - Essentials: Blanket Stitched Square Die Set

Tools: MISTI - Most Incredible Stamping Tool, U-Line double-sided tape, 3M double-sided tape, Cuttlebug, Xyron Create a Sticker, DoodleBug Design Inc. - Sprinkles Spring Assortment, Scrapbook Adhesives - 3D Foam Strips

Image coloured with Copic Markers:

Elephant: C5, C3, C2, C1, R30, R20

Chicks: E53, E50, E15, YR31, YR18, YR14, Y21, Y08, Y14, Y08

Flowers, Stems and Leaves: V09, V06, V04, V01, Y17, Y13, G85, G43

Eggs: Y17, Y13, Y04. BG15, BG13, BG11, BG10, V17, V15, V12, B04, B02, B01, RV66, RV55, RV13, RV11, RV10

Sky: B60, B02, B01, B00, B000, C1, Colorless Blender

Grass: G14, YG23, YG11, YG03, YG01

Hope you like it and have a fantastic week!

Check out more adorable images in the new "Spring Fever Release" at High Hopes Rubber Stamps!

You can find lots of inspiration from the Design Team Divas at the High Hopes blog, and the High Hopes Rubber Stamps Facebook Fan page plus you can also follow us on
Instagram, Twitter and Pinterest.


Wednesday, March 9, 2022

Beautiful Blessings!!

It’s Wednesday, and this week, I made an Easter card using High Hopes Rubber Stamps Easter Gnome - SLF034  for the main image and Beautiful Blessings - FDG030  for the sentiment. I love to colour gnomes and was so excited when I saw this adorable character in the High Hopes Rubber Stamps new "This and That" Spring Release.

To make my card this week, I began with a card base of Hammermill - Premium Colour 100 lb. cardstock, cut and scored to be 5.5" x 4.25". I cut Forever In Time - Viola cardstock to be the same size as the base card and attached it using double-sided tape. Echo Park - Welcome Easter cardstock and Forever In Time - Sky cardstock were die cut using My Creative Time - Rectangle Frame Layers and my Cuttlebug. I trimmed the Forever In Time - Sky cardstock to 2". Both pieces were inked with Tim Holtz Distress Ink - Evergreen Bough around all edges. I applied the smaller piece to the centre of the egg background and then applied U-Line Double-sided tape and popped it up onto the base background.

Using PinkFresh Studio - Essentials: Folk Edge Squares, I die cut Copic Marker X-Press It Blending Card cardstock. The image was then stamped onto it with my MISTI and Memento - Tuxedo Black ink. I stamped the sentiment onto Copic Marker X-Press It Blending Card cardstock and die cut it with My Creative Time - Bunch of Fun Circle Dies. The image and frame around it were coloured in with Copic Markers.

The remainder of the card was now ready to finish being assembled. I applied U-Line double-sided tape to the back of the image and sentiment and popped them up onto the egg background. Lastly, I added in a few YNS Gumdrops to complete the card.

Card Recipe:

Stamps: Easter Gnome- SLF034 (High Hopes Rubber Stamps)

Sentiment: Beautiful Blessings - FDG030 (High Hopes Rubber Stamps)

Inks: Memento - Tuxedo Black, Tim Holtz Distress Ink - Evergreen Bough

Paper: Copic Marker X-Press It Blending Card, Hammermill - Premium Colour 100 lb., Echo Park - Welcome Easter (6" x 6"), Forever In Time - Sky, Forever In Time - Viola

Die Cuts: My Creative Time - Rectangle Frame Layers, My Creative Time - Rectangle Frame Dies, My Creative Time - Bunch of Fun Circle Dies, PinkFresh Studio - Essentials: Folk Edge Squares

Tools: MISTI - Most Incredible Stamping Tool, U-Line double-sided tape, Cuttlebug, YNS GumDrops

Image coloured with Copic Markers:

Skin: E21, E11, E04, E00, E000

Beard: C5, C4, C3, C1, C0

Hat and Clothing: BG34, BG32, BG15, BG11, BG10, V15, V12, V01, V000

Boots: E33, E31, E30, E27, E25, E23, E21

Bunny and Bunny Ears: C3, C1, C0, RV11, R20

Carrot and Stem: E08, YR18, YR14, YR12, Y08, G14, G07, YG23, YG11, YG03

Grass: YG17, YG13, YG03

Background: Y00, G00, B000

Border around Square Frame Circle: V12

Hope you like it and have a fantastic week!

You can find lots of inspiration from the Design Team Divas at the High Hopes blog, and the High Hopes Rubber Stamps Facebook Fan page plus you can also follow us on
Instagram, Twitter and Pinterest.


Saturday, April 3, 2021

Have A Blessed Easter!

 Today, I'm sharing an Easter card using Three Pane Easter - M043 by High Hopes Rubber Stamps for the main image and Blessed Easter Greetings - G151 (High Hopes Rubber Stamps) for the sentiment. Happy Easter to family, friends and everyone!


To make my card this week, I started with Craft Smart Card Paper pre-made to 5.5" x 4.25". I stamped the images and sentiment using MISTI and Memento - Tuxedo Black ink onto Copic Marker X-Press It Blending Card. Using my Brother Scan and Cut, I cut out each of the images. My Creative Time - Rectangle Frame Die Layers and my Cuttlebug were used to die cut the sentiment and Craft Sparkling Stickers - Purple (02-3068629) paper.

The main images were coloured in with Copic Markers. The background papers were all from Your Next Stamp - Happy Spring (6"x6") paper pad. I cut each section at 4" x 1.5" and then inked around all of the edges with Tim Holtz Distress Ink - Wilted Violet. The sentiment was inked with Tim Holtz Distress Ink - Fossilized Amber.

To assemble the card, using glue, I attached the 3 background papers onto the base card. Crafts ribbon was attached using double-sided tape. The images, sentiment and sentiment background were attached to the background papers using 3M VHB - 2 sided tape. Lastly, to finish off the card, I cut 3 Easter eggs out of some watercolour paper that I had used various Cosmic Shimmer colours on previously. I inked around the edges with Tim Holtz Distress Ink - Wilted Violet and glued them directly to the background paper.

Card Recipe:

Stamp: Three Pane Easter - M043 (High Hopes Rubber Stamps)

Sentiment:  Blessed Easter Greetings - G151 (High Hopes Rubber Stamps)

Inks: Memento - Tuxedo Black, Tim Holtz Distress Ink - Wilted Violet, Tim Holtz Distress Ink - Fossilized Amber

Paper: Copic Marker X-Press It Blending Card, Craft Smart - Cards and Envelopes, Your Next Stamp - Happy Spring (6"x6") 

Die Cuts: My Creative Time - Rectangle Frame Die Layers - MCT-D274

Tools: MISTI - Most Incredible Stamping Tool, Cuttlebug, 3M VHB - 2 sided tape, Cosmic Shimmer, Brother Scan and Cut

Image coloured with Copic Markers:

Bunny: E35, E34, E33, E31, E30, R30, R24, R20, Eyes (Sakura Glaze - Black)

Chick: Y17, Y08, Y04, YR18, YR16, YR12, Eyes (Sakura Glaze - Black)

Lamb: BV20, C3, C1, C00, Eyes (Sakura Glaze - Black)

Backgrounds for images: Y17, Y08, Y04, V17, V15, V12

Hope you like it and have a fantastic week!

You can find lots of inspiration from the Design Team Divas at the High Hopes blog, and the High Hopes Rubber Stamps Facebook Fan page plus you can also follow us on
Instagram, Twitter and Pinterest.


Wednesday, March 31, 2021

Bunny Blooms!

 It’s Wednesday, and this week, I made an Easter card using Bunny Blooms - T063 by High Hopes Rubber Stamps for the main image and Script Easter Greetings - F093 (High Hopes Rubber Stamps) for the sentiment. Easter is almost here and this little bunny is about to brighten someone's day!


To make my card this week, I started with Arches Watercolour Paper cut to 5.5" x 4.25". I ran this through my Cuttlebug using Tranquil Tulips Stencil from Simply Cards and PaperCraft. Next, I played with multiple Cosmic Shimmer products and spritzed some water to create this shimmery background. I let this dry overnight. I wanted the embossed tulips to show up more, so using a finger sponge, Tim Holtz Distress Ink - Wilted Violet was brushed over top of the raised edges. And of course, there is never enough shimmer so I added some Irridescent Glitter Dust spray as well. Then I glued this directly to the base card of Hammermill Premium 100 lb. Cardstock folded at 5.5" x 4.25". Lastly, I inked around the edges with the same ink.

The main image Bunny Blooms - T063 (High Hopes Rubber Stamps) and Script Easter Greetings - F093 (High Hopes Rubber Stamps) sentiment were stamped using my MISTI and Memento - Tuxedo Black ink onto Copic Marker X-Press It Blending Card. The main image and sentiment were coloured in with Copic Markers.

To assemble the remainder of my card, both the image and sentiment were attached to the background using 3M VHB - 2 sided tape. C.C. Designs - Dragon Dreams Enamel Dots were added to complete the card.

Card Recipe:

Stamp: Bunny Blooms - T063 (High Hopes Rubber Stamps)

Sentiment: Script Easter Greetings - F093 (High Hopes Rubber Stamps)

Inks: Memento - Tuxedo Black, Tim Holtz Distress Ink - Wilted Violet

Paper: Copic Marker X-Press It Blending Card, Arches Watercolour Paper, Hammermill Premium 100 lb. Cardstock

Stencil: Simply Cards and PaperCraft - Tranquil Tulips Stencil

Tools: MISTI - Most Incredible Stamping Tool, Cuttlebug, 3M VHB - 2 sided tape, Glitter Dust - Irridescent Spray, C.C. Designs - Dragon Dreams Enamel Dots

Image coloured with Copic Markers:

Bunny: E35, E34, E33, E31, E30, R30, R24, R20, Eyes (Sakura Glaze - Black)

Flowers and Leaves: V17, V15, V12, YR14, Y17, Y04, G17, G14, G07

Cosmic Shimmer: Pixi Powder: Purple Violet, Sun Yellow, Aubergine Dream, Purple Violet, Emerald Green, Pixie Sparkles: Groovy Grape, Pale Blush

Hope you like it and have a fantastic week!

You can find lots of inspiration from the Design Team Divas at the High Hopes blog, and the High Hopes Rubber Stamps Facebook Fan page plus you can also follow us on
Instagram, Twitter and Pinterest.


Friday, March 26, 2021

Egg-Stra Special Easter!

Welcome HH Fans;

It is almost Easter and it will be so different this year due to the pandemic.  Instead of large Easter Egg Hunts, there will be many small ones.

For today's card, I have used the cute and adorable Easter Bunny Stack and paired it with Egg-Stra Special, both which are  from High Hopes Stamps.  After colouring the image with copic markers, I added some Milled Lavender Distress Ink around the image.   I cut some eggs from a small piece of design paper and added Nuvo Crystal Glaze to them. I off-centered the main image on the card and added some twine and enamel dots finished off the card.


Supplies used:
  • Stamps:  Easter Bunny Stack (S177), Egg-Stra Special (G243) -- both from High Hopes Stamps
  • Ink:  Tsukineko Memento Tuxedo Black, Milled Lavendar - Distress Ink
  • Paper:  XPress It Blending Cardstock, DP - Hello Easter (Echo Park), Bloom Street (Pink Paislee)
  • Copic Markers:
    • W00 - Warm Gray No. 00, W0 - Warm Gray No. 0, W1 - Warm Gray No. 1, W2 - Warm Gray No. 2
    • C00 - Cool Gray No. 00, C0 - Cool Gray No 0, C1 - Cool Gray No. 1
    • E40 - Brick White, E41 - Pearl White
    • R0000 - Pink Beryl, R00 - Pinkish White
    • YG17 - Green Grass, YG13 - Chartreuse, YG11 - Mignonette
    • G0000 - Crystal Opal, G000 - Pale Green, G00 - Jade Green
    • BG0000 - Snow Green, BG000 - Pale Aqua
    • B00 - Frost Blue, B01 - Mint Blue
    • Y06 - Yellow, Y08 - Acid Yellow
    • YR04 - Orange Chrome
    • BV)000 - Pale histle, BV00 - Mauve Shadow
  • Nuvo Crystal Glaze
  • Miscellaneous:  Twine and Enamel Dots

Do take some time with a favourite beverage and browse the High Hopes Stamps website to see the many and varied fun stamps that are available.  For some inspiration, hop on over to the High Hopes Stamps Blog and see what the HH Divas have been up to. We do post daily. Don't forget to follow us on Facebook, Twitter and Instagram.

Thanks for stopping by and have a great day,

Hugs,


Wednesday, March 24, 2021

Easter Fun!

It’s Wednesday, and this week, I made an Easter card using Easter Fun - Q023 by High Hopes Rubber Stamps for the main image and Hoppy Easter - H245 (High Hopes Rubber Stamps) for the sentiment. This image reminds me so much of when I was younger. Every year, my mom would make boiled eggs and then we would all sit around the table and put them in the various dies to make some cool colourful eggs. It was always so much fun!

 To make my card this week, I used AC White Paper for my base folded at 6" x 6". I combined 2 separate pieces of purple ribbon and some patterned ribbon eggs together using double sided tape. I attached this to Your Next Stamp Designer - Happy Spring paper. Then I attached this directly to the base using double-side tape. The sides were all inked with Tim Holtz Distress Ink - Wilted Violet. The egg embellishments were die cut using my Cuttlebug and Lawn Fawn - Mini Easter Eggs. The top layers were cut from Copic Marker X-Press It Blending Card and coloured with Copic B01 and BG32. The bottom layers were cut from Crafts - Sparkling Stickers  - 02-3068629. I added some glue to the top layer and attached them to the base egg. I attached these directly to the base.

The background for the bunny image was cut using Whimsy - Nested Frames Die Set. The background die was cut from Hot Buy - Recollections - Jewel Tones and them main image cut was from Copic Marker X-Press It Blending Card. The base frames were attached to the background using 3M VHB - 2 sided tape. The main image Easter Fun - Q023 (High Hopes Rubber Stamps) and Hoppy Easter - H245 sentiment were stamped using my MISTI and Memento - Tuxedo Black ink. The main image was coloured in with Copic Markers and the sentiment was coloured in using Zig Clean Color Real Brush Markers. Clear - Wink of Stella was brushed over top to make it sparkle.

To assemble the remainder of my card, I ran the coloured image and sentiment through my Xyron's and then attached them to the base shapes on the card.

Card Recipe:

Stamp: Easter Fun - Q023 (High Hopes Rubber Stamps)

Sentiment: Script Easter Greetings - F093 (High Hopes Rubber Stamps)

Inks: Memento - Tuxedo Black, Tim Holtz Distress Ink - Wilted Violet

Paper: Copic Marker X-Press It Blending Card, AC White, Hot Buy - Recollections - Jewel Tones, YNS Designer Paper Pad - Happy Spring, Crafts - Sparkling Stickers  - 02-3068629

Die Cuts: Whimsy - Nested Frames Die Set, Lawn Fawn - Mini Easter Eggs

Tools: MISTI - Most Incredible Stamping Tool, Cuttlebug, 3M VHB - 2 sided tape, Clear - Wink of Stella, Xyron Create a Sticker, Xyron Creative Station

Image coloured with Copic Markers:

Bunnies: E35, E34, E33, E31, E30, R30, R20, C2, C1, C0, Eyes (Sakura Glaze - Black, Gelly Roll Sakura #8 Pen)

Shirts: BG72, BG57, BG32, BG11, V17, V15, V12

Eggs and Paint Tins: BG32, B04, B02, B01, Y17, Y13, C5, C3, C1, E53, E51, E50

Water and Egg Carton: E53, E51, E50, B000, B0000

Table and Shadow: W2, W1, W0

Background: Y02

Sentiment: Zig Clean Color Real Brush Markers - English Lavender (803), Lilac (083), Yellow (050), Orange (070), Turquoise Green (042), Green Shadow (049), Light Pink (026)

Hope you like it and have a fantastic week!

You can find lots of inspiration from the Design Team Divas at the High Hopes blog, and the High Hopes Rubber Stamps Facebook Fan page plus you can also follow us on
Instagram, Twitter and Pinterest.


Wednesday, March 17, 2021

Easter Egg Gift!

 It’s Wednesday, and this week, I made an Easter card using this hoppy little Bunny With Gift - S118 by High Hopes Rubber Stamps for the main image and Script Easter Greetings - F093 (High Hopes Rubber Stamps) for the sentiment. Look at how "hoppy" he is to share his  decorated egg with a special person! I don't know about you, but I hope it's filled with chocolate. LOL!


To make my card this week, I used Recollections - Hot Buy Pre-Cut Cards for my base folded at 5.5" x 4.25". Next I die cut Hot Buy - Recollections - Spring Posies using my Cuttlebug and My Creative Time - Rectangle Frame Die. Using some spare ribbon I had, using some double-sided tape, I attached it directly to this die-cut. Then, using double sided tape, I attached this piece directly to the base card. The aqua colour paper is from Hot Buy - Recollections - Jewel Tones. I created this die cut using my Cuttlebug and Gina Marie Designs - Loopy Rectangle Die Set.

The frame for the sentiment was created in Microsoft Word and then printed out onto white cardstock. This was coloured in with ZIG Clean Color Markers - 050 - Yellow and 025 - Pink. I stamped the Bunny With Gift - S118 (High Hopes Rubber Stamps) and Script Easter Greetings - F093 sentiment using my MISTI. Using my Brother Scan and Cut, I cut around the image leaving a small white border. This was coloured in with Copic Markers.

To assemble the remainder of my card, I first used some double-side tape to attach the finished sentiment to the bottom of the aqua die cut. 3M VHB - 2 sided tape was added to both pieces and attached to card. Lastly, the completed image was attached to the die cut, using 3M VHB - 2 sided tape.

Card Recipe:

Stamp: Bunny With Gift - S118 (High Hopes Rubber Stamps)

Sentiment: Script Easter Greetings - F093 (High Hopes Rubber Stamps)

Inks: Memento - Tuxedo Black

Paper: Copic Marker X-Press It Blending Card, Craft Smart - Cards and Envelopes, Hot Buy - Recollections - Jewel Tones, Hot Buy - Recollections - Spring Posies

Die Cuts: My Creative Time - Rectangle Frame Dies, Gina Marie Designs - Loopy Rectangle Die Set

Tools: MISTI - Most Incredible Stamping Tool, Cuttlebug, 3M VHB - 2 sided tape

Images coloured with Copic Markers:

Bunny: E35, E34, E33, E31, E30, R30, R20

Egg and Bow: BG72, BG57, BG32, BG11, Y17, Y08, Y04, R83, R81, RV00, RV000

Easter Greetings: ZIG Clean Color Markers - 050 - Yellow, 025 - Pink

Hope you like it and have a fantastic week!

You can find lots of inspiration from the Design Team Divas at the High Hopes blog, and the High Hopes Rubber Stamps Facebook Fan page plus you can also follow us on
Instagram, Twitter and Pinterest.


Sunday, March 14, 2021

Peeking Spring Buddies

Hi Everyone, 
and welcome High Hope Stamps friends to another card inspirations! 

I'm so excited to be sharing this adorable image called "Peeking Spring Buddies" from High Hopes Stamps

Supplies List; white cardstock for my base, the pattern paper is Seaside Checks from Lasting Impressions. Memento black ink. The die I used to make the window is from my stash, light pink enamel dots, glossy accent, diamond stickles and lot's of foam tape. I left the sentiment area blank at this moment because I not sure if I want to give this Spring card to a dear friend or maybe to my nice birthday!  Copic list; gray C3 C5 C7 C9 yellow Y11 Y13 Y15 green YG06 YG13 red RV10 RV11 R24 R39

Thank you for visit my blog today. 
Have a BLESS day.


Thursday, March 11, 2021

Happy Easter!

  We have been enjoying some sun where I live and although there is still a lot of snow on the ground and it is still pretty cold it makes me itch for spring. Not just for the sun and melting snow but for spring flowers and Easter. 

I always seem to forget to give my Easter cards away but this year I am going to try to remember to. We may not be able to get together for Easter again so I am making cards to be able to send out to family. Three Pane Easter from High Hopes Rubber Stamps is perfect for Easter and Spring cards. These cute babies just make me smile and I hope they will make the person I send this card to smile too. 


After stamping these cuties with tuxedo black Memento ink, I coloured them with Copic alcohol markers and cut them out using my paper trimmer. After setting them aside I found some paper from Echo Park to create my patterned paper layers. I used a polaroid die to add some interest behind them and cut them out in matching card stock. 
After stamping the sentiment I cut it out using a banner die and trimmed the ends. I mounted it on card stock and slid it under the stamped image. Next I inked all of the layers with antique linen distress ink to help them stand out and added a gingham bow and enamel dots to finish off my card. 

Card Recipe 

Stamp: Three Pane Easter - High Hopes Rubber Stamps

Sentiments: Happy Easter! - High Hopes Rubber Stamps

Patterned Paper - Dots and Stripes, Spring - Echo Park


Tuxedo Black Memento ink, Hammermill 100lb digital cover stock, ribbon, Antique Linen Distress ink, enamel dots 


 Copic Markers:

Bunny - R20 R32 R35 E34 E35 E29 C1

Chick - Y00 Y02 Y08 Y26 Y35 Y38

Lamb - R30 R32 C0 C1 C3

Sky - B00 B02


Thanks for stopping by! Have a super fantastic day!


Wednesday, March 10, 2021

Posing Easter Bunny!

 It’s Wednesday, and this week, I made an Easter card using this sassy little Posing Bunny - R080 by High Hopes Rubber Stamps. She's all prettied up with her Easter Bonnet and wanted to show it off. LOL!

To make my card this week, I used Recollections - Hot Buy Pre-Cut Cards for my base folded at 5.5" x 4.25". Next I die cut Craft Smart - Hot Buy - Spring & Hop using my Cuttlebug and My Creative Time - Rectangle Frame Die. This was inked all around the edges with Tim Holtz Distress Ink - Mermaid Lagoon. It was then attached directly to the base card using Tombow Multi Mono Liquid Glue. The big Easter Egg is from Simple Stories - Bunnies & Baskets. This was popped up using 3M VHB - 2 sided tape.

I stamped Posing Bunny - R080 (High Hopes Rubber Stamps) using my MISTI and then used my Brother Scan and Cut to cut around it. This was coloured in with Copic Markers and I gave her eyes some eyelashes. I added this to the card using 3M VHB - 2 sided tape. To complete the card I added in some flowers.

Card Recipe:

Stamp: Posing Bunny - R080 (High Hopes Rubber Stamps)

Inks: Memento - Tuxedo Black, Tim Holtz Distress Ink - Mermaid Lagoon

Paper: Copic Marker X-Press It Blending Card, Simple Stories - Bunnies & Baskets, Craft Smart - Hot Buy - Spring & Hop, Recollections - Hot Buy Cards and Envelopes

Die Cuts: My Creative Time - Rectangle Frame Dies

Tools: MISTI - Most Incredible Stamping Tool, Cuttlebug, 3M VHB - 2 sided tape

Images coloured with Copic Markers:

Bunny: BV20, C3, C2, C1, R30, R20, E53, E51, E50

Hat and Ribbon: B04, B02, B01, B00, V09, V06, V04, V01

Hope you like it and have a fantastic week!

You can find lots of inspiration from the Design Team Divas at the High Hopes blog, and the High Hopes Rubber Stamps Facebook Fan page plus you can also follow us on
Instagram, Twitter and Pinterest.


Thursday, March 4, 2021

Easter Greetings

 Am I the only one who can't believe it is March already!??? That means spring is just around the corner and that all the snow we have will melt. We have had some beautiful, sunny spring like weather lately and it has been amazing to take a walk in the warm sun. 

Spring also means Easter is just around the corner so today I am adding to my Easter card stash using "A Tulip For You" from High Hopes Rubber Stamps. This stamp works for Easter but would also work for spring, Valentine's or an anniversary card. So many possibilities and I love when I can use a stamp for more than one occasion! 


I chose to go clean and simple (CAS) with my card design for this adorable stamp. After stamping it, I coloured it with Copic markers and set it aside. Patterned paper from Your Next Stamp with some adorable little hearts was perfect for this pair and I cut it and the card stock to fit my 5.5" x 5.5" card base. 

Next I laid my border edge die onto the stamped image paper to decide where I wanted to cut my border. I placed the sentiment into the space where I wanted to stamp it and then cut my border edge. After placing it on my card base decided how much had to be trimmed off the top to fit leaving a little patterned paper and card stock showing. Then I cut a piece of card stock to the correct width and cut the border edge. I placed the stamped image on to my Misti, placed the sentiment and stamped it directly on to the paper. 

To finish my card, I edged all of the paper with antique linen distress ink and added some twine and color added clear enamel dots.

Card Recipe 

Stamp: A Tulip For You - High Hopes Rubber Stamps

Sentiments: Script Easter Greeting - High Hopes Rubber Stamps

Patterned Paper - Hugs and Kisses - Your Next Stamp


Tuxedo Black Memento ink, Hammermill 100lb digital cover stock, edge die - Kat Scrappiness, color added clear enamel dots, twine, antique linen distress ink


 Copic Markers:

Bunnies - W00 W0 W1 E30 E31 E43

Bows - Y00 Y13 Y15 BG11 BG13 BG15 white gel pen

Noses, Ears - R30 R32

Leaves - YG01 YG02 YG19

Flowers - RV11 RV13 RV14 Y00 Y13 Y15 Y17

Butterfly - Y00 Y15 Y17

Grass - YG0000 YG01


Thanks for stopping by! Have a super fantastic day!


Wednesday, February 17, 2021

He Is Risen!

It’s Wednesday, and this week, I made an Easter Card using  He Lives! - R057 (High Hopes Rubber Stamps) for the main image and He Is Risen! - H137 (High Hopes Rubber Stamps) for the sentiment. I really love the serenity of this image. Here's hoping that we will get to spend Easter with our loved ones this year.


To make my card this week, I used AC Cardstock for my base folded at 6" x 6". For the main background, I used this beautiful paper from Heartfelt Creations - Flowering Dogwood Collections cut to the same size as the base and attached it using double-sided tape. Tim Holtz Distress Inks - Peeled Paint was used to ink around all of the edges. My Creative Time - Scalloped Stitched Oval Dies was used to cut all of the ovals and My Creative Time - Rectangle Frame Die Layers was used to cut the small rectangle. Tim Holtz Distress Ink - Fossilized Amber was used to ink around the large scalloped oval and Tim Holtz Distress Inks - Dusty Concord was used to ink around the larger oval and small rectangle. I used 2 types of purple ribbon and ran both pieces through my Xyron Create a Sticker to make it easier to attach them to each other and then onto the card. I used some double-sided tape and glue to adhere the larger oval to the base. 3M VHB - 2 sided tape was used to add the larger oval.

I stamped the image and sentiment using Memento - Tuxedo Black and my MISTI onto Copic Marker X-Press It Blending Card. I coloured in the image using Copic markers. For the sentiment, I found the white was too bright, so I coloured over it with a soft purple Copic marker - V01. I added 3M VHB - 2 sided tape to the back of the coloured image and placed it on top of the larger oval. For the sentiment, I doubled up on the 3M VHB - 2 sided tape before attaching it to the card.

Card Recipe:

Stamp:  He Lives! - R057 (High Hopes Rubber Stamps)

Sentiment Background: He Is Risen - H137 (High Hopes Rubber Stamps)

Inks: Memento - Tuxedo Black, Tim Holtz Distress Ink - Fossilized Amber, Tim Holtz Distress Inks - Dusty Concord, Tim Holtz Distress Inks - Peeled Paint

Paper: Copic Marker X-Press It Blending Card, Heartfelt Creations - Flowering Dogwood Collections - 12" x 12" Paper Pad - HCDP1-275, AC White Cardstock, Yellow Cardstock, Purple Cardstock

Die Cuts: My Creative Time - Rectangle Frame Die Layers - MCT-D274, My Creative Time - Scalloped Stitched Oval Dies

Tools: MISTI - Most Incredible Stamping Tool, Cuttlebug, 3M VHB - 2 sided tape, Xyron Create a Sticker

Images coloured with Copic Markers:

Cross: E59, E39, E35, E33, E31

Sash: BV08, V17, V15, V09, V04

Flower and Leaves: YG17, YG03, YG01, Y02, C0

Lamb: B60, C3, C1, C0, R30, Colorless Blender

Grass: YG13, YG11, YG03, YG01

Sky: Y02, Y06, Y08

Hope you like it and have a fantastic week!

You can find lots of inspiration from the Design Team Divas at the High Hopes blog, and the High Hopes Rubber Stamps Facebook Fan page plus you can also follow us on
Instagram, Twitter and Pinterest.


Wednesday, January 20, 2021

Hoppy Valentine's Day

It’s Wednesday, and this week I'm sharing a Valentine's Card featuring Bunny Love - S054 from (High Hopes Rubber Stamps) for the main image and Hoppy Valentines - F092 (High Hopes Rubber Stamps) for the sentiment. Love this adorable image and it can be used for so many different occasions, Valentine's, which I've used here, Easter or even for an Anniversary card.

To create the card this week, I stamped the main image and sentiment onto Copic Marker X-Press It Blending Card using Memento - Tuxedo Black ink and my MISTI. I coloured in the main image with Copic Markers. Then I fussy cut around it. The sentiment was die cut using Whimsy Stamps - Quick Strips Die Set - WSD330.

To create the base I began with AC Cardstock - Christmas (6" x 6"). Then I die cut K&Company - Kelly Panacci - KP Valentine - 30-599338 paper using My Creative Time -Stitched Squares Inside and Out. For the smaller heart, I used K&Company - Kelly Panacci - KP Valentine - 30-599345 paper and Sizzix Framelets by Stephanie Barnard - 562676 - Hearts Dotted dies. I also used the same dies to cut the larger heart using Recollections - Christmas Noel paper. I inked around all of the cut images with Tim Holtz Distress Ink - Aged Mahagony and also Tim Holtz Distress Ink - Barn Door.

To assemble the card, the large square was attached directly to the base using double side tape. All of the remaining layers were popped up using 3M VHB - 2 sided tape.

Card Recipe:

Stamp: Bunny Love - S054 from (High Hopes Rubber Stamps)

Sentiment: Hoppy Valentines - F092 (High Hopes Rubber Stamps)

Inks: Memento - Tuxedo Black, Tim Holtz Distress Ink - Barn Door, Tim Holtz Distress Ink - Aged Mahagony

Paper: Copic Marker X-Press It Blending Card, K&Company - Kelly Panacci - KP Valentine - 30-599345, K&Company - Kelly Panacci - KP Valentine - 30-599338, AC Cardstock - Christmas, Recollections -

Die Cuts: My Creative Time -Stitched Squares Inside and Out, Sizzix Framelets by Stephanie Barnard - 562676 - Hearts Dotted, Whimsy Stamps - Quick Strips Die Set - WSD330, Recollections - Christmas Noel

Tools and Miscellaneous: MISTI - Most Incredible Stamping Tool, Sakura Glaze - Black, 3M VHB - 2 sided tape

Image coloured with Copic Markers:

Bunnies: BV23, BV20, B60, E43, E42, E40, R85, R83, R81, Sakura Glaze - Black (Eyes)

Hope you like it and have a fantastic week!

You can find lots of inspiration from the Design Team Divas at the High Hopes blog, and the High Hopes Rubber Stamps Facebook Fan page plus you can also follow us on
Instagram, Twitter and Pinterest.


Wednesday, August 26, 2020

Time to Smell the Flowers!

It’s Wednesday, and this week, I used Daffodil Bunny - SLF006 (High Hopes Rubber Stamps) for the main image from the new August 2020 release and Smell The Flowers - G189 (High Hopes Rubber Stamps) for the sentiment. This adorable little bunny is taking time out to smell the flowers. We have a really nice garden of flowers that my husband takes care of. I'm not a green thumb at all. LOL! It's always nice to take a moment and enjoy the beauty of them.


To make my card this week, I started out with a simple white card base, sized at 6" x 6". The base background was also cut at 6" x 6" using Craft Consortium - Cottage Garden paper and then inked around the edges with Tim Holtz Distress Ink - Fossilized Amber. I just thought this paper went so well with this adorable image. I added the 2 colours of ribbon with some 2-sided tape and then adhered the entire background paper to the base with 2-sided tape.

The scalloped circle and inside image circle were both die cut using my Cuttlebug and Craftin Desert Diva's Stitched in Circle Dies. The circle in between the 2 of them was die cut with Lifestyle Crafts Cutting Dies - Nesting Circles. The edges of the large scalloped circle were inked with Tim Holtz Distress Ink - Picked Raspberry. For the sentiment, My Creative Time - Rectangle Frame Dies were used. The die was larger in depth, so I just die cut one side and then turned it around and only put it part way through my Cuttlebug to cut the other edge. It too, was then inked around the edges with Tim Holtz Distress Ink - Fossilized Amber. The image was coloured with Copic Markers.

To assemble the remainder of the card, the mid circle was attached directly to the large scalloped circle and then popped up with 3M VHB - 2 sided tape. The image and sentiment were popped up on top with 3M VHB - 2 sided tape as well.

Card Recipe:

Stamp: Daffodil Bunny - SLF006 (High Hopes Rubber Stamps)
Sentiment: Smell The Flowers - G189 (High Hopes Rubber Stamps)
Inks: Memento - Tuxedo Black, Tim Holtz Distress Ink - Fossilized Amber, Tim Holtz Distress Ink - Picked Raspberry
Paper: Copic Marker X-Press It Blending Card, Momenta - Cardstock, Crafts Sparkling Stickers - 02-3068629, Craft Consortium - Cottage Garden 6"x6"
Die Cuts: Craftin Desert Diva's Stitched in Circle Dies, Lifestyle Crafts Cutting Dies - Nesting Circles, My Creative Time - Rectangle Frame Dies
Tools: MISTI - Most Incredible Stamping Tool, Cuttlebug, 3M VHB - 2 sided tape

Image coloured with Copic Markers:

Bunny: E37, E35, E34, E33, E31, E30, R11, R02, R000
Bow: RV19, RV17, RV13
Grass and Greenery for Plants: BG99, BG97, G21, YG17, YG13, YG07, YG03, YG01
Daffodil: E15, Y38, Y18, Y04
Clouds and Sky: B60, B01, B00, B000, B0000, C0, Colorless Blender

Hope you like it and have a fantastic week!

You can find lots of inspiration from the Design Team Divas at the High Hopes blog, and the High Hopes Rubber Stamps Facebook Fan page plus you can also follow us on
Instagram, Twitter and Pinterest.