
Our “Fun in the Sun” challenge is continuing this week so if you haven’t yet joined us we hope you’ll share a fun, sunny card with us this week!
This is the card that I made for my Diva card sample last Tuesday using Surf Scene Dudley.

But…last week I didn’t get to share the inside of the card with you!
In the inside there is even more “Fun in the Sun”!

It’s a fun little “Pop up card”. Here’s a close up side view for you.

I am going to show you how I made this card for today’s tutorial.
To start with you’ll need:
1 piece of 5 ½” x 8 ½” cardstock for your card base
1 piece 5 ¼” x 8 ¼” white cardstock
Addition white cardstock for stamping your images on
Teal scrap for punched wave
Paper cutter
Scoring tool
Stamps
Ink
Sponges
Wave punch

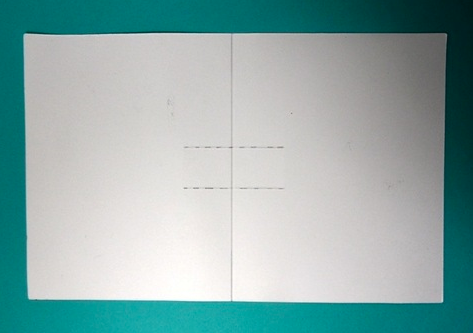
Score the white panel at 4 1/8” (in half-shown with the solid line)
Cut on the dotted lines which are 2 ¼” from the sides and each 2” long.
You should then be able to fold it so it looks like this.

Flatten the panel back out so that you can decorate it.
Create the clouds by using a die cut scallop oval and move it randomly around the page while sponging Aqua ink around the top. You can save the “cloud template” for reuse on future projects.

Randomly sponge brown ink on the lower portion to create the “sand”.

Punch a “wave” out of a scrap of teal paper and adhered it to the panel behind the cut out.

The final steps are to stamp, color, and cut out your images and sentiments and adhere to your pop up scene. (I used, Summer Sunshine & Surfer Dude Dudley)
Then adhere your scene to the inside of your card.
Here is the inside of another High Hopes “Pop up card” that I made earlier this year.
I used Hoppy Flower Froggy, Double Daisy & a portion of the Leapin' Lillypads Frog-ive me sentiment on this one.

I hope you enjoyed today’s tutorial and that you’ll give it a try.
Let me know if you have any questions!
Kristine
1 comment:
Thank you for sharing this tutorial, I 'm going to try this, love this pop-up cards.
José
Post a Comment