Wednesday, December 28, 2022

It's time for our AFTER CHRISTMAS SALE!!!

We hope everyone had a wonderful holiday season this year!!

It's time for our AFTER CHRISTMAS SALE!!

SAVE 25% OFF ALL ORDERS

Sales ends December 31st, 2022 @ midnight EST

**Get FREE shipping on all orders over $50.00 (after discount & before applicable taxes).  Within Canada & the US only

SHOP NOW BEFORE THE SALE ENDS

Use Coupon Code:  XMAS @ checkout

CLICK HERE

Happy Shopping!!!

Thursday, December 22, 2022

Sparkle and Cheer Friends

 I can't believe Christmas is in 3 days.......3 DAYS!!! Am I the only one who feels like this year went by at warp speed?!? This month the High Hopes design team has been sharing winter themed cards and for me, Christmas and New Year's are part of winter so for my final card of the year I have decided to do a card to wish you all - my followers, High Hopes fans and followers, and all my friends and family a very Merry Christmas and Happy New Year! 

The design team will be taking next week off to spend time with family and friends and we will be back to regular posting in January.
Merry Christmas and Happy New Year everyone from myself and "Polar Friends" from High Hopes Rubber Stamps. 


I started this card by cutting a piece of water colour paper to fit my 5.5" x 5.5" card base and did some ink blending with Distress Ink and Stampin' Up inks. I splattered some Unicorn's Hair acrylic paint on the ink (hard to see in the picture) to add some extra sparkle and shine. 
When the paper was dry, I used a fireworks die to cut out the fireworks and glued the paper down to a piece of card stock. I set it aside and after stamping these friends on alcohol marker friendly paper I coloured them with Copic markers, added Star Dust Stickles to their scarves and hat and hand fussy cut them leaving a thin white edge.

Next, I cut fireworks out of white, red and green glitter paper and inset them in to the background. I added a few extra stars around the fireworks just for fun. White card stock cut with a curvy die helped me make some snowy hills. To create the sentiment, I masked off the top portion of the sentiment, stamped it on matching card stock with Versa Mark and added some white WOW embossing powder. 

After heating it with my heat gun, I let it cool and then added white ink around the edge to help it stand out a little bit better. The stamp was added with some foam tape to add some dimension and matching glitter dots in the corners finish off my card. 

Card Details
Stamps - Polar Friends (TT058) - High Hopes Rubber Stamps
Sentiment - Sparkle & Cheer (LDG001)
Patterned Paper - glitter paper - stash and American Crafts 

Memento Tuxedo Black ink, Hammermill Digital Cover Card Stock, white WOW Embossing powder, Night of Navy ink - Stampin' Up, Stormy Sky - Distress ink, fireworks die - Your Next Stamp, Star Dust Stickles, Picket Fence Distress ink, foam tape, glitter dots, Unicorn's Hair acrylic paint - Prima 

Copic Markers
Penguin/Nose - N4 N5 N8 N10
Feet/Beak - Y11 Y15 Y17 Y38
Candy Cane - R17 R27 R37 R39
Paws - E01 E93
Shading - W0 W1
Hats/Scarves - R39 R59 R89 C7 G17 G28 B39
Glass - C1 C2 C4 C5 R59 G28 E01 E93
Ice Cubes - B000 B00


Thanks for stopping by! Have a super fantastic day!


Wednesday, December 21, 2022

Christmas Kitty Fun!!!

It’s Wednesday, and this week, I made a Christmas card using High Hopes Rubber Stamps Christmas Kitty Fun - S107 for the main image and Merry Christpaws - FLL006 for the sentiment. Our cats could never resist playing with our Christmas wrapping paper and playing in the boxes. I can't even begin to count how many cardboard boxes they demolished over the years! LOL! Wishing you and all of your pets a very safe and joyous Merry Christmas and A Happy New Year!

To make my card this week, I began with a card base of 6" x 6" using AC Cardstock - White. I thought this patterned paper from Craft Smart - Hot Buy called Happy Pawlidays went perfect with this image and sentiment.

The image was stamped using my MISTI and Memento - Tuxedo Black ink onto Copic Marker X-Press It Blending Card cardstock and Lawn Fawn - Let It Shine Snowflakes patterned paper. I coloured in the image and then fussy cut around it. With a black marker, I inked around the outside of the image.  I ran the patterned paper through my Xyron Creative Station to make it like a sticker and then fussy cut around the gift paper and paper pieced it onto the coloured image. The entire image was then adhered to the card using liquid glue. I removed the backing from the remainder of the gift portions and applied them directly to the card base as well. A few extra white and sparkly dots were added onto the patterned gift paper using a Gelly Roll Sakura #8 Pen and Gelly Roll Stardust - Clear pen. Stickles - Diamond was applied to the hat, pompom, snowflakes and dots on the background patterned paper to add some extra sparkle.

Using my MISTI and VersaMark ink, I stamped the sentiment onto a scrap piece of red cardstock. Ranger Embossing Powder White – Extra Fine Detail was applied over top of the ink and then heat set with a Marvy Uchida - Embossing Heat Tool. This was die cut using my Cuttlebug and Pink & Main - Large Sentiment Strip Dies. The sentiment was popped up onto the top of the card using U-Line double-sided tape. Lastly, I glued on some embellishment buttons after removing the backings from Dress It Up - Holiday Collection - Itty Bitty Snowflakes and Dress It Up - Holiday Collection - Glitter Holly. Tim Holtz Distress Ink - Barn Door was inked around the outside edges of the card with a sponge dauber to finish it off.

Card Recipe:

Stamp: Christmas Kitty Fun - S107 (High Hopes Rubber Stamps)

Sentiment: Merry Christpaws - FLL006 (High Hopes Rubber Stamps)

Inks: Memento - Tuxedo Black, Tim Holtz Distress Ink - Barn Door, VersaMark

Paper: Copic Marker X-Press It Blending Card, Hammermill - Premium Colour 100 lb., Lawn Fawn - Let It Shine Snowflakes (6" x 6"), Craft Smart - Hot Buy - Happy Pawlidays (12" x 12")

Die Cut: Pink & Main - Large Sentiment Strip Dies (PNM327)

Embossing Powder: Ranger Embossing Powder White – Extra Fine Detail

Tools and Embellishments: MISTI - Most Incredible Stamping Tool, U-Line double-sided tape, Xyron Creative Station, Dress It Up - Holiday Collection - Itty Bitty Snowflakes, Dress It Up - Holiday Collection - Glitter Holly, Marvy Uchida - Embossing Heat Tool, Gelly Roll Sakura #8 Pen, Gelly Roll Stardust - Clear, Sakura Glaze - Black, Stickles - Diamond, Cuttlebug

Image coloured with Copic Markers:

Kitty 1: E97, E95, E13, YR14, YR12, R02, R01, (Eyes and Nose - Sakura Glaze - Black)

Kitty 2: C8, C6, C4, C2, R02, R01, (Eyes and Nose - Sakura Glaze - Black)

Santa Hat: R59, R37, R35, BV23, BV20, Colorless Blender

Ribbon: R59, R37, R35, R20

Box: E35, E34, E33, E31

Paper Wrapping: YG07, YG03, Colorless Blender

Shadow: C1

Hope you like it and have a fantastic week!

You can find lots of inspiration from the Design Team Divas at the High Hopes blog, and the High Hopes Rubber Stamps Facebook Fan page plus you can also follow us on
Instagram, Twitter and Pinterest.


Tuesday, December 20, 2022

BRR....!

Hello!
Look at this adorable "Skating Along" Penguin from High Hopes Rubber Stamps! He looks like he doesn't have a care in the world! He's just out enjoying the winter day skating on the pond. He's got quite the form too LOL!
I decided to pair Mr Penguin with the "Frozen Skating Pond" to have a little scene for him to skate along! I stamped the images onto Copic friendly paper and then set about colouring them in. I cut the pond out using a MFT Stitched Square die, and cut the Penguin out using my Brother Cut N Scan. Next I popped him up using foam squares over part of the pond. I thought the HH "Brr" sentiment was perfect as I'm sure it's cold where he is! Lots of sparkle to my card today..... Twinkle Stickles on the trees and glitter pen on the ice surfaces. A few enamel dots finish off my card.
Copics Used:
C00, C1, C2, C6, C8, C9
R34, R39, B95, B97, B99
YG17, G28, YR24
B0000, B000, B0

This is my last post before the Holidays and I want to wish everyone a very Merry Christmas and all the best in the New Year! 
Thanks so much for stopping by!

Don't forget to head on over to the High Hopes website and see all Lora's adorable stamps! You can find more inspiration from the Design Team by visiting the High Hopes Blog and Facebook page too!
Happy Stamping!


Monday, December 19, 2022

Winter Owl

Howdy - MichelleO here today - BRRR...  This week I will be sending Warm Winter Wishes to many! Its gunna get cold here in Texas! For my card for High Hopes Stamps I pulled out Winter Owl. Love this little guy but he needs more than a hat and scarf! 

I colored with my Copics (colors below) and then pulled out my Nuvo White pearl and Sparkle to give some shimmer and bling to him. I found some older papers in my stash that just matched up his colors perfectly. OLD papers from Basic Grey... man I love those papers. Sewing down the layers with a zig zag stitch and then adding some Marvy Punch snowflakes this card does have a chilly feel to it. So I then added the High Hopes Stamps sentiment "Warm Winter Wishes" One of my all time favorite Winter sentiments! Not a fan of cold weather! 

Copic colors used -


 Hope you are bundled up and warm where you are! Warm Winter Wishes!


Thursday, December 15, 2022

Snow Buddy Wishes

  I tend to hibernate in the winter especially in January and February. I live on the edge of a snow belt so the weather is often snowing and blowing. So, my social life is quieter but I still love to let my friends know I am thinking about them and love to send a card once and awhile so I am adding to my thinking of you, just because stash with a card featuring "Snow Buddies" from High Hopes Rubber Stamps. 


I stamped on alcohol marker friendly paper, coloured these cuties with Copic markers and cut them out using a Peekaboo rectangle die. This was the first time using this die so I didn't realize it cut the middle like it does so I cut a matching card stock frame and set the stamp in the middle - a happy accident I think. 

I wanted to do something a little different with my pre made 5.5" x 5.5" base so after folding it in half, I scored one side at the half way mark to form a "Z" shape. I wasn't totally happy with how it "sat" so after adding some patterned paper from My Minds Eye, inking the paper edges and adding ribbon, I glued down the top flap for a fun, different card style. I added some sparkly icicles to help set the "outdoor" feel to the card and added a piece of white card stock on the inside to add a hand written note. 
I stamped the sentiment, added it to card stock and added enamel dots finish off my card.  

Card Details
Stamps - Snow Buddies (TDG014) - High Hopes Rubber Stamps
Sentiment - Bold Warm Wishes (H098)
Patterned Paper - Comfort and Joy - My Minds Eye 

Memento Tuxedo Black ink, Hammermill Digital Cover Card Stock, peekaboo rectangle die - Gina Marie Designs, Close To Cocoa ink - Stampin' Up, ribbon - stash, enamel dots, icicle border die - Impression Obsession

Copic Markers
Hedgehog - E25 E27 E29 E41 E42 E43
Owl -C0 C1 C2 C4 Y11 Y15 Y17 
Scarves/Hats/Muffs - R14 R27 R37 R59 G17 G28 B39
Stump - E23 E25 E27
Snow - BV20 B000


Thanks for stopping by! Have a super fantastic day!


Tuesday, December 13, 2022

Snowy Smiles!!!

It’s Wednesday, and this week, I made a Christmas card using High Hopes Rubber Stamps Snowy Smiles - RR003 for the main image. Winter is one of my favourite times of the year and the beauty of fresh snowfalls always make me happy as long as I don't need to shovel. LOL!

To make my card this week, I began with a card base of 5.5" x 4.25" using Hammermill - Premium Colour 100 lb. cardstock. Crafts - Sparkling Stickers - 02-3068629 was applied to the base card. I cut out Heartfelt Creations - Celebrate the Season Collection paper and inked around the edges with Tim Holtz Distress Ink - Wilted Violet and a finger dauber. This was popped up onto the base card using U-Line double-sided tape.

The image was stamped using my MISTI and Memento - Tuxedo Black ink onto Copic Marker X-Press It Blending Card cardstock. I coloured in the image and then fussy cut around it. With a black marker, I inked around the outside of the image and then added U-Line double-sided tape and popped it up into the centre of the circle on the patterned paper. I applied the Crafts - Sparkling Stickers - 02-3068629 to a scrap piece of Hammermill - Premium Colour 100 lb. cardstock to match the background base paper.

With my Cuttelbug and Birch Press Designs - Big Joy dies, I die cut the sparkly scrap piece of paper and another scrap piece of Hammermill - Premium Colour 100 lb. cardstock. I coloured in the larger die cut with Copic markers and then attached the 2 pieces using liquid glue. U-Line double-sided tape was added to the combined piece and it was popped up onto the card under the snowlady.

I cut off the backs to 3 buttons from the Dress It Up - Holiday Collection - It's Cold Outside and then applied Nuvo - Glacier Paste - Pixie Wings to them to give them a purple shimmer. Once the glacier paste was dry, I attached them to the card with liquid glue.

Card Recipe:

Stamp: Snowy Smiles - RR003 (High Hopes Rubber Stamps)

Inks: Memento - Tuxedo Black, Tim Holtz Distress Ink - Wilted Violet

Paper: Copic Marker X-Press It Blending Card, Hammermill - Premium Colour 100 lb., Heartfelt Creations - Celebrate the Season Collection (12" x 12"), Crafts - Sparkling Stickers - 02-3068629

Die Cuts: Birch Press Designs - Big Joy (57164)

Tools and Embellishments: MISTI - Most Incredible Stamping Tool, U-Line double-sided tape, Nuvo - Glacier Paste - Pixie Wings, Dress It Up - Holiday Collection - It's Cold Outside

Image coloured with Copic Markers:

Snowlady: BV20, B0000, YR68, YR31, YR18, Y38, R59, R35, R30, R21, Colorless Blender

Hat and Scarf: BG72, BG57, BG32, BG11, BG10, BG000, Colorless Blender

Circle Framing Snowlady: V17, V15, V12, BG000

Shadow Die Cut: V17, V15, V12

Hope you like it and have a fantastic week!

You can find lots of inspiration from the Design Team Divas at the High Hopes blog, and the High Hopes Rubber Stamps Facebook Fan page plus you can also follow us on
Instagram, Twitter and Pinterest.


Winter Wonderland!

Happy Tuesday!
I'm carrying on the "Winter Theme" for December over on the High Hopes Blog with this cutie called "Package Packin' Penguin". He's so cute and easy to colour, so he makes a fast card when you need one!
After stamping my image, I coloured this cutie in with my Copic Markers. I have a Silhouette Cameo and hardly ever use it.... I know, what a shame, LOL! So I challenged myself to use one of my many files. This card base is called "Christmas Tree Shadow Box (svg.) Instead of making it into the actual card base, I just used the front cutouts and popped each layer up with foam squares to get that shadow box look. Next using some of my Christmas scraps, added the designer papers onto a 5"x6.5" pre-made card base. I stamped the "Winter Wonderland" HH sentiment directly onto the front and popped the Penguin up as well.
Copics Used:
Penguin: N1, N0, N6, N7, N9/ YR23, YR27
Hat & Scarf: R56, R50, E04
Present: B91, B93, B95, B97, B99

Thanks so much for stopping by!

Don't forget to head on over to the High Hopes website and see all Lora's adorable stamps! You can find more inspiration from the Design Team by visiting the High Hopes Blog and Facebook page too!
Happy Stamping!


Monday, December 12, 2022

Bird Song

Howdy - MichelleO here and it is my High Hopes Stamps Day! And this week I pulled out a favorite winter image. This is "Bird Song" and it is just perfect for a happy little note card to sent to a friend.  I just love those little birds so happy in their winter hats and scarfs!

Now I've used this stamp quite a bit. It just makes me happy. I colored with my Copics (colors below) and then added some Nuvo White Pearl paint for the snow. I have challenged myself to use more of the many many many dies in stash, I love the tiny scallops in this one and that is it more narrow rectangle. So happy colored and then went to make my card. Found some older papers from My Minds Eye French Laundry collection. Love the sparkles to all the papers in this collection. Layered and sewed down with zig zag and straight stitches. Then went to put my image on ... uh oh... That Die is way to big for my card. Can't believe I didn't check that. But I was happy and singing along with the little birdies. Well I'll make it work! Just took it off the sides and let it run off the card. I kind of like how that turned out! 

The sentiment "Friendship Warms the Heart" is perfect for these sweet little birds and perfect for a pick me up note to make a friend smile!

There are so so many fabulous images to make you smile at High Hopes Stamps. Click HERE to pop straight over and I promise you will find LOTS to have fun with. 

Thanks so much!


Thursday, December 8, 2022

Winter Roundup

  The High Hopes design team has been sharing some wonderful winter themed cards this month. Last week, I went sledding with the Let's Go Sledding stamp and this week I am having some fun with "Lasso Some Snow". I can remember as a little one turning my face to the sky when it was snowing and trying to catch snowflakes on my tongue........but catching one with a lasso!? Not sure how that would work but it would be run to try!

I chose to do a front stepper style card using the super easy to follow tutorial from my talented friend and fellow DT Cheri Burry. You can find her tutorial here.


After stamping on alchohol friendly paper I coloured my image with Copic markers and hand fussy cut him leaving a thin white line. I set him aside and following the tutorial created my card base. I added patterned paper from Echo Park, cut snow with a stitched hill die and some trees with dies from Gina Marie Designs. I like some bling on my Christmas cards so I added some Aleene's Glitter snow to the hills and trees. To finish off my card I stamped the sentiment and added it to matching card stock. 

Card Details
Stamps - Lasso Some Snow (TLDG021) - High Hopes Rubber Stamps
Sentiment - Roundin' Up (G190)
Patterned Paper - Echo Park 

Memento Tuxedo Black ink, Hammermill Digital Cover Card Stock, stitched hills dies - Whimsy Stamps, tree die - Gina Marie Designs, snow - Aleene's Glitter Snow

Copic Markers
Coat - B95 B97 B99
Fence - E44 E47 E49
Hats/Wagon Wheel - E42 E43 E44
Snow - B000 B00 BV20
Birds - B91 B93 B95
Bandana/Mitts/Lasso - E40 E41 E43 
Nose/Buttons - T4 T6 T8


Thanks for stopping by! Have a super fantastic day!


Tuesday, December 6, 2022

Snowmen - Winter Fun!!

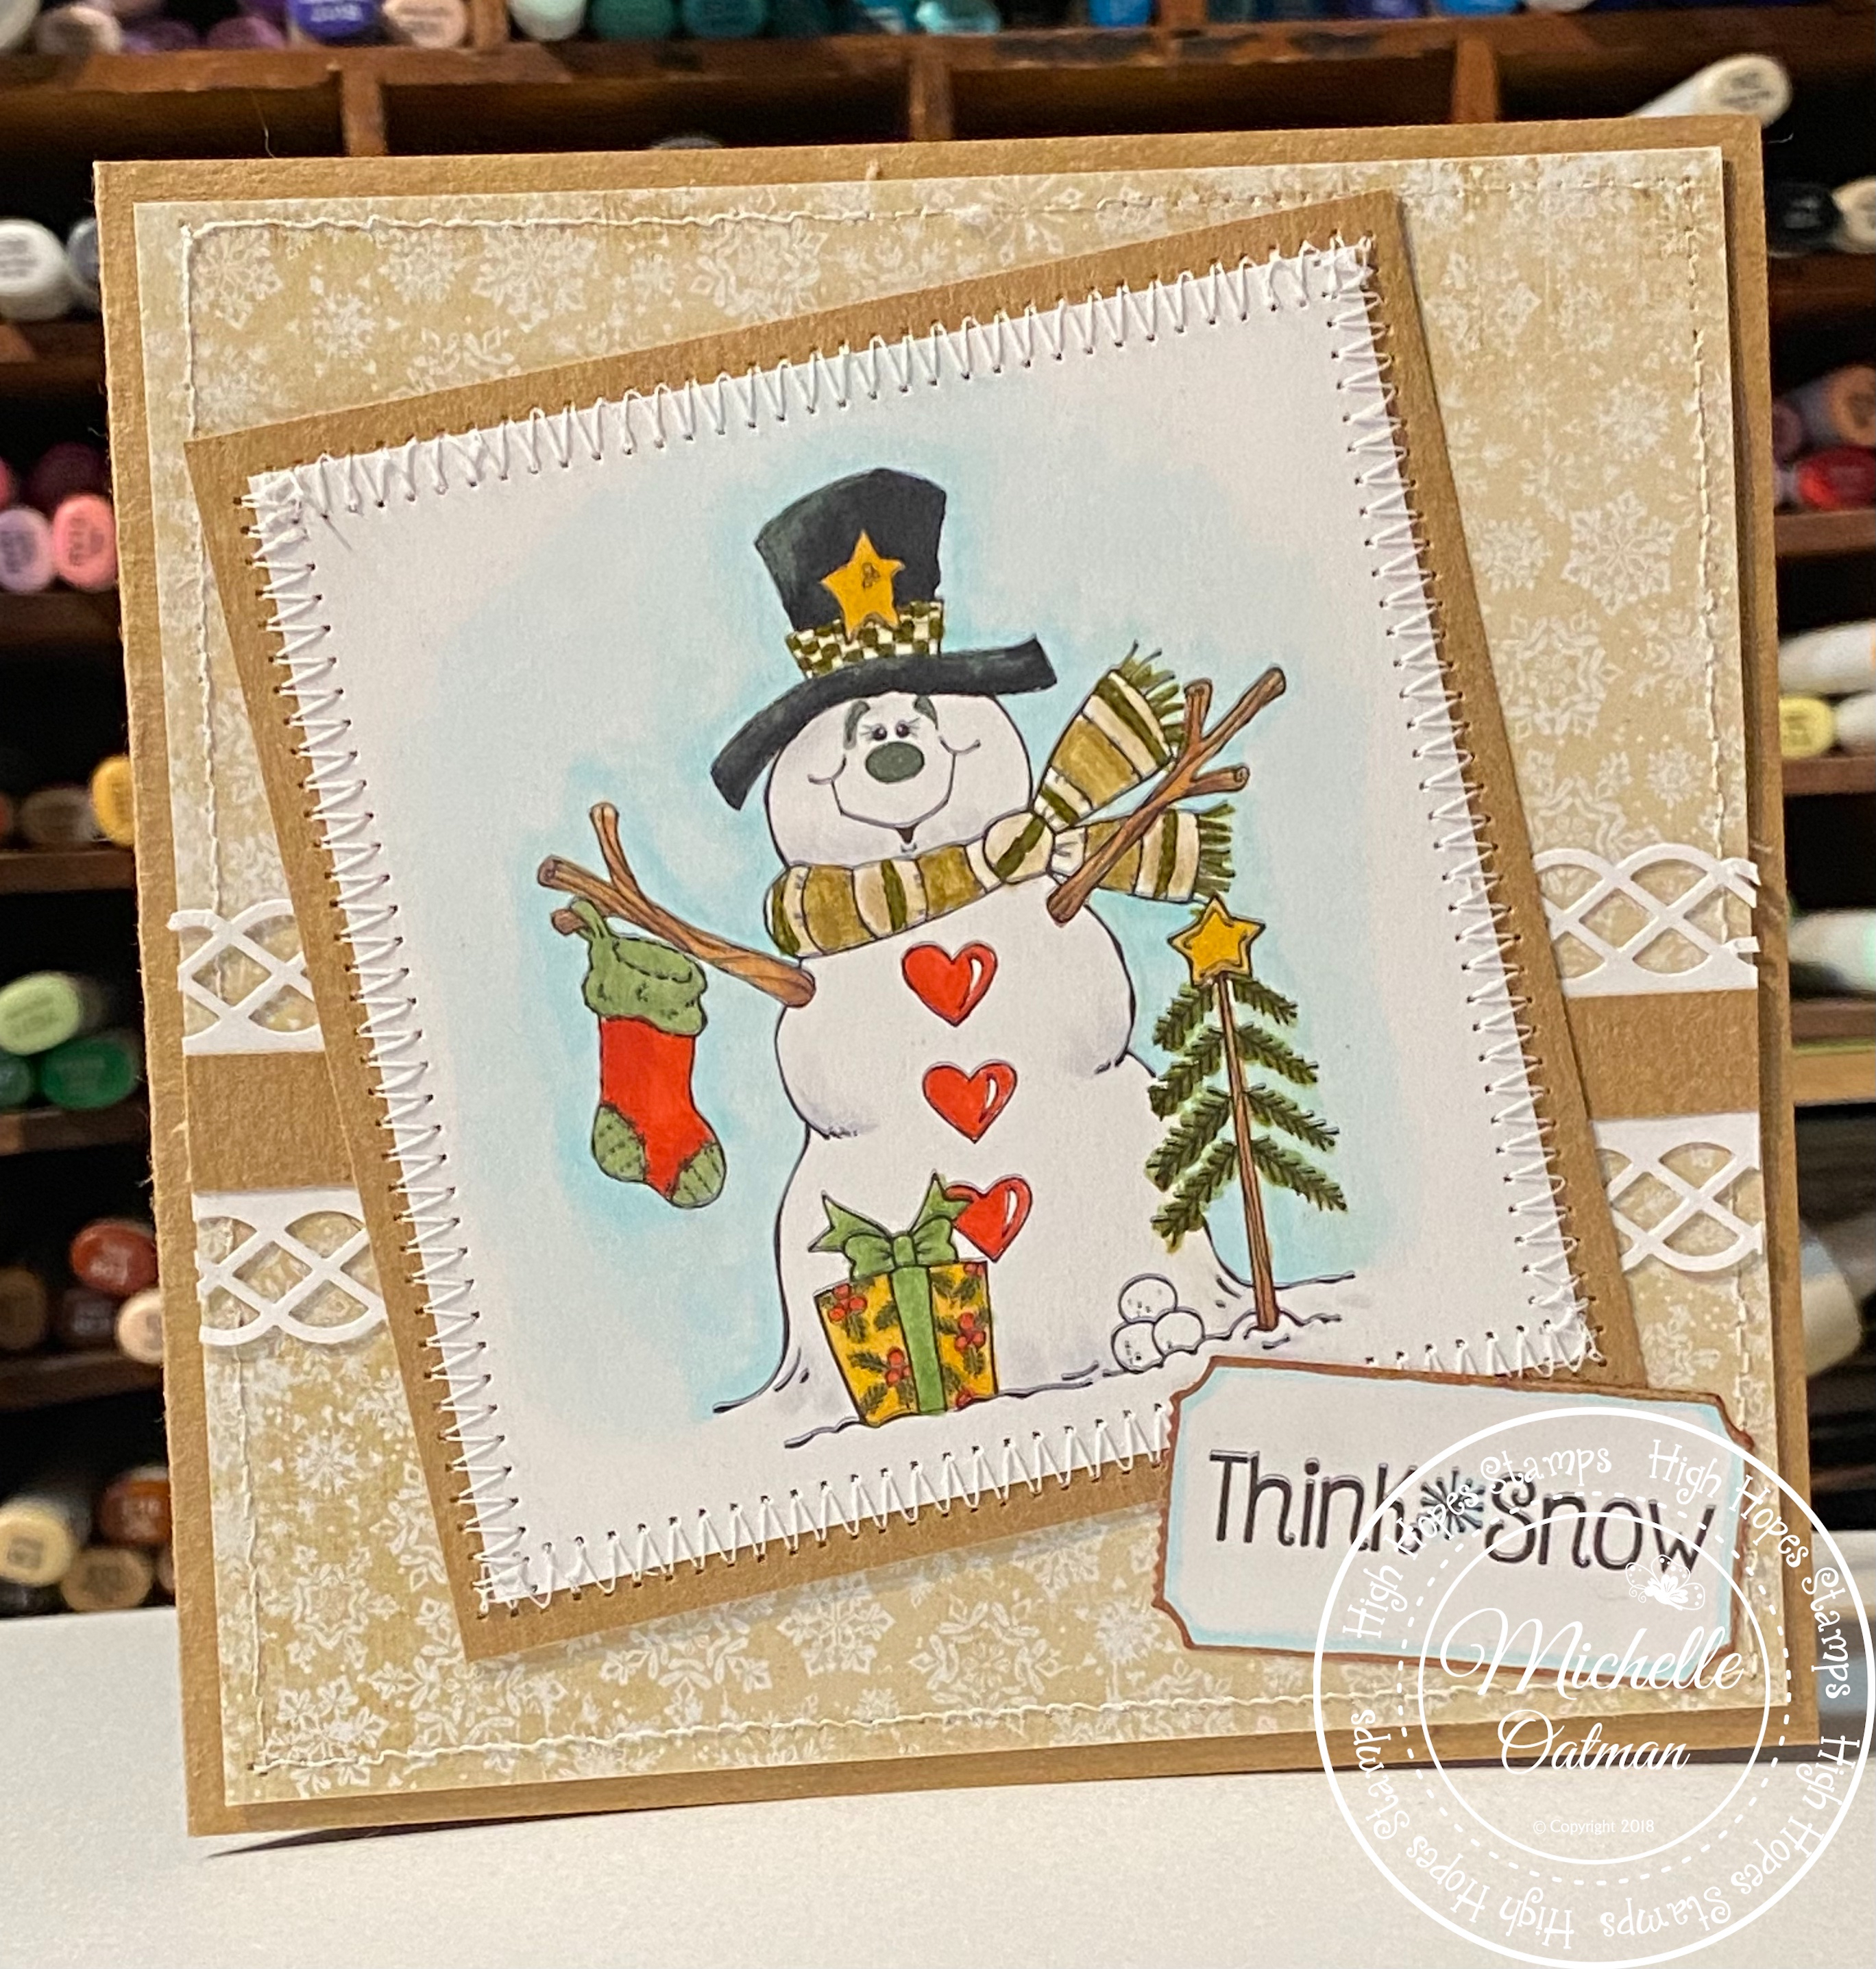
It’s Wednesday, and this week, I made a Christmas card using High Hopes Rubber Stamps Snowman Dash - TT054 for the main image and Winter Fun! - F109, for the sentiment. Growing up in the North, we couldn't wait to get home from school to go sledding down the hills across the street or behind our house. There was so much snow that the snowbanks the plows created were just the perfect height for us to have loads of fun! On the weekends, we would go to the much larger hills!

To make my card this week, I began with a card base of 5.5" x 4.25" using Hammermill - Premium Colour 100 lb. cardstock. I inked around the edges with a blender brush and blue ink that I still had on it from a previous project. I don't clean off my brushes because I have dedicated brushes for each colour group.

The image was stamped onto the inner die cut using my MISTI and Memento - Tuxedo Black ink, which I had die cut using my Cuttlebug and paper from Copic Marker X-Press It Blending Card cardstock with MFT - Stitched Rec Scallop Frame dies. I coloured in the image and then added the sentiment using a MISTI, VersaMark ink and Ranger Embossing Powder White – Extra Fine Detail. This was heat embossed using a Marvy Uchida - Embossing Heat Tool. The snow in the sky was created using a Gelly Roll Sakura #10 Pen and UNIPosca PC-3M White marker. Stickles - Star Dust was added to the snow on the hill and Cosmic Shimmer Fluffy Stuff and DecoArt Glamour Dust were added to give some texture to the snow where the sled had been. A Marvy Uchida - Embossing Heat Tool was used to fluff up the Cosmic Shimmer Fluffy Stuff. Once the Stickles was all dry, I pieced the 2 die cuts back together using Scotch tape on the back. U-Line double-sided tape was added to the combined piece and it was popped up onto the card.

Card Recipe:

Stamps: Snowman Dash - TT054 (High Hopes Rubber Stamps)

Sentiment: Winter Fun - F109 (High Hopes Rubber Stamps)

Inks: Memento - Tuxedo Black, VersaMark

Paper: Copic Marker X-Press It Blending Card, Hammermill - Premium Colour 100 lb.

Embossing Powder: Ranger Embossing Powder White – Extra Fine Detail

Die Cuts: Die-namics - Exclusive Designs for "My Favourite Things" - Stitched Rec Scallop Frame - MFT-860

Tools and Embellishments: MISTI - Most Incredible Stamping Tool, U-Line double-sided tape, Stickles - Star Dust, Cuttlebug, DecoArt Glamour Dust, Cosmic Shimmer Fluffy Stuff, UNIPosca PC-3M White marker, Marvy Uchida - Embossing Heat Tool, Blending Brush

Image coloured with Copic Markers:

Snowmen: BV20, B0000, YR68, YR31, Y38, R59, R235, 100, W9, W7, W5, Colorless Blender

Snowman1 Mittens and Scarf: BV08, BV13, BV02, BV01, BV00

Snowman2 Mittens and Scarf: BG75, BG57, BG49, BG13, BG11, BG10

Snowman3 Hat and Mittens: R59, R46, R37, R35, R14, R08

Sled: E49, E47, E39, E37, E35, E34

Sky: B06, B05, B04, B02

Hope you like it and have a fantastic week!

You can find lots of inspiration from the Design Team Divas at the High Hopes blog, and the High Hopes Rubber Stamps Facebook Fan page plus you can also follow us on
Instagram, Twitter and Pinterest.


Cold Hands!

Hello!
December is all about Winter themed cards over on the High Hopes Blog! Meet the adorable "Lasso Some Snow" Snowman. He's going to lasso some fun for him and his little bird friends!
I started my card by stamping the image onto Copic friendly paper with Memento Tuxedo Black Ink. I decided to use papers from the Echo Park "Winter" 6x6 collection and coloured the image to match. Using my Brother Cut N Scan, I cut the image out and using foam squares popped him up for some added dimension. I inked all the edges of my papers with Distress Oxide ink in "Faded Jeans". Some Spectrum Noir Glitter pen on the snow spots adds a fun sparkle to my card! The sentiment is also from High Hopes and is called "Fancy Cold Hands". A bit of twine and bow finishes everything off.
Copics Used:
B0000, B000, B00, B93, B95, B97, B99
R00, R24, R27, R29
E42, E43, E44, E47
C00, C1, C2, C6, C8
Y19, Y26, Y28, YR04, YR09

Thanks so much for stopping by!

Don't forget to head on over to the High Hopes website and see all Lora's adorable stamps! You can find more inspiration from the Design Team by visiting the High Hopes Blog and Facebook page too!
Happy Stamping!

Monday, December 5, 2022

Snowman Love

Howdy - MichelleO here - This month for High Hopes Stamps we are coloring up a little Winter Fun - And for me I found a happy little Snowman to build. This is "Snowman Love" -  

 
I went with bright happy colors with a kraft paper base and snowflake kraft paper from Farm House Papers. Love that snowflake paper! My snowman is colored with my Copics (colors below) and then all my papers are sewn together with a band across the middle made with Martha Stewart punch border. 
 
The sentiment is from High Hopes Stamps "Think Snow"  Love that sentiment with the snowflake between the words. I punched the sentiment with a EK Success ticket punch. Then created a faux mat with my Copic markers. 

That sweet little snowman pops! Love the happy colors, that make him pop. 

Copic colors used -


Hope you enjoyed - now make sure to pop over to the High Hopes Stamps Web Store HERE and find so many great images to color up some winter fun yourself! 

 Thanks for looking! 


Thursday, December 1, 2022

Winter Fun

 Last weekend when we got dumped on with snow, I had the pleasure of watching the neighbour's little ones trying to sled down a really tiny hill. It didn't work so well but they had so much fun and I couldn't help but laugh and giggle with them. 

When we were little, we had a very large hill to go sledding on and how we didn't break a limb or tailbone is beyond me! "Let's Go Sledding" from High Hopes brings back some wonderful childhood memories and also reminds me of my neighbours on the weekend. These two seem to have gotten more speed then they thought and have gone straight off the end of the hill instead of down it.....gulp!


I stamped on alcohol marker friendly paper, coloured these cuties with Copic Markers and hand fussy cut them. My card base is 5"x 5" and patterned paper from Whimsy Stamps was perfect for my background. I cut a few stitched hills to fit and added some tiny trees to help with the perception that they are flying through the air. I used some Prismacolor pencils to add a "track" for where they should have gone down the hill.
A build a banner die with a snowflake from Memory Box and some larger snowflakes cut with a Memory Box die help create my snowy scene. The sentiment was stamped and cut with a fishtail banner die and mounted on matching card stock. Enamel dots finish off my card. 

Card Details
Stamps - Let's Go Sledding (TLF032) - High Hopes Rubber Stamps
Sentiment - Winter Fun (F109)
Patterned Paper - Blurry Flurries

Memento Tuxedo Black ink, Hammermill Digital Cover Card Stock, stitched hills dies - Whimsy Stamps, Your Next Stamp, build a banner die (retired) - Whimsy Stamps, snowflake dies - Memory Box, fishtail banner die - Your Next Stamp, tree die - Memory Box, Prismacolor Pencils

Copic Markers
Skin - E00 E21 E11 E04
Beards - W0 W1 W2 
Clothing - BG32 BG15 BG49 BG09 V05 V06 V09 C9
Sled - E34 E35 E29
Boots - E23 E25 E27 E29


Thanks for stopping by! Have a super fantastic day!