Thursday, July 28, 2022

Hippo For Christmas

 When I was a child and I heard the hippopotamus for Christmas song all I could do was giggle. All I was hoping for was a puppy or pony ... but a hippo!???!! I mean I did think it through for a bit....how would I explain to Mom that the one tub in the house is now for the hippo, what would I feed it, where would I keep it after it out grew the tub? So many questions with no easy answers so, I stuck with wishing for a puppy or pony! 

As an adult I see the humor behind the song and have way too much fun singing it with the littles in my life and giggling as we try to get through singing it. I know one of them goes where I did in her head trying to figure all the details out and all I can do is just knowingly smile.....because.......really........who doesn't want a hippopotamus for Christmas?


This adorable hippo is stamped on alcohol maker friendly paper, coloured with Copic markers and cut out using a big and little pierced chain die. After cutting a piece of card stock for the back I set it aside. There has been a present die in my die collection for awhile now just waiting for the perfect opportunity to be used, so I cut some presents out of matching card stock and box edges and bows out of some green glitter paper for a bit of sparkle.
After gluing all the pieces together, I cut a piece of patterned paper from Doodlebug for my card base and a piece of water color paper to go in behind the stamped image. I glued everything down and then stamped the sentiment and cut it out with a fish tail banner. Some glitter dots finish off my card. 
 
Card Recipe 

Stamp: Party Hippo (S201) - High Hopes Rubber Stamps

Sentiment - Hippopotamus For Christmas (H201) - High Hopes Rubber Stamps

Patterned Paper: Christmas Town - Doodlebug

Watercolor Wishes - Lawn Fawn

Glitter paper - American Crafts


Tuxedo Black Memento ink, Hammermill 100lb digital cover stock, present die - Gina Marie Designs, big and little chain die - Gina Marie Designs, fish tail banner die - Your Next Stamp, glitter dots


 Copic Markers:

Hippo - N1 N2 N4 N5 N8

Confetti - Y02 YR23 E47

            Present - YG03 YG17 YG67 BG99


Thanks for stopping by! Have a super fantastic day!


Wednesday, July 27, 2022

Sparkle & Cheer!!

It’s Wednesday, and this week, I made a Christmas slim-line card using High Hopes Rubber Stamps Christmas Gofer - TDG003 for the image and Sparkle & Cheer - LDG001 for the sentiment. This little gofer is all set to start decorating his tree for Christmas. With all of this heat right now, snow is sounding pretty good to cool off a bit. LOL!

To make my card this week, I began with a card base of Hammermill - Premium Colour 100 lb. cardstock, cut and scored to be 4" x 8". I cut the background to be the same size using Creative Memories - Glacier paper and adhered it to the base card using double-sided tape. I die cut Recollections - White Cardstock and Signature Collection by Sara Davies - Glittering Snowflakes cardstock using my Anna Griffin Empress Mini Machine and My Favourite Things - Die-namics - Elegant Rectangle Stax dies. I stamped the sentiment onto the white cardstock using Memento - Tuxedo Black ink and my MISTI. Using my die cutting machine again and Waffle Flower - Nesting Square dies, I die cut Copic Marker X-Press It Blending Card. I stamped the image onto it using Memento - Tuxedo Black ink and my MISTI.

The image was coloured in with Copic markers and then I added snow to the sky using a Gelly Roll Sakura #10 Pen. For the hat trim and pop-pom, I added Cosmic Shimmer Fluffy Stuff and heated it with my Marvy Uchida - Embossing Heat Tool to puff up the liquid. I put a little bit of Stickles - Diamond onto my finger and dabbed it across the trim and pom-pom to give them an extra bit of sparkle. Lastly, I added some Stickles - Diamond to the snow. When the Stickles was all dry, I adhered the image to Signature Collection by Sara Davies - Glittering Snowflakes cardstock with double-sided tape and some glue. Using my cutter, I cut a slim border around the image. I ran the sentiment through my Xyron Creative Station and adhered it to the larger die cut. U-line double-sided tape was added behind the 2 pieces and they were both popped up onto the card. Lastly, to finish the card off, I added a few YNS Gumdrops - White Sugar and Sparkle to both sides of the sentiment.

Card Recipe:

Stamp: Christmas Gofer - TDG003 (High Hopes Rubber Stamps)

Sentiment: Sparkle & Cheer - LDG001 (High Hopes Rubber Stamps)

Inks: Memento - Tuxedo Black

Paper: Copic Marker X-Press It Blending Card, Hammermill - Premium Colour 100 lb., Creative Memories - Glacier Paper Pack 12" x 12", Signature Collection by Sara Davies - Glittering Snowflakes, Recollections - White Cardstock

Die Cuts: My Favourite Things - Die-namics - Elegant Rectangle Stax - MFT-1268, Waffle Flower - Nesting Square dies

Tools: MISTI - Most Incredible Stamping Tool, Anna Griffin Empress Mini Machine, U-Line double-sided tape, Cosmic Shimmer Fluffy Stuff, Marvy Uchida - Embossing Heat Tool, Gelly Roll Sakura #10 Pen, Stickles - Diamond, YNS Gumdrops - White Sugar and Sparkle, Xyron Creative Station

Image coloured with Copic Markers:

Gofer: E49, E47, E27, E25, E23, E21, R30, R20

Hat and Scarf: BG09, BG05, BG02, BG01, C2, C1, C00, Cosmic Shimmer Fluffy Stuff, Stickles - Diamond

Baubles: R59, R37, R35, YG17, YG09, YG07, YG05, C3, C2, C0

Snow: B60, B00, Stickles - Diamond

Sky: B99, B97, B95, B93, B91

Hope you like it and have a fantastic week!

You can find lots of inspiration from the Design Team Divas at the High Hopes blog, and the High Hopes Rubber Stamps Facebook Fan page plus you can also follow us on
Instagram, Twitter and Pinterest.


Tuesday, July 26, 2022

Just Chillin'!

Hello!
Penguins are my #1 favourite stamp image. My Grandmother loved Penguins, I loved her, and now they remind of her every time I see one! So that makes them my favourite now too! This is a simple, fun card but it packs a ton of cuteness! Meet "Just Chillin" from High Hopes Stamps! Ohhhhh I bet his butt is cold LOL. 
Today I am using papers from the Sunny Studios "Holiday Cheer" 6x6 collection. They are fun and bright and suit this cutie perfectly! After stamping my image onto Copic friendly paper, I coloured him to match my papers using my Copic Sketch markers. Using a Gina Marie "Wonky Stitched" die I cut out the image and papers that are behind him. A simple card layout makes this a quick and easy card! I love the HH sentiment called "Ice Day"! I added some icicle borders, glitter pen to the ice block and sentiment to finish things off.
Copics Used:
C00, C1, C6, C7, C9
Y15, Y17, Y19
R27, R29, RV66
YG03, YG05, YG17
BG0000, BG000, BG01, BG45, BG49

Don't forget to head on over to the High Hopes website and see all Lora's adorable stamps! You can find more inspiration from the Design Team for the Christmas in July theme by visiting the High Hopes Blog and Facebook page too!
Happy Stamping!


Monday, July 25, 2022

Jolly Old St.Nick

Howdy - MichelleO here -

One more Christmas in July for me at High Hopes Stamps - now its over 100 degrees here... but any image with a Santa and cute little cats is always fun to color even if I am melting! LOL 

This is Jolly Old St. Nick

 
I love that Santa's boot can't be put on due to the kitty in it! I do worry that he doesn't have a sock though - Colored with my Copics (colors below) and then a little bling with Nuvo glitter paint pen for Santa's white trim. I found a Santa paper and Merry Christmas paper from Paper Studio that I sewed down and put on a white card stock base. Then the fun High Hopes Stamps Sentiment "I believe in Santa Claus!

Love this image - makes you giggle.. and maybe a little close to home with cats in shoes around here! Ha! 

Copic colors used -


 For so many fabulous Christmas images to get ahead on your Christmas card list - click HERE to pop straight to the High Hopes Stamps Web site! 

 Thanks! 


Thursday, July 21, 2022

Wee Three Kings

  We are continuing with the Christmas in July theme over at High Hopes and this week I have stepped out of my comfort zone when it comes to the shape of my card. Most of the cards I make are 5.5" x 5.5" square and the odd time I slip an A2 in there just for fun but this week I have chosen to do a slim line style card. 

What got me "going there" was... I saw this die on a local company's website and it was a have to have it kind of thing....I'm sure that doesn't happen to anyone else right?!? <wink> I love the "Wee Three Kings" stamp from High Hopes and I knew that it would be a perfect fit for this die set. 


I stamped this adorable stamp on alcohol marker friendly paper and coloured it with Copic markers. I hand fussy cut it leaving a thin edge that was coloured to match the sand as close as I could. This die is quite large so I didn't have patterned paper to fit (most of my paper is 6x6) so what is a gal to do but create her own paper. 

I started by getting a piece of water color paper and my inks. After playing around with the inks for a bit I found a combination that worked for the ideas I had in my head. After inking the background I spritzed it with water, white acrylic paint (watered down) and added a few stars with a white gel pen. I wasn't overly happy with these stars so I added some Nuvo drops to the centre of them for an added touch of bling. To finish off the card, I stamped the sentiment directly on to the paper and added a sparkly Bethlehem star. 


Card Recipe 

Stamp: Wee Three Kings (S051) - High Hopes Rubber Stamps

Sentiment - Oh Holy Night (E070) - High Hopes Rubber Stamps

Patterned Paper: made by me


Tuxedo Black Memento ink, Hammermill 100lb digital cover stock, water color paper, inks - Creamy Caramel and Not Quite Navy - Stampin' Up, Danube Blue - Memento, star die - Nativity set - Sizzix, card shape die - Studio Light Essentials 


 Copic Markers:

Skin - E00 E21 E11 E04

Clothing - R37 R39 R59 V09

              G46 G28 BG99 B99

            B37 B39 BV29 BV09

   E40 E41 E42 E44

Gifts - Y02 YR23 E47

Hair - C1 C2 C4 C5 E35 E57 E49


Thanks for stopping by! Have a super fantastic day!


Wednesday, July 20, 2022

Santa...I Tried!!

It’s Wednesday, and this week, I made a Christmas card using High Hopes Rubber Stamps Reindeer Games - S108 for the image and Santa...I Tried - FLL001 for the sentiment. It's never too early to start making Christmas cards and I couldn't resist this super fun image and sentiment paired together. It just makes me laugh and I hope it makes you laugh too! I don't think the reindeer worked very hard, I think he just wanted Santa to pull the sleigh while he relaxed. LOL!

To make my card this week, I began with a card base of Hammermill - Premium Colour 100 lb. cardstock, cut and scored to be 5.5" x 4.25". I cut the background to be the same size using Stampin UP! - 'Tis The Season paper and adhered it to the base card using double-sided tape. Using Tim Holtz Distress Ink - Rustic Wilderness and a finger dauber, I inked around all of the edges of the card. Using my Cuttlebug and My Creative Time - Rectangle Frame Dies, I die cut Forever In Time - Texture Rouge paper. I added some U-Line double-sided tape to it and popped it up on top of the patterned paper. Using Copic Marker X-Press It Blending Card, my Cuttlebug and My Creative Time - Rectangle Frame Layers, I die cut Copic Marker X-Press It Blending Card cardstock.

The image was stamped with Memento - Tuxedo Black ink onto the die cut using my MISTI - Most Incredible Stamping Tool. I coloured in the image and background with Copic Markers. I added in the puffy Santa trim and pop-pom using Cosmic Shimmer Fluffy Stuff. This was then heated with my Marvy Uchida - Embossing Heat Tool to puff up the liquid. For the blue tints in the snow, I first coloured them in with Copic Marker - B60 and then using a Ranger - Emboss It Pen Clear and Stampendous - Frozen Ice Tinsel Embossing Powder, I heat embossed the snow drifts. I stamped the sentiment using my MISTI, Versamark and Ranger Embossing Powder White – Extra Fine Detail. This again was heated with my heating tool. Then, I added in the snow in the sky with a Gelly Roll Sakura #10 Pen. Lastly, I added Stickles - Diamond to add some more sparkle to the snow on the ground and Stickles - Holly all around the frame of the coloured image. I set this all aside to dry for a few hours and then applied U-Line double-sided tape to the back of the coloured image and popped it up onto the red rectangle. To finish off the card, I added in 3 pop-dots from YNS Gumdrops - Milk and Cookies - Matte.

Card Recipe:

Stamp: Reindeer Games - S108 (High Hopes Rubber Stamps)

Sentiment: Santa...I Tried! - FFL001 (High Hopes Rubber Stamps)

Inks: Memento - Tuxedo Black, Tim Holtz Distress Ink - Rustic Wilderness, Versamark

Paper: Copic Marker X-Press It Blending Card, Hammermill - Premium Colour 100 lb., Stampin UP! - 'Tis The Season (6"x6"), Forever In Time - Texture Rouge

Die Cuts: My Creative Time - Rectangle Frame Dies, My Creative Time - Rectangle Frame Layers

Embossing Powders: Stampendous - Frozen Ice Tinsel Embossing Powder, Ranger Embossing Powder White – Extra Fine Detail.

Tools: MISTI - Most Incredible Stamping Tool, Cuttlebug, U-Line double-sided tape, Cosmic Shimmer Fluffy Stuff, Marvy Uchida - Embossing Heat Tool, Ranger - Emboss It Pen Clear, Gelly Roll Sakura #10 Pen, Stickles - Diamond, Stickles - Holly, YNS Gumdrops - Milk and Cookies - Matte

Image coloured with Copic Markers:

Skin: E21, E11, E00, E000, R30, R20, Eyes (Sakura Glaze - Black)

Hair and Beard: C3, C1, C0, Colorless Blender

Clothing: R59, R37, R35

Sleigh: R59, R37, R35, C5, C3, C1, E27, E25, E23

Mitts and Scarf: G29, G28, G24

Reindeer: E53, E51, E50, 37, E35, E34, E33, R30, R20

Hoofs and Boots: T9, T7, T5

Rope: Y19, Y17, Y15

Sky: B99, B79, B69, B29, B26, B24

Hope you like it and have a fantastic week!

You can find lots of inspiration from the Design Team Divas at the High Hopes blog, and the High Hopes Rubber Stamps Facebook Fan page plus you can also follow us on
Instagram, Twitter and Pinterest.


Tuesday, July 19, 2022

Hot Cocoa!

Howdy!
Today I'm sharing another card with you for the "Christmas in July" month long theme going on over at High Hopes Rubber Stamps! "Snowy's Cup" is one of favourite HH stamps and I always love colouring him! Sometimes I imagine him as a marshmallow & candy decoration you put in your hot cocoa and he melts into it making a delicious rich drink. Love the "Dot Warm Heart" sentiment too! It's true they both really do warm my heart!
One of my favourite non-traditional Christmas colours to use is blue. The Echo Park "Winter" 6x6 collection was perfect for my card, especially with that mug designer paper. After I stamped Snowy onto some Copic friendly paper, I coloured him in using my Copic Sketch markers. Next using my Brother Cut N Scan, I cut around him leaving a small white edge. All my papers today have been inked on the edges using Distress Ink in Vintage Photo. I always love the little bit of dimension it adds to your card. I cut the sentiment out using s MFT Stitched Banner die. A bit of twine, a bow and holly gem fish off my card today.
Copics Used:
B91, B93, B95, B97, B99
E40, E41, E43, E44, E47
C00, C0, C1
R01, R37, R59, R89
YG61, YG63
YR04, YR09

Don't forget to head on over to the High Hopes website and see all Lora's adorable stamps! You can find more inspiration from the Design Team for the Christmas in July theme by visiting the High Hopes Blog and Facebook page too!
Happy Stamping!


Monday, July 18, 2022

Gingerbread Family in Heart

Howdy - MichelleO here today and this week for High Hopes Stamps we have some adorable Gingerbread Family in Heart - yummy cute!  

 They are a fun family - wish they had a smell to them I love the smell of gingerbread! ha! I colored with my Copics (colors below) and then cut it out so it would pop more on the dark red checked pattern paper. Both pattern papers are from Paper Studio. I sewed down with a zig zag stitch. Then placed the heart and the High Hopes Sentiment "Gingerbread Dreams" below. A few Nuvo decor pearl paint drops in the corner, then added the same for the frosting on the family. I just love how they really pop on the red! 

Copic colors used -


Love this one and now I am craving some gingerbread cookies! If it wasn't 105 degrees outside I would seriously consider making a batch! Ha! 

To see more wonderful image for your cards - Christmas will be here really fast! Click HERE to get right to the High Hopes Stamps Store! 


Thursday, July 14, 2022

Frozen Penguin Greeting

  I love Christmas in July! I have a lot of Christmas cards to do every year and doing cards in July gets me started nice and early! I will also be making cards till the last minute because I have added more people to my list but that is a me thing. I have a lot of friends and family who love penguins so I need a lot! of Christmas card featuring them. 

My first penguin Christmas card for this year features "Frozen Fun" from High Hopes Rubber Stamps. He just makes me smile and I love that High Hopes has so many penguin stamps to choose from - I think they are now all on my wish list!


After stamping my penguin on alcohol marker friendly paper, I coloured him with Copic markers and cut him out with a circle die. It is hard to see in the photo, but there is a touch of silver Wink of Stella on the snowflake tips on the bucket. 
Using a Fiskars circle cutter, I cut a piece of card stock to size to go behind him. Next I got my A2 size card base and laid the stamped image on it. 

I didn't want to keep the whole circle for my design so I decided how much I wanted to cut off the edge and cut the card stock piece as well. Patterned paper from an old pad from My Mind's Eye worked well for the background. 

Next I cut a second piece of patterned paper in a strip and trimmed it to the size I wanted for the design. Some silver trimmed matching ribbon was cut to size and added to the strip. I stamped and sized the sentiment, glued it down and added some enamel dots for the finishing touch.                                


Card Recipe 

Stamp: Frozen Fun (S240) - High Hopes Rubber Stamps

Sentiment - Penguin Greeting (K051) - High Hopes Rubber Stamps

Patterned Paper: Comfort & Joy - My Minds Eye


Tuxedo Black Memento ink, Hammermill 100lb digital cover stock, circle die, Fiskars circle cutter, ribbon, silver Wink of Stella, ribbon


 Copic Markers:

Body - T4 T6 T8 W1 W2 Y11 Y15 Y17

Sign - E30 E31 E43 E47

Snow - B0000 B000 B21

Bucket - G21 G24 G46 G29

Ear Muffs, Tie - G24 G46 G29


Thanks for stopping by! Have a super fantastic day!


Tuesday, July 12, 2022

Shepherd Boy!!

It’s Wednesday, and this week, I made a Christmas card using High Hopes Rubber Stamps Young Shepherd - P029 for the image and Oh Holy Night - E070 for the sentiment as part of celebrating Christmas in July this month.  This little shepherd is showing all of his love for his little lamb and sharing the true meaning of Christmas.

To make my card this week, I began with a card base of Hammermill - Premium Colour 100 lb. cardstock, cut and scored to be 5.5" x 4.25". I used a panel from Heartfelt Creations - Festive Winterscapes Collection for the main background as I thought it would go so well with the image and sentiment for this card. I added some U-Line double-sided tape and popped it up onto the base card.

The image and sentiment were both stamped onto Copic Marker X-Press It Blending Card using my MISTI - Most Incredible Stamping Tool. The image was stamped with Memento - Tuxedo Black ink and the sentiment was stamped with Memento - Danube Blue ink. The image was coloured in with Copic Markers and then I fussy cut around it leaving a slim white border. I die cut the sentiment after I stamped it using my Anna Griffin Empress Mini Machine and Poppystamps - Christmas Quotes dies. I applied U-Line double-sided tape to the back of the sentiment and image and popped them both up onto the background.

Card Recipe:

Stamp: Young Shepherd - P029 (High Hopes Rubber Stamps)

Sentiment: Oh Holy Night - E070 (High Hopes Rubber Stamps)

Inks: Memento - Tuxedo Black, Memento - Danube Blue

Paper: Copic Marker X-Press It Blending Card, Hammermill - Premium Colour 100 lb., Heartfelt Creations - Festive Winterscapes Collection

Die Cuts: Poppystamps - Christmas Quotes

Tools: MISTI - Most Incredible Stamping Tool, U-Line double-sided tape, Anna Griffin Empress Mini Machine

Image coloured with Copic Markers:

Skin: E21, E11, E04, E00, E000, R22, R20, Eyes (Sakura Glaze - Black)

Hair: E43

Clothing and Sandals: E89, E87, E84, E81, E25, E23, Y38, Y35, Y32, B91

Staff: E31, E25, E23

Lamb: B60, BV20, T9, T7, T5, E41, E40, C00, R30, R20, Colorless Blender

Hope you like it and have a fantastic week!

You can find lots of inspiration from the Design Team Divas at the High Hopes blog, and the High Hopes Rubber Stamps Facebook Fan page plus you can also follow us on
Instagram, Twitter and Pinterest.


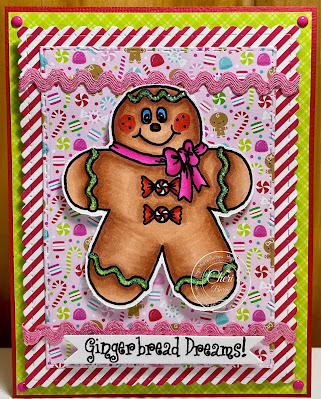
Gingerbread Dreams!

Happy Tuesday!
It's all about Christmas this July over at High Hopes! I always love doing "Christmas in July" cards as it motivates me to get started on my own personal Xmas cards. I'm in love with this cutie called "Lg. Gingerbread Man", he looks good enough to eat LOL. I matched him with the "Gingerbread Dreams" sentiment, I mean I will be dreaming of gingerbread now! I might just have to make some today!
On my card today, I used the Craftin' Desert Diva's "Fancy Frames" die set for my paper layers.The fun and bright papers are from the Doodlebug "Night Before Christmas" 6x6 collection. They have the best collections for fun and bright cards. I stamped the image onto Copic friendly paper and coloured him in with my Copic Sketch markers. Next I used my Brother Cut N Scan to cut out my image and popped him up with foam squares for added dimension to my card! I added some "ric rac" pink ribbon, enamel dots and some Crystal Stickles on the icing to finish off this fun card!
Here's the decorated inside with a little bit of the Gingerbread Man sticking up on the bottom.
Copics Used:
Gingerbread man: E11, E13, E15, E17, E29, R24, B24
Candies: R24, R29
Bow: RV04, RV06, RV09
Icing: YG03, YG17

Don't forget to head on over to the High Hopes website and see all Lora's adorable stamps! You can find more inspiration from the Design Team using the Christmas in July theme by visiting the High Hopes Blog and Facebook page too!
Happy Stamping!

Monday, July 11, 2022

Road Trippin' Santa

Howdy - MichelleO here today - Doing a more Christmas in July at High Hopes Stamps! And my Santa is out for a ride! This is Road Trippin' Santa

 
You just knew Santa would have a convertible right? - I have colored with my Copics (colors below) and found a couple of Paper Studio papers to layer on white card stock with Santa. I rounded the corners on the papers and the image - mainly because I just found my fiskars corner rounder punch after it missing for months.. LOL I used a red Copic to create a faux border around the edge of image. 
 
The sentiment "Santa Claus is coming to town!"  is a fun favorite with any Santa in movement! I rounded the corners of the sentiment as well. Then I found some glitter enamel dots and had to use them. Then Santa had to have some glitter on his coat and hats trim. So out with my Nuvo glitter pen! Love adding sparkle! 

It needed a bit more... hmmmm.... OH I found some older alphabet enamel dots while cleaning out! HO HO HO! 

Copic colors used -

Was a fun card to color and put together ... despite me having to color in the heat. Air Conditioning going out in 105 degree heat is not good! Thankfully we found a very nice man to come out on the weekend and fix it pretty quick. I was thinking of coloring a snowman... but thought it might melt! So Santa speeding around in a convertible seemed perfect! 

Hope you enjoyed - now make sure to pop over to the High Hopes Stamps web store HERE and see all the Christmas in July or any other fun image! 


Thursday, July 7, 2022

Christmas Monkey

 Welcome to Christmas in July at High Hopes Rubber Stamps. The design team is getting a head start on their Christmas cards and will be providing inspiration all month long! 

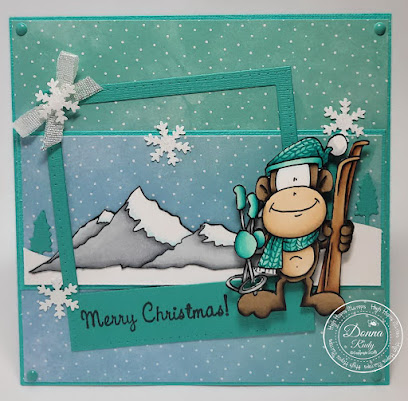
Apparently "Ski Bum Monkey" was inspired by the photos he took on his winter vacation last year. He has chosen his favourite photo to send out as his Christmas cards this year! 


After stamping the monkey and mountains on alcohol marker friendly paper I coloured them with Copic markers and hand fussy cut them. 
I set them aside and found patterned paper from Recollections and cut them to fit my card 5"x 5" card base. Next I cut a polaroid die, trees and a piece of snow. Before gluing anything down, I used my Misti to stamp the sentiment on the polaroid frame. 
 I cut a piece of matching patterned paper to go across the middle of the card, and glued the mountains, trees and snow down. Next I added the polaroid frame over the mountains and added some sparkly snowflakes (hard to see in the photo) and ribbon. Ski Bum Monkey was added with foam pop dots and enamel dots finish off the card.


Card Recipe 

Stamp: Ski Bum Monkey (M142), Mountains (TDG007)  - High Hopes Rubber Stamps

Sentiment - Sm. Christmas Script (F051) - High Hopes Rubber Stamps

Patterned Paper: Northern Lights - Recollections


Tuxedo Black Memento ink, Hammermill 100lb digital cover stock, snowflakes - Marvy punch, polaroid die - Your Next Stamp, tree die - Gina Marie Deisgns, ribbon - Galena, 3D foam pop dots - Forever In Time, enamel dots 


 Copic Markers:

Body - E43 E44 E47 E49 E30 E31 E43

Scarf/Mitt - BG11 BG32 BG15 BG49

Ski Poles - BG11 BG32 BG15 BG49 N1 N2 N4

Skiis - E32 E34 E35 E29


Thanks for stopping by! Have a super fantastic day!


Wednesday, July 6, 2022

Lovin' From My Oven!!

It’s Wednesday, and this week, I made a Christmas card using High Hopes Rubber Stamps Baking Ginger - S225 for the image and Lovin' From My Oven - G198 for the sentiment as we are celebrating Christmas in July this month. I always remember my mom baking so many varieties of cookies and other sweets at Christmas time. We especially had fun helping her decorate all of the gingerbread cookies.

To make my card this week, I began with a card base of Hammermill - Premium Colour 100 lb. cardstock, cut and scored to be 5.5" x 4.25". Using my Cuttlebug, My Creative Time - Rectangle Frame Dies and My Creative Time - Rectangle Frame Layers, I die cut Doodlebug - Milk and Cookies for the Gingerbreads and Carta Bella - Christmas Cheer for the inside panel. Tim Holtz Distress Ink - Vintage Photo was used to go around the inside and outside edges of the gingerbread patterned background. I applied some washi tape to both fronts of the pieces and then turned them around and used double-sided tape to keep them together. I adhered the combined background to the base card and then removed the washi tape.

The image and sentiment were both stamped onto Copic Marker X-Press It Blending Card using my MISTI - Most Incredible Stamping Tool and Memento - Tuxedo Black ink. The image was coloured in with Copic Markers. I die cut the sentiment using my Cuttlebug and Poppystamps - Christmas Quotes. The image was fussy cut around with scissors and then I put it through my Xyron Creative Station so that it would lay flat when I adhered it to some red Scrapbook.com - Peppermint Smooth Cardstock. After adhering it, I once again fussy cut around the image leaving a fine border. Using R24 Copic Marker, I inked around all of the edges. I applied U-Line double-sided tape to the back of this piece and popped it up into the centre of the patterned rectangle. I also applied U-Line double-sided tape to the back of the sentiment and popped it up at the bottom of the card. Lastly, I cut the button holes off of 3 Dress It Up - Holiday Collection - Christmas Cookies and using liquid glue, adhered them to the card.

Card Recipe:

Stamp: Baking Ginger - S225 (High Hopes Rubber Stamps)

Sentiment: Lovin' From My Oven - G198 (High Hopes Rubber Stamps)

Inks: Memento - Tuxedo Black, Tim Holtz Distress Ink - Vintage Photo

Paper: Copic Marker X-Press It Blending Card, Hammermill - Premium Colour 100 lb., Carta Bella - Christmas Cheer by Susan Duncan (6"x6"), Doodlebug - Milk and Cookies (6"x6"), Scrapbook.com - Peppermint Smooth Cardstock - 4.25" x 5.5"

Die Cuts: My Creative Time - Rectangle Frame Dies, My Creative Time - Rectangle Frame Layers, Poppystamps - Christmas Quotes

Tools: MISTI - Most Incredible Stamping Tool, U-Line double-sided tape, Cuttlebug, Dress It Up - Holiday Collection - Christmas Cookies, Xyron Creative Station

Image coloured with Copic Markers:

Gingerbread: Y21, E57, E35, E33, E31, R22, R20, B60, BV20, Colorless Blender, Eyes (Sakura Glaze - Black)

Hat: B60, BV20, Colorless Blender

Apron: G99, YG67, YG63, YG61, R29, R24

Spoon: R59, R37, R35

Background: Y04, Y02, Y00

Hope you like it and have a fantastic week!

You can find lots of inspiration from the Design Team Divas at the High Hopes blog, and the High Hopes Rubber Stamps Facebook Fan page plus you can also follow us on
Instagram, Twitter and Pinterest.


Tuesday, July 5, 2022

Season's Greetings!

Hello!
It's Christmas in July over on the High Hopes Blog and the Design Team is having so much fun creating with this theme. For my card today, I am using the adorable "Hope For Peace Snowy" and the "Season's Greetings" sentiment both from High Hopes of course! After penguins, Snowmen are my favourite Winter/Christmas themed stamps to create with!
I started my card making process by stamping my image onto some Copic friendly paper using Memento Tuxedo Black ink. Next, I decided on what papers I wanted to use and I chose the Echo Park "Christmas Salutations" 6x6 collection. I coloured my image to match the papers using my Copic Sketch markers. Using a MFT Postage stamp die, I cut my image out and popped it up using foam squares onto my base of layers. Some twine, a bow, snowflake embellie and enamel dots finish off my card.
Copics Used:
N0, N1, N3, N5, N7, N8, N10
R01, R39, R59, R89
YG63, YG67
C00, C0, C2
YR04, YR09
B0000, B000, B00

Thanks for stopping by!
Don't forget to head on over to the High Hopes website and see all Lora's adorable stamps! You can find more inspiration from the Design Team for the Christmas in July theme by visiting the High Hopes Blog and Facebook page too!
Happy Stamping!