Showing posts with label Flowers. Show all posts

Tuesday, May 10, 2022

Love One An-udder!!

It’s Wednesday, and this week, I made an Anniversary card using High Hopes Rubber Stamps Cow Hugs - TT136 for the image and Love An Udder - F205 for the sentiment. Love this adorable combination and thought it would be great for an Inspirational card or an Anniversary card!

To make my card this week, I began with a card base of Hammermill - Premium Colour 100 lb. cardstock, cut and scored to be 5.5" x 4.25". Doodle Bug Designs Inc. - Down on the Farm cardstock background paper was cut to the size of 5.5" x 4.25" and adhered directly to the base using double-sided tape. Tim Holtz Distress Ink - Black Soot and a finger dauber were used to ink around all of the edgs of the card. Using my Anna Griffin Empress Mini Machine and dies from Whimsy Stamps - Wavy Nested Frame Dies Set, I die cut one pattern out of Recollections - Black cardstock and a smaller cut from Copic Marker X-Press It Blending Card. Using PinkFresh Studio - Slim Stripes dies and my Anna Griffin Empress Mini Machine, I die cut some black stripes using the half-inch die from Recollections - Black cardstock. I added some U-Line double-sided tape to the backs of the 2 black pieces and popped them up onto the patterned background. Using scisssors, I cut off the excess from the black stripe after it was adhered to the base.

I stamped the main image and sentiment onto the Copic Marker X-Press It Blending Card using my MISTI and Memento - Tuxedo Black. The image was coloured in with Copic Markers. I used a Sakura Glaze - Black pen, and Gelly Roll Sakura #8 Pen to create the eyes. After the image was coloured in, I added some U-Line double-sided tape to it and popped it up onto the black die cut. Using my machine again, I die cut the sentiment using Gina K Designs - Sentiment Strips. This was popped up with Scrapbook Adhesives - Black 3D Foam Strips onto the black stripe. To finish off my card, I added 2 little button cows on either side of the sentiment from Dress It Up - In the Barnyard and Dress It Up - Mooove It.

Card Recipe:

Stamps: Cow Hugs - TT136 (High Hopes Rubber Stamps)

Sentiment: Love An Udder - F205 (High Hopes Rubber Stamps)

Inks: Memento - Tuxedo Black, Tim Holtz Distress Ink - Black Soot

Paper: Copic Marker X-Press It Blending Card, Hammermill - Premium Colour 100 lb., Doodle Bug Designs Inc. - Down on the Farm - 6" x 6" paper pad, Recollections - Black

Die Cuts: PinkFresh Studio - Slim Stripes, Whimsy Stamps - Wavy Nested Frame Dies Set (WSD382), Gina K Designs - Sentiment Strips

Tools: MISTI - Most Incredible Stamping Tool, U-Line double-sided tape, Anna Griffin Empress Mini Machine, Sakura Glaze - Black Pen, Gelly Roll Sakura #8 Pen, Dress It Up - In the Barnyard and Dress It Up - Mooove It

Image coloured with Copic Markers:

Cows: N9, N7, N5, N0, E42, E41, E40, R30, R02, R01, R00, R000 (Eyes - Sakura Glaze - Black, Gelly Roll Sakura #8 Pen)

Leaves and Grass: G99, YG67, YG17, G21, G07, G05

Flowers: B29, B26, B24, B21, YR16, YR12, E15, Y35, Y11, Y08, Y06, Y04, R46, R14, R08

Bow and Cow Bell: R46, R14, R08, Y38, Y35, Y17, Y15

Sky and Clouds: B60, B01, B00, B000, B0000

Hope you like it and have a fantastic week!

You can find lots of inspiration from the Design Team Divas at the High Hopes blog, and the High Hopes Rubber Stamps Facebook Fan page plus you can also follow us on
Instagram, Twitter and Pinterest.


Wednesday, April 27, 2022

Hedgies Happy Birthday!!

It’s Wednesday, and this week, I made a birthday card using High Hopes Rubber Stamps Hedgie Stack - TDG027 for the image and Mini Sentiment Set #1 - HLL001 for the sentiment. These little hedgies are excited to wish someone special a very Happy Birthday!

To make my card this week, I began with a card base of Hammermill - Premium Colour 100 lb. cardstock, cut and scored to be 5.5" x 5.5". I cut the Crafter's Companion - Luxury Cardstock - Gold cardstock background paper to the size of 5.5" x 5.5" and adhered it directly to the base using double-sided tape. AITOH Origami - Print Chiyogami - Butterflies paper was cut to the size of 5.25" x 5.25" and glued on top of the gold paper. Using my Couture Creations - Go Power and Emboss and PinkFresh Essentials: Folk Edge Squares, I die cut another square from Crafter's Companion - Luxury Cardstock - Gold and Copic Marker X-Press It Blending Card. I popped up the gold die cut onto the floral background using U-Line double-sided tape. I stamped the main image onto the Copic Marker X-Press It Blending Card using my MISTI and Memento - Tuxedo Black.

The image was coloured in with Copic Markers. I used a Gelly Roll Sakura #5 Pen to create some more texture in the fur by just dabbing it everywhere. I'm hoping that it looks like little spikes at the end of their fur. I applied U-Line double-sided tape to the back of the coloured image and popped it up onto the gold die-cut. I stamped the sentiment using my MISTI and Memento - Tuxedo Black ink onto Copic Marker X-Press It Blending Card. Using a 3/4" punch, I punched out the circle surrounding the sentiment. Then, using my Cuttlebug and My Creative Time - Bunch of Fun Circle Dies, I die cut a slightly larger circle out of a scrap piece of gold paper from Crafter's Companion - Luxury Cardstock - Gold. I ran the sentiment through my Xyron Create a Sticker and attached it directly to the gold circle. Using some U-Line double-sided tape, I popped it up onto the coloured image. Lastly, to complete my card, I added in some PinkFresh Studio - Essentials Jewel Mix and flowers gems from the Dollar Store.

Card Recipe:

Stamps: Hedgie Stack - TDG027 (High Hopes Rubber Stamps)

Sentiment: Mini Sentiment Set #1 - HLL001 (High Hopes Rubber Stamps)

Inks: Memento - Tuxedo Black

Paper: Copic Marker X-Press It Blending Card, Hammermill - Premium Colour 100 lb., Crafter's Companion - Luxury Cardstock - Gold, AITOH Origami - Print Chiyogami - Butterflies

Die Cuts: PinkFresh Essentials: Folk Edge Squares, My Creative Time - Bunch of Fun Circle Dies

Tools: MISTI - Most Incredible Stamping Tool, U-Line double-sided tape, Couture Creations - Go Power and Emboss, Gelly Roll Sakura #10 Pen, Gelly Roll Sakura #5 Pen, PinkFresh Studio - Essentials Jewel Mix, Cuttlebug

Image coloured with Copic Markers:

HedgeHogs: T7, T5, T4, T3, E51, E50, R30, R22, R21, R20 (Eyes - Sakura Glaze - Black, Gelly Roll Sakura #10 Pen), Gelly Roll Sakura #5 Pen

Leaves and Grass: G99, YG67, YG17, YG13, G21

Flowers: Y17, RV02, RV10, RV00

Tree and Limbs: E31, E27, E25, E23

Sky: B02, B01, B00, B000, B0000

Hope you like it and have a fantastic week!

Check out more adorable images in the new "Spring Fever Release" at High Hopes Rubber Stamps!

You can find lots of inspiration from the Design Team Divas at the High Hopes blog, and the High Hopes Rubber Stamps Facebook Fan page plus you can also follow us on
Instagram, Twitter and Pinterest.


Wednesday, April 20, 2022

Somebunny Loves You!!

It’s Wednesday, and this week, I made a card using High Hopes Rubber Stamps Bunny Blossoms - TDG024 for the image and Some Bunny - FDG032 for the sentiment. I just love this super adorable little bunny taking time to smell the flowers. Spring is here, but the winter snow keeps playing tricks on us still. LOL! We just had another snow storm the other day. I thought April was supposed to bring Spring showers, not Spring snow!!!

To make my card this week, I began with a card base of AC Cardstock - White, cut and scored to be 6" x 6". I cut the Recollections - Matte Gold Foil cardstock background paper to the size of 6" x 6" and adhered it directly to the base using double-sided tape. Crafts Designer Paper - 02-3093268 was cut to the size of 5.75" x 5.75" and inked around the edges with Tim Holtz Distress Ink - Black Soot. I applied U-Line double-double sided tape and popped the paper onto the gold backing. Using my Couture Creations - Go Power and Emboss and Waffle Flower - Nesting Square dies, I die cut another square from Recollections - Matte Gold Foil cardstock and Copic Marker X-Press It Blending Card. I popped up the gold square onto the bunny background and stamped the main image onto the Copic Marker X-Press It Blending Card using my MISTI and Memento - Tuxedo Black.

The image was coloured in with Copic Markers. I though I'd go out of my comfort zone this week to create this sky with a variety of different colours. I thought it still needed something more so I added in some clouds using a PrimaColor Pencil - White. I also added in some extra fur with PrimaColor Pencil - Beige. Once, I was satisfied with the sky, I added U-Line double-sided tape to the back of it and it too was popped up onto the card. The sentiment was stamped onto Copic Marker X-Press It Blending Card using my MISTI and Memento - Tuxedo Black. I fussy cut around it and then applied it to a small piece of Recollections - Matte Gold Foil cardstock using repositionable tape. I used my Brother Scan and Cut to cut around the image with a slight border. I coloured around the circle stamped image with RV000 and then used a black marker to go all around the edges. I applied U-Line double-sided tape and popped it up onto the gold die-cut. Lastly, 2 layers of the U-Line double-sided tape were applied to the right side only of the sentiment and glue to the left and attached it to the base coloured paper to finish off the card.

Card Recipe:

Stamps: Bunny Blossoms - TDG024 (High Hopes Rubber Stamps)

Sentiment: Some Bunny - FDG032 (High Hopes Rubber Stamps)

Inks: Memento - Tuxedo Black, Tim Holtz Distress Ink - Black Soot

Paper: Copic Marker X-Press It Blending Card, AC Cardstock - White, Recollections - Matte Gold Foil cardstock, Crafts Designer Paper - 02-3093268

Die Cuts: Waffle Flower - Nesting Square dies

Tools: MISTI - Most Incredible Stamping Tool, U-Line double-sided tape, Couture Creations - Go Power and Emboss, Brother Scan and Cut, Gelly Roll Sakura #10 Pen

Image coloured with Copic Markers:

Rabbit: E57, E55, E53, E51, E50, E35, R30, R22, R21, R20 (Eyes - Sakura Glaze - Black, Gelly Roll Sakura #10 Pen), PrimaColor Pencil - Beige (PC997)

Leaves and Grass: G99, YG67, YG17, G21

Flowers: Y17, Y08, RV66, RV63, RV55, RV52, RV00, RV000, R83, R81

Tree and Limbs: E31, E27, E25, E23

Sky: B02, B01, B00, B000, B0000, RV00, R00, R000, Y02, Y00, (Clouds: PrimaColor Pencil - White (PC398))

Hope you like it and have a fantastic week!

Check out more adorable images in the new "Spring Fever Release" at High Hopes Rubber Stamps!

You can find lots of inspiration from the Design Team Divas at the High Hopes blog, and the High Hopes Rubber Stamps Facebook Fan page plus you can also follow us on
Instagram, Twitter and Pinterest.


Wednesday, April 6, 2022

Ellie & Friends!!

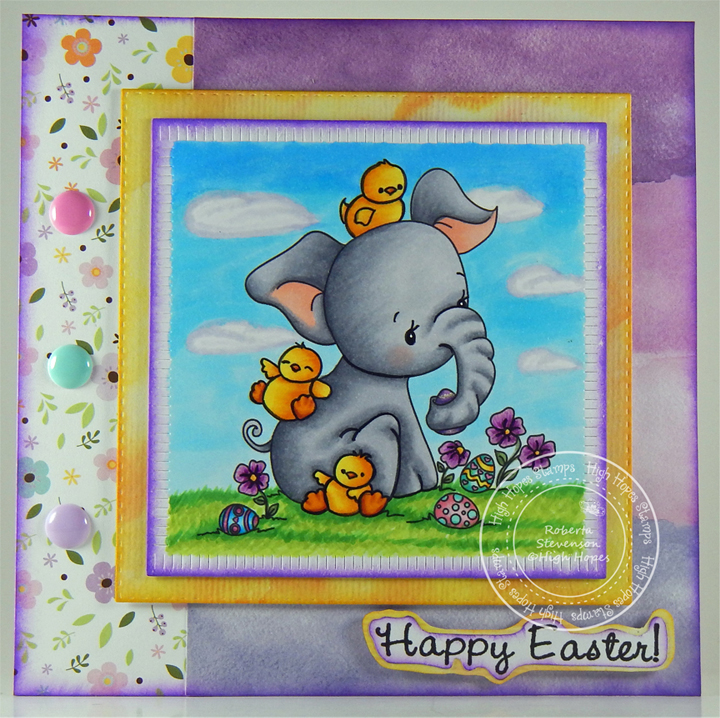
It’s Wednesday, and this week, I made an Easter card using High Hopes Rubber Stamps Ellie & Friends - TDG025 for the image and Happy Easter! - F096 for the sentiment. We are celebrating our new "Spring Fever Release" this month and who couldn't love this adorable image!

To make my card this week, I began with a card base of AC Cardstock - White, cut and scored to be 6" x 6". I cut the flower cardstock from Echo Park - Welcome Easter at 6" x 1.75" and Lawn Fawn - Watercolor Wishes Rainbow paper to 6" x 4.5". I applied double-side tape and adhered both pieces directly to the base. Tim Holtz Distress Ink - Wilted Violet ink was used to ink around all of the edges of the base card. Using My Creative Time -Stitched Squares Inside and Out and my Cuttlebug, I die cut Momenta - Cardstock and inked around the edges with Tim Holtz Distress Ink - Fossilized Amber. 3M double-sided tape was applied to the back of this and it was popped up onto the base card.

Using PinkFresh Studios - Essentials: Blanket Stitched Square Die Set and my Cuttlebug, I die cut Copic Marker X-Press It Blending Card. I stamped the main image onto this die cut and sentiment onto Copic Marker X-Press It Blending Card using my MISTI and Memento - Tuxedo Black. The image was coloured in with Copic Markers and then U-Line double-side tape was applied to the back of it. This was popped up over top of the yellow square.

I fussy cut around the sentiment and inked around the edges with Tim Holtz Distress Ink - Wilted Violet. I ran it through my Xyron Create a Sticker and applied it to the Momenta - Cardstock and fussy cut around it again. I applied Scrapbook Adhesives - 3D Foam Strips to the back of the sentiment layers and added it to the bottom right of the card. Lastly, I added in 3 DoodleBug Design Inc. - Sprinkles Spring Assortment to complete the card.

Card Recipe:

Stamps: Ellie & Friends - TDG025 (High Hopes Rubber Stamps)

Sentiment: Happy Easter! - F096 (High Hopes Rubber Stamps)

Inks: Memento - Tuxedo Black, Tim Holtz Distress Ink - Wilted Violet, Tim Holtz Distress Ink - Fossilized Amber

Paper: Copic Marker X-Press It Blending Card, Lawn Fawn - Watercolor Wishes Rainbow - 6" x 6", Echo Park - Welcome Easter (6" x 6"), Momenta - Cardstock, AC Cardstock - White

Die Cuts: My Creative Time -Stitched Squares Inside and Out, PinkFresh Studios - Essentials: Blanket Stitched Square Die Set

Tools: MISTI - Most Incredible Stamping Tool, U-Line double-sided tape, 3M double-sided tape, Cuttlebug, Xyron Create a Sticker, DoodleBug Design Inc. - Sprinkles Spring Assortment, Scrapbook Adhesives - 3D Foam Strips

Image coloured with Copic Markers:

Elephant: C5, C3, C2, C1, R30, R20

Chicks: E53, E50, E15, YR31, YR18, YR14, Y21, Y08, Y14, Y08

Flowers, Stems and Leaves: V09, V06, V04, V01, Y17, Y13, G85, G43

Eggs: Y17, Y13, Y04. BG15, BG13, BG11, BG10, V17, V15, V12, B04, B02, B01, RV66, RV55, RV13, RV11, RV10

Sky: B60, B02, B01, B00, B000, C1, Colorless Blender

Grass: G14, YG23, YG11, YG03, YG01

Hope you like it and have a fantastic week!

Check out more adorable images in the new "Spring Fever Release" at High Hopes Rubber Stamps!

You can find lots of inspiration from the Design Team Divas at the High Hopes blog, and the High Hopes Rubber Stamps Facebook Fan page plus you can also follow us on
Instagram, Twitter and Pinterest.


Wednesday, June 30, 2021

Smell The Flowers!!!

It’s Wednesday, and this week, I made a card using Tink Picking Posies - T027 by High Hopes Rubber Stamps for the main image and Smell The Flowers - G189 (High Hopes Rubber Stamps) for the sentiment. Most of the flowers are now in full bloom. It's so wonderful to see all of the beautiful colours and smell the wonderful aromas of the flowers in our garden. So happy that my husband has such a green thumb and loves gardening!

To make my card this week, I stamped my image and sentiment using my MISTI and Memento - Tuxedo Black ink onto Copic Marker X-Press It Blending Cardstock. I stamped the image a second time onto plain copy paper and fussy cut around it to create a mask. My Creative Time - Rectangle Frame Dies and My Creative Time - Rectangle Frame Layers were used to cut out the sentiment and background layer. I coloured in the image using Copic markers and then put my mask over top of the coloured image. Using stencils that I had created earlier with Avery Elle - Pierced Clouds Dies (D-05-01), I inked in the clouds using Tim Holtz Distress Ink - Salty Ocean. Once this was done, I removed the mask.

To assemble my card, I started with a base using Hot Buy - Cards and Envelopes (5.5" x 4.25"). I ran the coloured image through my Xyron Create a Sticker and applied it to the black cardstock. 3M VHB - 2 sided tape, was applied to the back of the black frame and then it was attached directly to the base.

Card Recipe:

Stamp: Tink Picking Posies - T027 (High Hopes Rubber Stamps)

Sentiment: Smell The Flowers - G189 (High Hopes Rubber Stamps)

Inks: Memento - Tuxedo Black, Tim Holtz Distress Ink - Salty Ocean

Paper: Copic Marker X-Press It Blending Card, Black Cardstock, Plain Copy Paper (Mask)

Die Cuts: My Creative Time - Rectangle Frame Dies, My Creative Time - Rectangle Frame Layers, Avery Elle - Pierced Clouds Die (D-05-01)

Tools Miscellaneous: MISTI - Most Incredible Stamping Tool, Xyron Create a Sticker, Cuttlebug

Image coloured with Copic Markers:

Skunk: 100, C9, C7, C5, R30, R20, Colorless Blender, (Eyes and Nose - Sakura Glaze - Black)

Flowers: RV09, RV06, Y17, Y15, Y11, Y08, V04, V01

Leaves: G28, G24, G21

Grass: YG17, YG13, YG03, YG01

Sky: B00 to fill in white spots

Hope you like it and have a fantastic week!

You can find lots of inspiration from the Design Team Divas at the High Hopes blog, and the High Hopes Rubber Stamps Facebook Fan page plus you can also follow us on
Instagram, Twitter and Pinterest.


Wednesday, June 2, 2021

Fairy Garden!!

It’s Wednesday, and this week, I'm sharing a card I made from the High Hopes Rubber Stamps "Mix It Up Release"  using Fairy Garden - TT141 for the main image and Leave Room - LL015 for the sentiment! I love movies and reading books about Fantasy! It's always so much fun to get lost in the moment, just like these little fairies are enjoying their little magical garden!

To make my card this week, I started out with a base card using AC Cardstock - White at the size of 6" x 6". I thought this paper by Graphic45 - Unique Papercrafting - Fairie Dust Collection - Moonlit Blooms went so well with the sentiment and the garden, so I die-cut it using my Couture Creations - Go Power and Emboss and Creative Expression Craft Dies by Sue Wilson - Noble Dies - Double Pierced Squares - Set B. I used double-sided tape and attached it directly to the base.

The image and sentiment were both stamped using my MISTI and Memento - Tuxedo Black ink. I coloured in the image with Copic markers and then fussy cut around it and the sentiment. I ran both pieces through my Xyron Creative Station to make them into stickers and so that they would lie completely flat when I attached them to some pieces of Recollections - Black cardstock. Once again, I fussy cut around the coloured image and sentiment. 3M VHB - 2 sided tape was attached to the backs of the image and sentiment and were applied directly to the background of the card to finish it off.

Card Recipe:

Stamp: Fairy Garden - TT141 (High Hopes Rubber Stamps)

Sentiment: Leave Room - LL015 (High Hopes Rubber Stamps)

Inks: Memento - Tuxedo Black

Die Cuts: Creative Expression Craft Dies by Sue Wilson - Noble Dies - Double Pierced Squares - Set B

Paper: Copic Marker X-Press It Blending Card, Graphic45 - Unique Papercrafting - Fairie Dust Collection - Moonlit Blooms, AC Cardstock - White, Recollections - Black cardstock

Tools: MISTI - Most Incredible Stamping Tool, 3M VHB - 2 sided tape, Couture Creations - Go Power and Emboss, Xyron Creative Station

Image coloured with Copic Markers:

Tree House: E49, E27, E25, E23, E21, W5, W3, W0, BG72, BG57, BG32, BG11, BG01, Y04, Y02, C5, C3, C1

Walkway: E47, E44, E43, E42, E40

Greenery: YG67, YG63, YG17, YG13, YG11, YG03, YG01, G17, G14, G07

Flowers: V12, V09, V06, V01, YR30, YR20, YR16, YR14, E15, Y17, Y08, Y06, GB02, BG01, BG0000

Bench and Bridge: BG72, BG57, BG32, BG11, C5, C3, C1, E27, E23, E21

Bird Bath: C5, C3, C1,

Water: B93, B91, B52, B41, B06, B04, B02, B01, B000

Check out some other fun new returning stamps from the Mix It Up Release here:
Mix It Up Release - High Hopes Rubber Stamps (highhopesstamps.com)

Hope you like it and have a fantastic week!

You can find lots of inspiration from the Design Team Divas at the High Hopes blog, and the High Hopes Rubber Stamps Facebook Fan page plus you can also follow us on
Instagram, Twitter and Pinterest.


Wednesday, August 26, 2020

Time to Smell the Flowers!

It’s Wednesday, and this week, I used Daffodil Bunny - SLF006 (High Hopes Rubber Stamps) for the main image from the new August 2020 release and Smell The Flowers - G189 (High Hopes Rubber Stamps) for the sentiment. This adorable little bunny is taking time out to smell the flowers. We have a really nice garden of flowers that my husband takes care of. I'm not a green thumb at all. LOL! It's always nice to take a moment and enjoy the beauty of them.


To make my card this week, I started out with a simple white card base, sized at 6" x 6". The base background was also cut at 6" x 6" using Craft Consortium - Cottage Garden paper and then inked around the edges with Tim Holtz Distress Ink - Fossilized Amber. I just thought this paper went so well with this adorable image. I added the 2 colours of ribbon with some 2-sided tape and then adhered the entire background paper to the base with 2-sided tape.

The scalloped circle and inside image circle were both die cut using my Cuttlebug and Craftin Desert Diva's Stitched in Circle Dies. The circle in between the 2 of them was die cut with Lifestyle Crafts Cutting Dies - Nesting Circles. The edges of the large scalloped circle were inked with Tim Holtz Distress Ink - Picked Raspberry. For the sentiment, My Creative Time - Rectangle Frame Dies were used. The die was larger in depth, so I just die cut one side and then turned it around and only put it part way through my Cuttlebug to cut the other edge. It too, was then inked around the edges with Tim Holtz Distress Ink - Fossilized Amber. The image was coloured with Copic Markers.

To assemble the remainder of the card, the mid circle was attached directly to the large scalloped circle and then popped up with 3M VHB - 2 sided tape. The image and sentiment were popped up on top with 3M VHB - 2 sided tape as well.

Card Recipe:

Stamp: Daffodil Bunny - SLF006 (High Hopes Rubber Stamps)
Sentiment: Smell The Flowers - G189 (High Hopes Rubber Stamps)
Inks: Memento - Tuxedo Black, Tim Holtz Distress Ink - Fossilized Amber, Tim Holtz Distress Ink - Picked Raspberry
Paper: Copic Marker X-Press It Blending Card, Momenta - Cardstock, Crafts Sparkling Stickers - 02-3068629, Craft Consortium - Cottage Garden 6"x6"
Die Cuts: Craftin Desert Diva's Stitched in Circle Dies, Lifestyle Crafts Cutting Dies - Nesting Circles, My Creative Time - Rectangle Frame Dies
Tools: MISTI - Most Incredible Stamping Tool, Cuttlebug, 3M VHB - 2 sided tape

Image coloured with Copic Markers:

Bunny: E37, E35, E34, E33, E31, E30, R11, R02, R000
Bow: RV19, RV17, RV13
Grass and Greenery for Plants: BG99, BG97, G21, YG17, YG13, YG07, YG03, YG01
Daffodil: E15, Y38, Y18, Y04
Clouds and Sky: B60, B01, B00, B000, B0000, C0, Colorless Blender

Hope you like it and have a fantastic week!

You can find lots of inspiration from the Design Team Divas at the High Hopes blog, and the High Hopes Rubber Stamps Facebook Fan page plus you can also follow us on
Instagram, Twitter and Pinterest.


Wednesday, July 22, 2020

The Song of Birds

It’s Wednesday, and this week, I used Bluebird - TLF015 from High Hopes Rubber Stamps new release for the main image and Kiss of the Sun - H223 (High Hopes Rubber Stamps) for the sentiment. I just fell in love with this image and sentiment and knew it was the perfect combination for a slim line card.


Closer Look: Blue Bird


Closer Look: Poem


For my card this week, I stamped the images and sentiment onto Copic Marker X-Press It Blending Card using my MISTI and Memento - Tuxedo Black ink. The main image was die cut using my Cuttlebug and Essentials by Tattered Lace Dies - Easel Slider. The sentiment was die cut using My Creative Time - Rectangle Frame Dies and My Creative Time - Rectangle Frame Layers. The image was coloured in with Copic markers. Once all of the colouring was completed, I went around all of the die cuts with a Sharpie - Gold Medium Point - Water Based Paint pen.

I decided to make this a slim line card starting out with a white card base sized at 8.75" x 4". I just received some new Cosmic Shimmer Pixie Powders and just had to try them out. So I cut some Monte Marte - Watercolour Book - 190 GSM paper the same size and started playing. This background is the one that I decided to go with. I just loved the way it picked up some of the same colours as the flowers. The powder was easy to use. You just sprinkle some powder on the paper and spritz with water. You can't really make it out in the photo, but the paper actually has a beautiful pearlesque look to it. I also went around all of the sides of the base with the Sharpie pen as well. I then popped up the sentiment and coloured image with 3M VHB - 2 sided tape and added some embellishments.

When I went to decorate the little flower embellishments with Stickles - Yellow, some accidentally went onto my background paper.  I decided I really liked the look and then just added it everywhere using the tip of my stylus.

Card Recipe:

Stamp:  Bluebird - TLF015  (High Hopes Rubber Stamps)
Sentiment: Kiss of the Sun - H223 (High Hopes Rubber Stamps)
Inks: Memento - Tuxedo Black, Cosmic Shimmer Pixie Powder - Candy Pink
Paper: Copic Marker X-Press It Blending Card, Monte Marte - Watercolour Book - 190 GSM, Hot Pink cardstock
Die Cuts: My Creative Time - Rectangle Frame Dies, My Creative Time - Rectangle Frame Layers, Essentials by Tattered Lace Dies - Easel Slider
Tools: MISTI - Most Incredible Stamping Tool, Cuttlebug, 3M VHB - 2 sided tape, Craft - Rhinestone Stickers, Sharpie - Gold Medium Point - Water Based Paint

Image coloured with Copic Markers:

Flowers: RV17, RV04, RV02, RV000, E15, Y38, Y15, Y04
Leaves: YG67, YG17, YG09
Branches: E31, E29, E23
Bird: E99, E97, YR20, YR16, YR15, YR12, Y32, B39, B14, B12, B06, B05, BG01, C8, C5, C3, C1, C0, W5, W3, W1, Colorless Blender
Background: Y02, Y00, Y000, Q-Tip, Rubbing Alcohol
Main Background: Cosmic Shimmer Pixie Powder - Candy Pink, Stickles - Yellow, Forever In Time Bling Tape - Floral, Water Spritzer

Hope you like it and have a fantastic week!

Be sure to check out all of the fun new images on the High Hopes website. You can find lots of inspiration from the Design Team Divas at the High Hopes blog, and the High Hopes Rubber Stamps Facebook Fan page plus you can also follow us on Instagram, Twitter and Pinterest.


Wednesday, April 8, 2020

Sunny Days Ahead

It’s Wednesday, and this week, I used Sunny Days Ahead - P004 (High Hopes Rubber Stamps). I searched to find colours that represented each word going around the image and found the following: Faith - Pink, Courage - Red, Hope - Blue and Victory - Purple and so this is how I coloured this image. I believe these words speak for themselves and in the days to come, we will all see the sun shining brighter days upon us all.


The card base is 5" x 5". I layered each of the papers and coloured image on black cardstock to pop the colours. I chose the paper of the children holding hands to represent the day when we can all get back to normal and hold hands and play together with our loved ones again. The chain link patterned paper represents how we are all linked together in doing our part to stay strong and healthy, and to give each other the hope, faith and courage to be victorious in the sunny days ahead. I popped up the final layer with 3M VHB - 2 sided tape and added in some black pop dots to complete this card.

Card Recipe:

Stamp:  Sunny Days Ahead - P004 (High Hopes Rubber Stamps)
Inks: Memento - Tuxedo Black, Tim Holtz Distress Ink - Carved Pumpkin
Paper: Copic Marker X-Press It Blending Card, Lauderdale - BasicGrey, Life of the Party - BasicGrey
Tools: MISTI - Most Incredible Stamping Tool, 3M VHB - 2 sided tape


Image coloured with Copic Markers:

Sky: B01, B00, B000
Grass: YG17, YG13, YG03, YG01
Sun: Y38, Y35, Y08, R22, R20, Clear - Wink of Stella
Bug: Y17, BG000, BV000, Clear - Wink of Stella
Frog: G07
Flowers: V06, V04
Hope: B24, B23, B21
Victory: BV02, BV01, BV00
Faith: R85, R83, R81
Courage: R37, R27, R24
Corners: G07, YG13, V06, V04, Y38, Y35

Hope everyone stays healthy and safe and I hope you like this week's card.
Have a fantastic week!

Here's something else to brighten your day!!!
Over on the High Hopes Website there is a Store Wide sale, save 20% off right now when you use the coupon Code Love at the checkout!

You can find lots of inspiration from the Design Team Divas at the High Hopes blog, and the High Hopes Rubber Stamps Facebook Fan page plus you can also follow us on
Instagram, Twitter and Pinterest.