
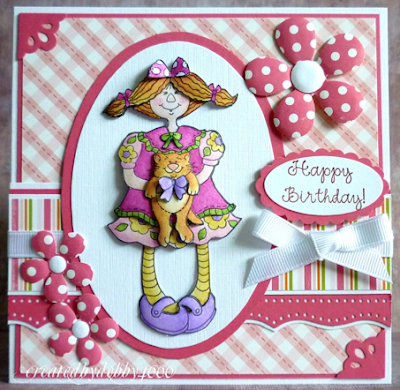
You need to work out your layers it does help to write them down.

2. The important thing to remember, if you’re layering the skirt or top or even the cat’s body and head, like want I’m doing, You need to add colour to the cats head on the body and a bit of the top on the skirt, like in picture 2. Don’t worry about adding depth of colour to these bits it so white doesn’t show between the layers.

3. Cut them out don’t worry about being good at cutting. I always use a grey pen like a Marvy pen (not Black it’s too harsh) round the edges it hides a multiple of sins.
Then using a Perganmo mat that is used for embossing vellum and a large ball tool I emboss the back of each layer. You could use a foam mat but be careful it’s very soft and the image may collapse into it so very gently.
If you get lines try embossing in different directions.

4. I always colour a whole image and use it for a base. I use a toothpick/cocktail stick to put the silicone glue on. You can use sticky fixers/dimensional but I get a better effect with silicone.
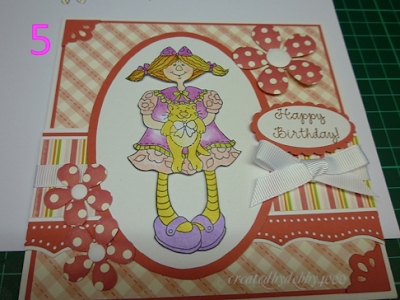
5. I make the card first using the base image as a guide.

6. It really is a matter of putting a blob of the glue where you are going to place your layer.

7. Now this is where things are different. This is the skirt with a bit of the top.
I put silicone on the skirt on the base image and I use Zig glue pen on the skirt layer but on the bit of the top.

8. I place the skirt on the main image and when I feel it’s in the right position, I stick the top flat on the main image.
You can see I’m going to do the same with the top.

9. Same with the cat, silicone glue on the body and zig glue pen on his head and when in position, flatten the head.
The shoes are done very similar too. I used the zig glue pen for the strap so when I layer them the strap won’t be sticking up.

10. Almost there just a blob of silicone for the cats head and some tiny bit of silicone for his bow.

11. A sideways look at the image.

12. If you have any questions don’t hesitate to e-mail me at debby4000craftystuff@hotmail.co.uk
14 comments:
Oh thank you so much Debby (and High Hopes). I have admired your work for quite a while and have been wondering how you do it. What a lot of work you put into each image. No wonder they look so great.
Oh Debby, I had a feeling this is the process you'd follow when making your cards... Gosh, it's a lot of work and I admire you so much more now for the time and effort you put into each creation. This truly is a labour of love... No wonder your cards look so beautiful. Stunning! hugs Sharon x
Fantastic tutorial Debby!...I'm and old follower of your personal blog and I love your creations!...Thanks for sharing your technique!..I'll try!
Greetings from Spain
Lourdes
Hi Debby. Thanks for the tutorial. You really put a lot of work into your cards. Donna
Wow so much work goes into each of your cards, I realise that now!! Thanks for sharing your style with us in this brilliant tutorial.
Pinky
Brilliant tutorial Debby been waiting for this a long time and so worth the wait excellent work.
hugs
Lorraine x
fabulous tutorial!
Wonderful tutorial Debby. You do beautiful 3D work! Nice of you to share your technique! Thank you!
Thank you so much Debby for sharing your method with us. Now I need to get some Silicone glue!
Great 3D effect) Very nice set for this sort od works))
Fabulous! I've always admired Debby's work and wondered how she created such depth!
Thanks for sharing Debby!
thank you for the tutorial i love 3D work and i do it alot but i haven`t done it with my stamped images before so now i will just looks fantastic love your work.Debbie
thank you for the tutorial i love 3D work and i do it alot but i haven`t done it with my stamped images before so now i will just looks fantastic love your work.Debbie
Absolutely love this card and the 3D effect. Your tutorial is so easy to follow! TFS
Wish I could make some, but am unfortunately extremely bad ar fussy cutting 😪 Perhaps I'll be able to convince a friend to do the fussy cutting for me. 🤞
Post a Comment