Monday, June 8, 2020

Carpenter Ant

Howdy - MichelleO here today - How fun is a little Carpenter Ant building a sign of Happy Birthday! This is High Hopes Stamps "Carpenter Ant" a fun busy little guy!


I colored with my Copics (colors below) and shaded with pencils. I found a scrap pieces of paper that have an ant feel to them... a table cloth pattern was too funny. For the sentiment I matched up the little ant with "Wooden Happy Birthday" Love how it matches up with Carpenter Ant! I sewed all the layers together with both zig zag stitch and straight stitch. And placed on a white card stock base. For a little fun I added some enamel dots.

Copic colors used -


There is so much fun to color up at High Hopes Stamps!! To get to the website store click HERE - guaranteed you will fall for lots of adorable images!


Sunday, June 7, 2020

Aunt Shirley Tea

Hi everyone, 
Today's card showcases this adorable image call "Aunt Shirley's Tea" from High Hopes Stamps!

To make this friendship card I stamped and colored it with alcohol markers. I have fun fussy cutting so that is what I did for this image. The pattern paper is "Lest's Celebrate"from First Edition I used this awesome die frame from Kat Scrappiness to created my shaker. Sequins are from my stash. I layered my "Aunt Shirley's Tea" on top of some die cut and one of my first crepe paper rosettes.

Copic I Used; tea cup R20 R21 R22
leaves YG11 YG13
flowers Y11 Y13

 Here is a close up!
I used various types of sequins to created my shaker. I die cut and assemble this beautiful bow die and adhesive in the size of my tea cup.

Here is the inside!
To finish my card I used a couple stitched rectangle dies and stamped "Friendship Special Tea" with Memento black ink. I also used my Nuvo drops to embellish it. I hope I've inspired you today. Check up  High Hopes Stamps blog to see what the team have created!


Friday, June 5, 2020

I Love You!

Hi Everyone:

Another week has been and gone and Friday is here again.  For today's post, I have used the adorable Albert's Gift from High Hopes Stamps.  Albert definitely has a gift and something to say to his special someone.


I coloured Albert with Copic Markers, I used the Stitched Squares Dies from Your Next Stamp to cut him out.   A die from the Stitched Hearts Nesting Designs from Tutti Designs was used to cut some hearts out using different papers from the Bloom Street paper packa ge.  Some twine and rhinestones were used to finish off the design.

Supplies used:
  • Stamps:  Albert's Gift (Q058), I Love You! (D004) -- High Hopes Stamps
  • Paper:  XPress It Blending Cardstock, DP - Bloom Street -- Pink Paisley
  • Copic Markers:
    • Albert:  G85 - Verdigris, G82 - Spring Dim Green, G46 - Mistletoe, G43 - Pistachio, G40 - Dim Green
    • Flowers:  R89 - Dark Red, R83 - Rose Mist, R81 - Rose Pink, YG17 - Grass Green, YG13 - Chartreuse, YG11 - Mignonette 
  • Dies:  Stitched Hearts Nesting Designs -- Tutti Designs; Stitched Squares - Your Next Stamps
  • Rhinestones:  Lippy Red, Antique Rose -- Kaisercraft
For some daily inspiration stop by the High Hopes Stamps Blog to see what the HH Divas have been up to.  You can also follow us on Facebook, Twitter and Instagram.

Thanks for stopping by and have a great day.
Hugs,


Thursday, June 4, 2020

Soo-eet Hogs and Kisses

Sharing some soo-eet hogs and kisses with the adorable "Soo-eet Petunia and Audrey" from High Hopes Rubber Stamps. 
I have a very good friend who loves pigs and wants to get one some day so this stamp is perfect for her - I think I will use it for her Birthday card! 
In the mean time, this card will be kept in my stash until someone in my life needs to be sent some hogs and kisses in a card. 


After colouring up the stamp with alcohol markers I cut it out using the pleated circle die from Gina Marie Designs. I cut a matching piece of card stock to go behind it - I like the colour peaking through the die. Patterned paper from MFT and Julie Nutting helped create the country feel I was looking for. 
I cut my first layer of gingham to fit my card base and then cut a banner die to go behind the image. I traced the outside of the banner die on matching card stock and cut it to fit. 
The flower paper is actually a scrap piece I had that was cut in half and mounted on card stock and fit perfectly on the sides of the banner - getting them lined up is always a trick. 
 I stamped the sentiment and mounted it on matching card stock and finished my card off with some cotton lace ribbon from my stash and enamel dots. 

Card Recipe 
Stamp: Soo-eet Petunia and Audrey - High Hopes Rubber Stamps
Sentiment: Hogs-N-Kisses - High Hopes Rubber Stamps
Patterned Paper: Gingham Galore - MFT, Paper Dolls - Julie Nutting

Tuxedo Black Memento ink, banner die - Banners #3 Sizzix, circle die - Spellbinders, pleated circle die - Gina Marie Designs, cotton lace ribbon - stash, enamel dots - Gina Marie Designs

 Copic and Spectrum Noir Markers: E00 FS9 E11 B93 B95 B97 IG1 IG3 IG5 CR9 R29 R59 FS6 CR3 CR1 

The High Hopes Design team posts daily inspiration on Facebook and the High Hopes blog - we'd love for you to pop by for a visit! Inspiration can also be found on the High Hopes Instagram and Pinterest pages! 
                                                               
Thanks for stopping by! Have a super fantastic day!

Wednesday, June 3, 2020

Happy Bird Day!

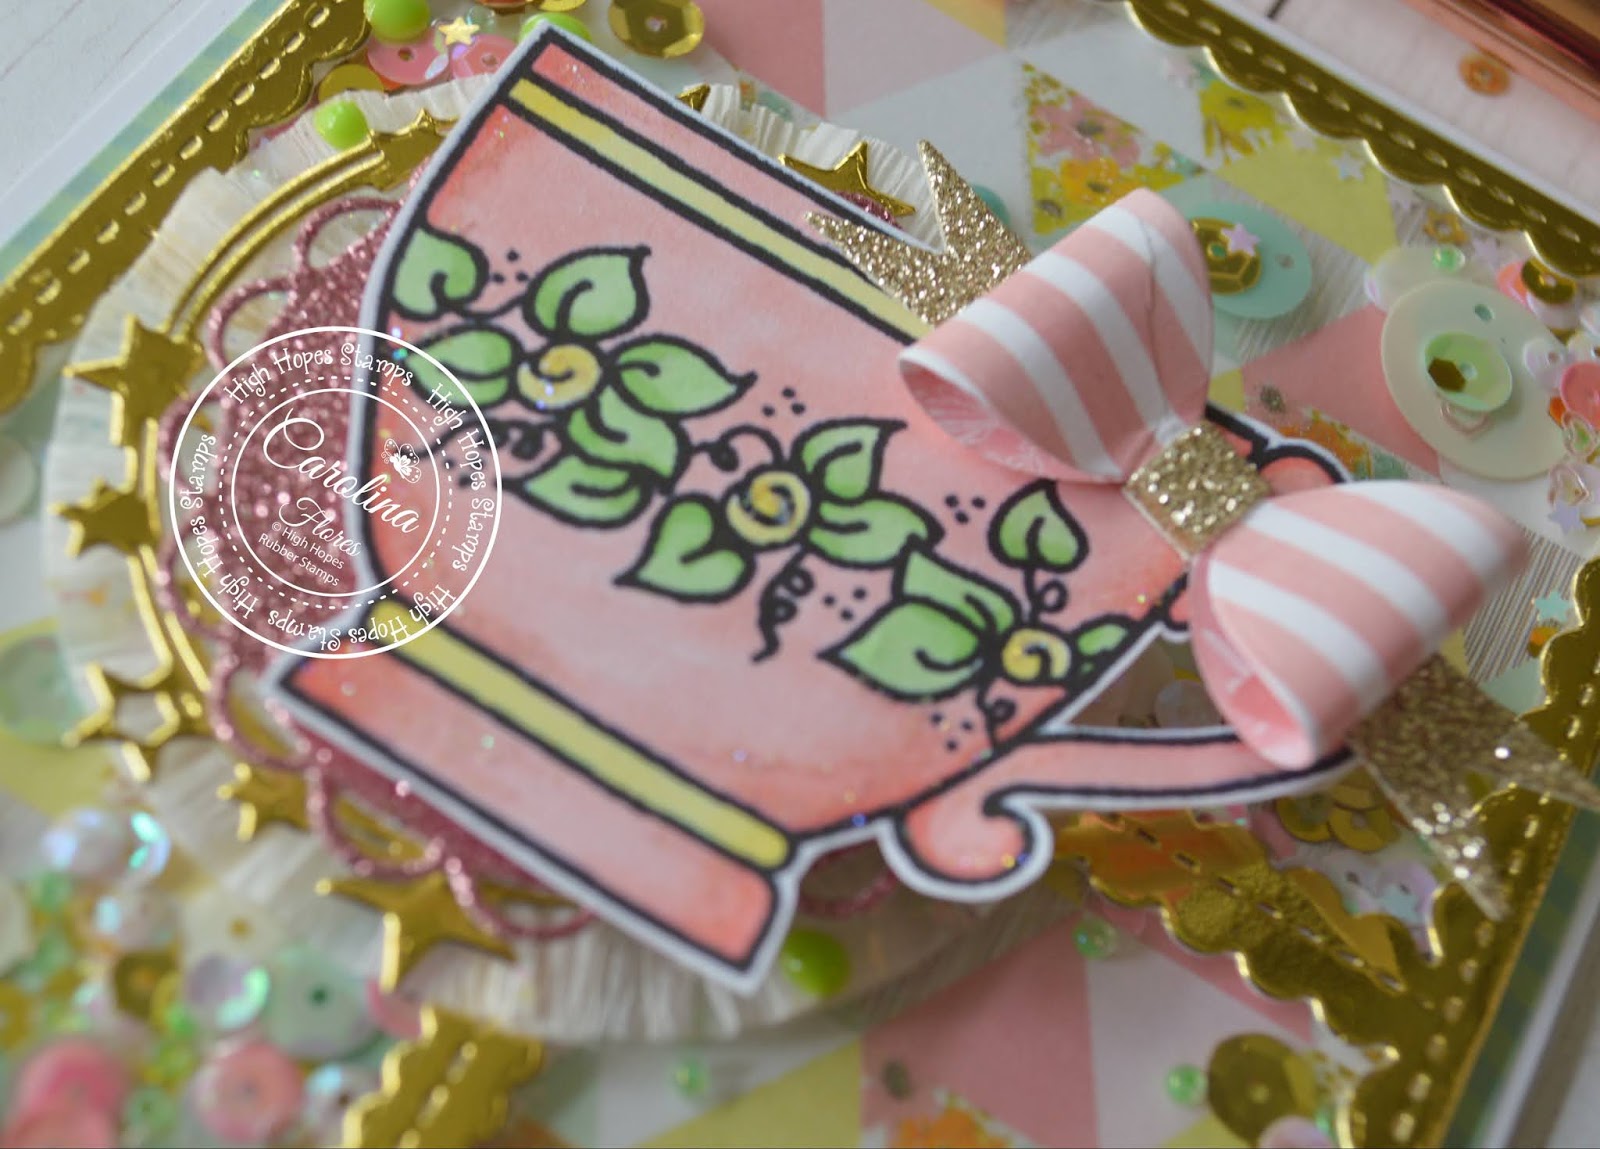
It’s Wednesday, and this week, I used Party Girl Florence - S098 (High Hopes Rubber Stamps) for the main image and Happy Bird Day - F098 (High Hopes Rubber Stamps) for the sentiment. Florence is all dolled up and ready for a Bird Day party! She's the centre of attention with all of her bling, balloons, party hat and musical whistle. She's also has some fancy moves in store for the Flamingo party dance! LOL!


To make my card this week, I started off with a white card base of 6" x 6". For the background paper, I used Forever in Time - Flamingo - Perfect Prints. I coloured the little party hats onto the Flamingos using PrismaColor Premier Pencils. Then I added some white pearls around their necks with Sharpie Water Based Paint - White - Extra Fine Point. Lastly, I edged around the paper with Tim Holtz Distress Ink - Cracked Pistachio.

I used my Cuttlebug and My Creative Time - More Stitched Circles MCT-D136 to die cut Copic Marker X-Press It Blending Card Stock and then my MISTI and Memento - Tuxedo Black ink to stamp the image. I coloured in the image with Copic markers and then used Lifestyle Crafts Cutting Dies - Nesting Circles to cut out the pink and aqua circles. I ran the coloured image through a Xyron Creative Station to make it into a sticker and then mounted it onto the pink cardstock. Then I popped up this piece and the aqua circle with 3M VHB - 2 sided tape. I went around the edge of the pink circle with Hibiscus - Stickles and used Crystal - Stickles for the necklace around Florence's neck.

I stamped the sentiment onto Yellow cardstock and the ran it through my Xyron Create a Sticker. I mounted that onto some pink cardstock and then popped up this piece and the aqua cardstock with 3M VHB - 2 sided tape. I went around the pink cardstock with Hibiscus Stickles. To finish off the card, I added some Crafts - pop dots.

Card Recipe:

Stamp:  Party Girl Florence - S098  (High Hopes Rubber Stamps)
Sentiment: Happy Bird Day - F098 (High Hopes Rubber Stamps)
Inks: Memento - Tuxedo Black, Tim Holtz Distress Ink - Cracked Pistachio
Paper: Copic Marker X-Press It Blending Card, Forever in Time - Flamingo - Perfect Prints (6"x6"\15cmx15cm)
Die Cuts: Lifestyle Crafts Cutting Dies - Nesting Circles, My Creative Time - More Stitched Circles
Tools: MISTI - Most Incredible Stamping Tool, Cuttlebug, 3M VHB - 2 sided tape, Xyron Creative Station, Xyron Create a Sticker, Sharpie Water Based Paint - White - Extra Fine Point, Hibiscus - Stickles, Crystal - Stickles, Crafts - Pop Dots

Image coloured with Copic Markers:

Flamingo: RV09, RV06, RV04, RV00, RV000, C5, C8, PrismaColor Premier White Pencil
Balloons: RV19, RV17, RV09, RV000, Y15, Y08, Y04, Y00, PrismaColor Premier White Pencil
Hat: B29, B26, B16
Hats on Background Paper: PrismaColor Premier Pencils - PC905 (Aquamarine), PC1006 (Parrot Green), PC1002 (Yellowed Orange), PC994 (Process Red)
Water and Sky: BG13, BG11, BG10, BG01, B01, B00, B000, B0000

Hope you like it and have a fantastic week!

You can find lots of inspiration from the Design Team Divas at the High Hopes blog, and the High Hopes Rubber Stamps Facebook Fan page plus you can also follow us on
Instagram, Twitter and Pinterest.


Tuesday, June 2, 2020

Welcome Little One!

Happy Tuesday!
I'm hopping in to share this cute baby card with you today using the High Hopes "Kanga & Joey" stamped image. It's always fascinated me how the Joey (baby) fits in the pouch! It's such a cute image to use for a baby card!
I started my card by stamping and colouring the image with my Copic Sketch Markers. I wanted to try to show some texture to resemble fur so I took a washcloth and some Copic Blending Solution and dabbed it on the coloured image. This technique sort of takes some of the colour out and adds dimension. Next using my Brother Cut N Scan machine I cut the image out leaving a white border around it. I am using papers today from the Carta Bella "It's A Boy" 6x6 collection. The sentiment is also from High Hopes and is called "Sm. Little One".
I inked all the edges of my papers with some Tim Holtz Distress Ink in Vintage Photo. A few heart shaped enamel shapes finish off my card.
Copics Used:
E31, E33, E34, E35, E37
R01, R02, R22

Thanks for visiting today!
Happy Stamping!

Monday, June 1, 2020

Lilly the Spring Fairy

Howdy - MichelleO here and I just love a girly flower card! And High Hopes Stamps Lilly the Spring Fairy is the perfect stamp to add flowers and sparkle!


My Fairy is colored with Copics (colors below) and then cut out with a stitched oval die. I found papers from Paper Studio Country Roads collection. The layers are stitched down with a zig zag stitch. The sentiment is also from High Hopes Stamps "Have a fairy special day" that I added a faux mat with a Copic marker. I sewed that layer down then punched out some leaves and Mulberry Roses. Love Roses! And because every fairy needs some sparkle of magic I added Viva Decor Sparkle to her wings.

Copic colors used -


For lots of fun magical images pop over to the High Hopes Stamps web site HERE 

Thanks!