Tuesday, November 29, 2022

Udderly Fabulous Christmas!!!

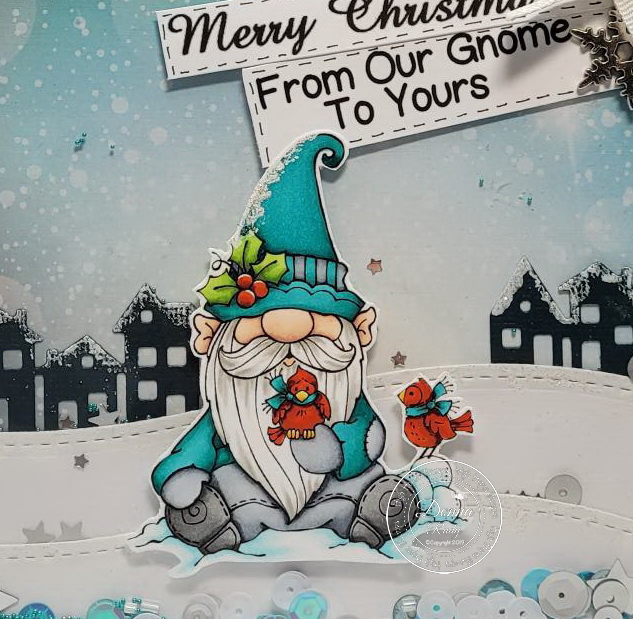
It’s Wednesday, and this week, I made a CAS Christmas card using High Hopes Rubber Stamps Decorating With Charlie - TT060 for the main image and Udderly Fabulous - HDG007 for the sentiment. These little farm friends have started to decorate their tree. Have you started to decorate yours?

To make my card this week, I began with a card base of 4.25" x 5.5" Hammermill - Premium Colour 100 lb. cardstock. I cut Copic Marker X-Press It Blending Card cardstock to be the same size as the base card and then with my MISTI and Memento - Tuxedo Black ink, I stamped the image onto it. I coloured in the image and then placed it back into my MISTI to stamp the sentiment onto it. I applied VersaMark ink and then embossed it with Ranger Embossing Powder White – Extra Fine Detail. I heated this with my Marvy Uchida - Embossing Heat Tool. Snow was added to the sky using a UNIPosca PC-3M White marker. For the snow at the bottom of the card, Brutus Monroe - Snow Paste was applied with a small spatula and DecoArt Glamour Dust was sprinkled over top while it was still wet to give it even more sparkle. Once the snow was dry, I applied double-sided tape and liquid glue to adhere the image directly to the base card.

Card Recipe:

Stamp: Decorating With Charlie - TT060 (High Hopes Rubber Stamps)

Sentiment: Udderly Fabulous - HDG007 (High Hopes Rubber Stamps)

Inks: Memento - Tuxedo Black, VersaMark

Paper: Copic Marker X-Press It Blending Card, Hammermill - Premium Colour 100 lb.

Embossing Powder: Ranger Embossing Powder White – Extra Fine Detail

Tools: MISTI - Most Incredible Stamping Tool, Marvy Uchida - Embossing Heat Tool, DecoArt Glamour Dust, Brutus Monroe - Snow Paste, UNIPosca PC-3M White marker

Image coloured with Copic Markers:

Cow: C8, C6, C4, C3, C1, C00, B60, R30, R20, R00, R000, E95, E93, E53, E51, E50

Mouse: R30, R20, R02, R01, W5, W3, W1, W0, W00

Sky: B05, B04, B02, B01, B00

Tree and Pines: E49, E27, E23, G29

Bauble, Scarf and Collar: R59, R37, R35

Holly and Bell: G43, G29, YG63, YR24, Y35, Y08, E15

Grass: YG67, YG63

Hope you like it and have a fantastic week!

You can find lots of inspiration from the Design Team Divas at the High Hopes blog, and the High Hopes Rubber Stamps Facebook Fan page plus you can also follow us on
Instagram, Twitter and Pinterest.


Santa's Coming!

Ho Ho Ho!
It's hard to believe that Christmas is less than a month away! It always seems to creep up on us! I have to say this is the first year I had my shopping done and presents wrapped by the middle of November! Look at me go LOL. Todays card features the adorable "Christmas Santa" from High Hopes Rubber Stamps!
I started my card by stamping the image onto Copic friendly paper and then stamped the "Coming To Town" sentiment underneath Santa. Next, I coloured my image in using my Copic markers to match papers from the Vicki Boutin "Evergreen and Holly" 6x8 collection. Using a MFT Stitched Octagon die, I cut the image out and piece to put behind it. Of course Santa has to have some sparkle so I added Crystal Stickles to the fur parts on his outfit. Some twine and enamel dots finish off my card.
Copics Used:
Skin & Beard: E11, E21, R20/ C0, C1, C2, C3
Santa's outfit: R22, R24, R27, R29/ C5, C8, C9
Rudolph: E31, E33, E35, E37/ W2, W5
Greens: YG03, YG17
Stars: Y26, Y28
Snow: B0000, B000, B00


Thanks so much for stopping by!

Don't forget to head on over to the High Hopes website and see all Lora's adorable stamps! You can find more inspiration from the Design Team by visiting the High Hopes Blog and Facebook page too!
Happy Stamping!

Monday, November 28, 2022

Precious Nativity

Howdy - MichelleO here today. This week for High Hopes Stamps I picked a very sweet special image. I love the warmth and feeling of this image. This is "Precious Nativity" it is a perfect Christmas image for your cards.

I wanted to keep most all the focus of this card on the image - not the papers and such. So I tried to keep it simple. As simple as I can anyway, I tend to go off track and keep doing more and adding more. This image is colored with my Copics (colors below) and then cut out with a Spellbinders die. The edges are inked with Ranger distress ink to give a warmer vintage feel. The pattern papers are from Making Memories, and I liked the music paper with the sentiment from High Hopes Stamps "Away in a manger

You know you have the song going on in your head - I know I did coloring and putting this all together. A gingham bow on top just for a little embellishment. 

This image just makes me happy! 

Copic colors used -

No matter what direction you want to go with your holiday cards. High Hopes Stamps has got you covered. Or you can just go crazy and make lots of different cards! 

Hope you enjoyed - 


Thursday, November 24, 2022

Christmas Joy

  I can say it is officially winter is here where I live. I am writing this post on Sunday evening after spending the day in what felt like a snow globe. We were "blessed" enough to be in a snowsquall band that blanketed the area from Saturday night until around noon today with a good 20+ cms of snow and blizzard like conditions most of the day. 

I hunkered down in my craft room because really....what else is there to do <smile> and worked on some Christmas cards. I wasn't going to go outside to build a snowman in that weather so I decided to build one on a Christmas card with "Christmas Joy Snowy" from High Hopes Rubber Stamps. 


 I stamped this adorable snowman on alcohol marker friendly paper, coloured him with Copic markers and cut him out using a stitched tag. A combination of patterned paper from Echo Park and Memory Box were perfect for this cutie so I cut them to fit my A2 size card base and rounded the bottom corners. I cut a second tag from matching cardstock to place behind the stamped tag. The tag doesn't have a hole in it so I punched one and put some ribbon through the hole and down the back of tag. 
I glued down my layers and added a branch, and a bow on top of the hole. Some clear sparkle pen added to the branches and star buttons and enamel dots finish off my card. 

Card Details
Stamps - Christmas Joy Snowy (S228) - High Hopes Rubber Stamps
Patterned Paper - Woodsy Plaid - Memory Box, I Love Christmas - Echo Park

Memento Tuxedo Black ink, Hammermill Digital Cover Card Stock, ribbon - Close To My Heart, stitched tag die - Tutti Designs, branch die - Sizzix, enamel dots, clear Spectrum Sparkle pen

Copic Markers
Hat - E34 E35 E29 E49
Holly/Berries - G82 G94 G99 BG99 R05 R14 YR18 R56
Nose - Y21 Y38 YR18
Coat - E41 E42 E57 
Shading - B0000 B000


Thanks for stopping by! Have a super fantastic day!


Tuesday, November 22, 2022

Noel!!

It’s Wednesday, and this week, I made a CAS Christmas card using High Hopes Rubber Stamps Woodland Stocking - TDG011. We always had stockings under the tree filled with goodies and our names on each of the stockings. Even our dogs had their own stockings growing up. LOL!

To make my card this week, I began with a card base of 6" x 6" using AC Cardstock - White. I adhered Recollections - Christmas Cottage 6 in. x 6 in. cardstock to the base front using double-sided tape. Using my Cuttlebug and paper from Copic Marker X-Press It Blending Card, I die cut the frame with Waffle Flower - Nesting Square dies. The image was stamped onto the die cut using my MISTI and Memento - Tuxedo Black ink. I coloured in the image and then inked around the edges with a NUVO Glitter Marker - Golden Honey. I added some U-Line double-sided tape to the back of the coloured image and popped it up into the centre of the diamond. To finish off the card, I added 4 pop dots from YNS - Happy Harvest Gumdrops.

Card Recipe:

Stamps: Woodland Stocking - TDG011 (High Hopes Rubber Stamps)

Inks: Memento - Tuxedo Black, Tim Holtz Distress Ink - Pine Needles

Paper: Copic Marker X-Press It Blending Card, AC Cardstock - White, Recollections - Christmas Cottage (12" x 12")

Die Cuts: Waffle Flower - Nesting Square dies

Tools: MISTI - Most Incredible Stamping Tool, U-Line double-sided tape, NUVO Glitter Marker - Golden Honey, Cuttlebug, YNS - Happy Harvest Gumdrops

Image coloured with Copic Markers:

Cheeks: RV00, RV000

Eyes and Noses: Sakura Glaze - Black, Gelly Roll Sakura #5 Pen

Snowman: BV20, B0000, Y38, YR31, C9, C7, C5, B04, B02, B01, Colorless Blender

Owl: E55, E53, E51, W0, W00, Y38, YR31

Fox: E99, E97, E08, N1, N0, R02, R01

Penguin: C9, C7, C5, C3, E42, E41, YR31, Y38

Reindeer: E51, E50, E33, E31, E30, E29, E27, E25, E23, E21, R02, R01

Noel and Ribbon: YR27, YR23, Y15, Y11, Y00

Tree Branch and Pines: E29, E25, E23, G49

Holly, Leaves and Pine Needles: G99, G29, G21, YG67, YG17, R89, R27, R24

Sock: B04, B02, B01, B00, R59, R37, R35, C1, G29

Ribbon: R59, R37, R35

Hope you like it and have a fantastic week!

You can find lots of inspiration from the Design Team Divas at the High Hopes blog, and the High Hopes Rubber Stamps Facebook Fan page plus you can also follow us on
Instagram, Twitter and Pinterest.


Snow Couple!

Hello!
Well we just had a blast of winter so these adorable Snowmen are perfect for my post today! We sure got spoiled the beginning of November with warm Fall weather so to all of sudden get some cold weather was a shock lol! I remember when the kiddies were little, the first snowfall they'd rush out to make snowmen even if there was hardly any snow. I love anything "snow people" related and this cutie called "Snow Couple Block" from High Hopes Stamps just makes me feel happy!
I started my card design by stamping the image onto alcohol friendly paper and coloured the image in with  my Copic Sketch markers. I love the colours and snowflake print from the Sunny Studios "All Is Bright" 6x6 collection. My design is simple, with just layers of Designer Paper and the image out out with a MFT Zig Zag die. I kept the card flat, no foam tape this time for easy mailing. A few enamel dots and some Crystal Stickles finish off my card today.
I decorated the inside of my card using some of the scraps from the paper collection and a MFT Border die. The HH Sentiment called "Snowfolk" goes nicely with the Snow Couple Block.
Copics Used:
Snowmen: N0, N1, N5/ YR04, YR09
Hat & Buttons: N5, N6, N8
Boy's Scarf & Mitts: E23, E25, E29/ BG 49, BG53, BG57
Girl's Scarf & Mitts: RV17, RV52, RV55/ G28, YG17, YG03
Birds: R22, R24, R27, YR04

Thanks so much for stopping by!

Don't forget to head on over to the High Hopes website and see all Lora's adorable stamps! You can find more inspiration from the Design Team by visiting the High Hopes Blog and Facebook page too!
Happy Stamping!


Monday, November 21, 2022

Cocoa Gnome

Howdy - MichelleO here today - and tt has gotten chilly here where I am! Time to pullout the Hot Cocoa and Cookies! And with this adorable image from High Hopes Stamps you also get a cute Gnome! This is Cocoa Gnome -  

 
Don't you love that big nose? LOL - I colored with my Copics (colors below). Digging through some older papers I found some Making Memories papers that I liked the dark warm red colors. Not a typical Christmas paper, but I still thought it worked well with this Gnome. For something a little different for me I used a Fiskars corner slot punch to hold the image in the mat. You ever notice when you have a lot of craft items you forget about some favorites. Use to use that punch a bunch back in the day. 
 
For my sentiment I decided that the High Hopes Stamps "Cookies and Cocoa Script" sentiment worked perfectly with this image.  

Copic colors used -

Had so much fun coloring up this image. I could hear the cold front blowing outside my window and coloring up a Gnome in Cocoa just felt warm! 

Make sure to pop over to the High Hopes Stamps web site HERE and see all the fun you could be having coloring up great images! 


Thursday, November 17, 2022

From Our Gnome

 I have the shakes this week! As in I made what I am calling a full front shaker card. It is the first time I have tried this style and it was a ton of fun! Of course I  would change a few things next time but over all I think my card featuring "Snowy Gnome" from High Hopes Rubber Stamps will make one of the young people or adults on my card giving list smile!


 I started my card by stamping Snowy Gnome on alcohol friendly paper, colouring him with Copic markers and hand fussy cutting him leaving a thin white edge. I set him aside and found a snowy background paper from Whimsy Stamps and cut it to fit my 5" x 5" base. I die cut some houses and added a bit of white acrylic paint to the roofs and some glitter so it looked like snow. While that was drying I cut some stitched snowy hills and added paint and glitter to the edges as well. I glued down the snow hills and houses on the base and set it aside.

To create my full front shaker, I cut a page protector in a square half an inch larger all the way around then my base. I glued down three sides and added some seed beads, sequins and a glitter mix and then glued the last side closed. All of this glued down to the card base. 

I glued my gnome down in the middle of the card and added two sentiments, a silver snowflake charm and a bow to the corner. I added some black stitch lines around the sentiments to help them stand out a bit. Glitter dots finish of my card.

Card Details
Stamps - Snowy Gnome (TLF024) - High Hopes Rubber Stamps
Sentiment - Scripty Merry Christmas (FLL007), From Our Gnome (FDG009)- High Hopes Rubber Stamps
Patterned Paper - Blurry Flurries - Whimsy Stamps

Memento Tuxedo Black ink, Hammermill Digital Cover Card Stock, stitched hill die - Whimsy Stamps, house die - Gina Marie Designs, ribbon, glitter - Hero Arts, page protector, white acrylic paint, glitter dots, sequins - stash, seed beads - Your Next Stamp, sequin mix - Lucy's Cards

Copic Markers
Skin - EOO E21 E11 E04    
Birds - Y11 Y35 Y38 R05 R17 YR18 R59
Clothing -BG45 BG15 BG72 BG75 C1 C2 C4 C7 
Beard - W1 W2 W3
Boots - T2 T4 T6 T7 
Holly and Berries - YG01 YG03 YG17 BG99 RO5 R17 YR18 R59
Snow - BG000 BG01 blender


Thanks for stopping by! Have a super fantastic day!


Tuesday, November 15, 2022

Winter Friends!!

It’s Wednesday, and this week, I made a Christmas card using High Hopes Rubber Stamps Winter Friends - TT048 for the main image and Jingle All the Way - H040, for the sentiment. Snowmen are one of my favourite images to colour and how adorable is this happy snowman singing to his little friend?

To make my card this week, I began with a card base of 6" x 6" using AC Cardstock - White. I adhered American Crafts - "Kringle and Co" 6 x 6 in. cardstock to the base front. Red and green cardstock were cut to the sizes of 6" x 1.25" and 6" x 1-1/8" from some spare paper I had. I adhered the green to the red using double-sided tape and some glue to allow me to centre it. The combined strip was put through a Xyron Create a Sticker to keep it flat. I added this combined strip to the card approximately a .25" up from the bottom. Tim Holtz Distress Ink - Rustic Wilderness was used to ink around all of the edges of the card and it was set aside to dry.

Using my Cuttlebug and paper from Copic Marker X-Press It Blending Card, I die cut the frame with Gina Marie Designs - Loopy Oval die cuts. The image was stamped onto the die cut using my MISTI and Memento - Tuxedo Black ink. I coloured in the image and then added the snow in the sky using a Gelly Roll Sakura #10 Pen. Stickles - Crystal was added to the snow on the ground and along the branches to give it some sparkle.  I set the image to the side to allow the Stickles time to dry.

I cut a piece of Recollections Christmas Ink Jet Printable Glitter Paper to the size of 4" x 1". Using my MISTI once again, I stamped the sentiment onto it using Memento - Tuxedo Black ink and then cut a fish tail on each end. U-Line double sided tape was added to the back of the sentiment and then it was popped up and centred in between the red and green stripe. U-Line double-sided tape was added to the back of the image and it was popped up onto the card above the sentiment once the Stickles had dried. Lastly, I die cut 2 pinecones and some pine leaves using my Cuttlebug and dies from Stampin' UP! - Pretty Pines Thinlets die set. Liquid glue was used to pieced them altogether. I adhered these to the 2 upper corners of the card and then applied some Stickles - Crystal to the leaves to finish off the card.

Card Recipe:

Stamps: Winter Friends - TT048 (High Hopes Rubber Stamps)

Sentiment: Jingle All the Way - H040 (High Hopes Rubber Stamps)

Inks: Memento - Tuxedo Black, Tim Holtz Distress Ink - Rustic Wilderness

Paper: Copic Marker X-Press It Blending Card, AC Cardstock - White, American Crafts - "Kringle and Co" 6 x 6 in. (15.2 cm x 15.2 cm), Recollections Christmas Ink Jet Printable Glitter Paper

Die Cuts: Gina Marie Designs - Loopy Oval, Stampin' UP! - Pretty Pines Thinlets (141851)

Tools: MISTI - Most Incredible Stamping Tool, U-Line double-sided tape, Stickles - Crystal, Cuttlebug, Xyron Create a Sticker

Image coloured with Copic Markers:

Snowman: BV20, B0000, YR68, Y38, Y18, R29, R24, RV00, Colorless Blender

Snowman Hat, Mittens and Scarf: G99, GY67, YG63, YG61, R59, R37, R35

Snowman Boots and Buttons: C9, C7, C5, C3

Bird: R46, R14, R08, Y17

Bird Hat and Scarf: G99, YG67, YG63, R59, R37, R35

Bells: YR27, YR23, Y15, Y11, Y00

Tree Branch and Pines: E29, E25, E23, G49

Snow: BV20, B0000, Colorless Blender, Gelly Roll Sakura #10 Pen, Stickles - Crystal

Sky: B04, B02, B01, B00

Hope you like it and have a fantastic week!

You can find lots of inspiration from the Design Team Divas at the High Hopes blog, and the High Hopes Rubber Stamps Facebook Fan page plus you can also follow us on
Instagram, Twitter and Pinterest.


A Few Good Men!

Happy Tuesday!
Today I am sharing with you a quick and easy card! The "Good Men Garland" stamp from High Hopes Rubber Stamps fits perfectly across a 4.25" x 5.5" card base and is quick and easy to colour! 
To start my card, I stamped the image onto Copic friendly paper and coloured it in to match my designer papers. The papers are from the Doodlebug "Night Before Christmas" 6x6 collection. I love the little gingerbread men in the papers, too cute! I used a Pretty Pink Posh border die to cut out underneath my stamped image and designer paper. A pretty green strip of ribbon and bow finish off my card.
Copics Used:
E31, E33, E35
R24, R29, YG25
RV06, RV09, BG000

Thanks so much for stopping by!

Don't forget to head on over to the High Hopes website and see all Lora's adorable stamps! You can find more inspiration from the Design Team by visiting the High Hopes Blog and Facebook page too!
Happy Stamping!


Monday, November 14, 2022

Callie Christmas Kitty

Howdy - 

Time to get those Christmas Cards done! And High Hopes Stamps has my very favorite images!  How can you not love Callie Christmas Kitty?? It reminds me of our kitties... especially Mercedes.. sigh. 

Normally for Callie I go very bright - but for this one I went with a vintage look. I colored with my Copics (colors below) and then I inked around the edges with Ranger Tea Dye ink to "age" it some. But then I just had to add a little bling on those ornaments and candy with Nuvo Decor Glitter - ornaments just have to sparkle right? Then my papers are from Making Memories Christmas - love the vintage country feel of them. I sewed down all the layers with a border punch from Martha Stewart Lattice punch. And then one of my all time favorite Christmas sentiments with any kitty holiday card - "Meowy Christmas!

Love how this card turned out! Even if this kitty is in a little trouble. 

Copic cards used -


To find so many fabulous images for your Christmas cards - click HERE to jump straight over and fall in love! 

Thanks so much!


Thursday, November 10, 2022

Penguin Christmas Wishes

  I am working furiously to get my Christmas cards done. I am not sure it will happen but I have hope! <smile> Last week I shared that I have a lot of people on my card giving list that love snowmen.......well, I have just as many that like penguins so I am really glad that High Hopes Rubber Stamps has some many penguins perfect for the job!

My card features "Waving Penguin" floating down the river on a hand drawn piece of ice with the "Mountains" in the background which I have coloured to look like icebergs. 


 After stamping the mountains and adorable penguin on alcohol marker friendly paper I coloured them with Copic markers and hand fussy cut them. The piece of ice he is floating on is hand drawn, coloured and fussy cut. I used some patterned paper from Echo Park for the card base and some Lawn Fawn paper to create the river. The snow banks for the river edge were cut with a curved die and I added some Prismacolor pencils to the edges to give them some depth. An icicle border and some sparkly snowflakes add the the wintery feel of the card.
 
I stamped the sentiment and added it to some matching cardstock and added a bow and some holly leaves to the corner. The penguin has Star Dust Stickles added to the polka dots on his scarf and the stripes on his hat and is added to the card with foam pop dots. Some enamel dots finish off the card.


Card Details
Stamps - Waving Penguin (RLF007), Mountains (TDG007) - High Hopes Rubber Stamps
Sentiment - Penguin Greeting (K051)- High Hopes Rubber Stamps
Patterned Paper - Winter - Echo Park, Water Colour Wishes - Lawn Fawn

Memento Tuxedo Black ink, Hammermill Digital Cover Card Stock, snowflake die - Memory Box, ribbon, foam pop dots, holly die - Your Next Stamp, enamel dots, Star Dust Stickles 

Copic Markers
Penguin - T4 T6 T8 T9 Y11 Y15 YR23 Y26 C1 C2
Hat - C1 C2 C4 C7 R05 R56 R59 G14 G07 G28 BG99 G46 G28 BG99
Icebergs - B21 B93 B95
Prismacolor Pencils - Light Cerulean Blue, Powder Blue


Thanks for stopping by! Have a super fantastic day!


Tuesday, November 8, 2022

Carolers - Joy To The World!!

It’s Wednesday, and this week, I made a Christmas card using High Hopes Rubber Stamps Carolers - TT011 for the main image and Joy to the World - GLL012, for the sentiment. Seeing these carolers reminds me of my younger days when we would go visiting and sing Christmas carols at our cousins and our parent's friends' houses.

To make my card this week, I began with a card base from Recollections - Winter 4.25" x 5.5 (Assorted Box of Cards). Using my Cuttlebug and paper from Crafter's Companion - Luxury Cardstock - Ice Blue Pack, I die cut the snowflake border with Lawn Fawn - Snowflake Border die cuts. Using the same paper, I cut a thin strip .25" x 5.5". With Lawn Fawn - Sparkle Cardstock in "Pixie Dust", I cut a strip 1" x 5.5". Using double-sided tape, I attached the 1" strip directly onto the base card. I ran the other strip through my Xyron Create a Sticker and attached it to the card next to the 1" strip. I added liquid glue to the backs of each of the snowflakes for the snowflake border and adhered them over top of the larger strip. Tim Holtz Distress Inks - Tumbled Glass and a finger dauber were used to ink around all of the edges of the card.

With my Cuttlebug and dies from My Favourite Things - Die-namics - Elegant Rectangle Stax, I die cut a large rectangle out of Copic Marker X-Press It Blending Card cardstock. The image was stamped onto the die cut using my MISTI - Most Incredible Stamping Tool and Memento - Tuxedo Black ink. I coloured in the image and then added the snow in the sky using a Gelly Roll Sakura #10 Pen. Cosmic Shimmer Fluffy Stuff was added to the trim of the girl's jacket and then heat set with a Marvy Uchida - Embossing Heat Tool to puff it up. Crystal - Stickles was added on top of this and also along her dress hem. DecoArt Snow-Tex sprinkled with DecoArt Glamour Dust and a spatula were used to create the snow on the bottom of the image. Crystal - Stickles was added to add some extra sparkle and give some highlights. Wink of Stella - Clear was added on top of the music books. The sentiment was stamped onto Copic Marker X-Press It Blending Card using my MISTI and Memento - Northern Pine ink. It was then die cut using my Cuttlebug and Poppystamps - Christmas Quotes dies. Tim Holtz Distress Ink - Rustic Wilderness was used to ink around the edges. I added U-Line double-sided tape to the back of the sentiment and finished image and popped them both up onto the card. Lastly, I added Ranger - Snowflake Glitter with liquid glue to finish it off.

Card Recipe:

Stamps: Carolers - TT011 (High Hopes Rubber Stamps)

Sentiment: Joy to the World - GLL012 (High Hopes Rubber Stamps)

Inks: Memento - Tuxedo Black, Tim Holtz Distress Ink - Rustic Wilderness, Memento - Northern Pine, Tim Holtz Distress Inks - Tumbled Glass

Paper: Copic Marker X-Press It Blending Card, Recollections - Winter 4.25" x 5.5 (Assorted Box of Cards), Crafter's Companion - Luxury Cardstock - Ice Blue Pack, Lawn Fawn - Sparkle Cardstock in "Pixie Dust" (8.5" x 11")

Die Cuts: My Favourite Things - Die-namics - Elegant Rectangle Stax - MFT-1268, Lawn Fawn - Snowflake Border (#LF2431), Poppystamps - Christmas Quotes

Snow: DecoArt Snow-Tex, DecoArt Glamour Dust, Crystal - Stickles

Tools: MISTI - Most Incredible Stamping Tool, U-Line double-sided tape, Cosmic Shimmer Fluffy Stuff, Crystal - Stickles, DecoArt Glamour Dust, Cuttlebug, Marvy Uchida - Embossing Heat Tool, Xyron Create a Sticker, Ranger - Snowflake Glitter

Image coloured with Copic Markers:

Skin: E21, E11, E04, E00, E000, R30, R24, R21 (Eyes: Gelly Roll Sakura #10 Pen, Sakura Glaze - Black)

Hair: E15, Y38, Y21, YR23, E47, E44, E43, E42

Boy Mitts, Scarf and EarMuffs: BG09, BG05, BG02, BG01

Boy Jacket: R59, R37, R35

Boy Jeans: B26, B23, B21

Boy Boots: E27, E25, E23, E21,

Girl's Coat and Boots: BG72, BG57, BG32, BG11, Cosmic Shimmer Fluffy Stuff, Crystal - Stickles

Girl Dress and Leggings: YG67, YG63, YG61, G19, G16, G14, Crystal - Stickles, Gelly Roll Sakura #10 Pen

Girl EarMuffs and Mittens: YG67, YG63, YG61

Song Books: YR23, Y15, Y11, Y00, Wink of Stella - Clear

Bird: R46, R14, R08

Cat: T9, T7, T5, T4, R01

Dog: E37, E35, E33, R24

Sky: B99, B97, B95, B93

Hope you like it and have a fantastic week!

You can find lots of inspiration from the Design Team Divas at the High Hopes blog, and the High Hopes Rubber Stamps Facebook Fan page plus you can also follow us on
Instagram, Twitter and Pinterest.


Nordic Snowman!

Hello!!!
Just popping in with another card to celebrate the "Christmas/Winter" theme the Design Team is using this month over at High Hopes Rubber Stamps.  I decided to use this cutie called "Nordic Snowman" and paired it with the HH "Snow People Saying" sentiment.
To start making my card, I stamped the image onto Copic friendly paper. I fell in love with these papers from the Photo Play's "Tula and Nobert's Christmas Party" 6x6 collection. Non-traditional.... but works for a winter themed card as well. I coloured the image to match the papers and used a Studio Katia "Half Stripped Cover" to pop my image up on. It was fun piecing the different papers back into the die. A bow (MFT Bountiful Bows die) and some Crystal Stickles finish off my card.
Copics Used:
C00, C1, C2
YR04, YR09
E23, E25
BG05, BG06, BG09, BG70, BG78
G05, G07, G09, G24, YG17
B000

Thanks so much for stopping by!

Don't forget to head on over to the High Hopes website and see all Lora's adorable stamps! You can find more inspiration from the Design Team by visiting the High Hopes Blog and Facebook page too!
Happy Stamping!

Monday, November 7, 2022

Little Drummer Boy

Howdy - MichelleO here today - Can you believe how close the Christmas is?? Today for High Hopes Stamps I have a sweet Christmas Stamp - "Little Drummer Boy"  I think he is just adorable! 

 
I decided to go a bit more simple a little more "manly" like card.   I colored my little drummer with my Copics (colors below) then found a piece of older stripe paper from my stash of scraps. The edges are sewn down with a zig zag stitch. Then for some reason my large Martha Steward leaf border was on my desk. It seemed to want to be used - so I punched out a green card stock border. The sentiment is High Hopes Like the natural feeling of it. The image and sentiment "Pa Rum Pa Pum Pum" LOVE this sentiment ... I always find myself singing while working with it!   The image and sentiment are matted with the same dark brown card stock used for the base and sewed down with a straight stitch. 

Simple - but love how it all came together. 

Copic colors used - 


Now you just have to pop over to the High Hopes Stamps web store HERE and see all the fun you could be having with their images! so so so much to fall in love with! 


Thank you - 


Thursday, November 3, 2022

Snow Sweet Christmas

 My Mom loves snowmen. She had a large collection of them but had to downsize it last year when they moved in to a smaller home. It was hard on her but I have decided that I will start a new snowman collection for her.......in the form of cards! They don't take up much room - I know she keeps my cards <wink> and if I make her a snowman card each Christmas, she will be adding to her collection. Shhhh, don't tell her - this will be our little secret okay?

This year I decided to use "Snow Sweet Snowlady" from High Hopes Rubber Stamps for Mom's card. I think she is adorable! and I know Mom too and she loves turquoise so hopefully she will love this card. 


 I stamped this adorable snow lady on to alcohol marker friendly paper, coloured her with Copic markers and hand fussy cut her. I added some dots to her cheeks with a white gel pen, some clear sparkle pen to her poinsettia and some silver Wink of Stella to her hat band, the centre of the poinsettia and the centre of her candy buttons. I added the silver to bring out the silver in the patterned paper I used from Stampin' Up - what looks grey on the paper is actually shiny silver.
 
After cutting the snowflake paper to fit the A2 size card base, I laid a snowflake border die on the left edge of the card and cut it out. Next, I die cut the same snowflake border out of silver glitter paper and in laid it on the card. Then came the challenging part........putting all the tiny stripe pieces on to the left side of the card - a puzzle for sure! I haven't mastered photographing a card with glitter paper on it but it is very sparkly in real life. 

I used a simple wavy border die to cut a few snow banks to put behind the stamp to ground her, stamped the sentiment and added a few matching enamel dots to finish off the card. 

Card Details
Stamps - Snow Sweet Snowlady (S081) - High Hopes Rubber Stamps
Sentiment - Magic of Christmas (H258)- High Hopes Rubber Stamps
Patterned Paper - Winter Frost - Stampin' Up

Memento Tuxedo Black ink, Hammermill Digital Cover Card Stock, Spectrum Clear Sparkle pen, wavy border die - Your Next Stamp, Snowflake border die - Whimsy Stamps, Silver Wink Of Stella, white gel pen, enamel dots

Copic Markers
Hat/Scarf - BG32 BG13 BG49 BG75 BG99 
Bird - Y11 Y15 Y17 B000 B01 B02 B05
Poinsettia/Candy Cane/Buttons - R05 R27 R37 R59
Snowlady Shadow - B00 
Nose - T2 T4 T6 T8
Cheeks - R20


Thanks for stopping by! Have a super fantastic day!