Tuesday, August 30, 2022

By The Moonlight!!

It’s Wednesday, and this week, I made a Hallowe'en card using High Hopes Rubber Stamps By The Moonlight - TT047 for the image and Block Happy Halloween - FF049 for the sentiment. These little friends are ready for some spooky fun on Hallowe'en.

To make my card this week, I began with a card base of Hammermill - Premium Colour 100 lb., cut and scored to be 5.5" x 4.25". I die cut the background from Stampin' UP! - Magic In This Night Designer Series Paper to be the same size as the base. Using a combination of Tim Holtz Distress Ink - Black Soot, Villainous Potion, Seedless Preserves and Fossilized Amber and finger daubers, I added some extra colour to the background. Martha Stewart - Hallowe'en Washi Tape was placed across the bottom. I cut Doodlebug Design Inc. - Hallowe'en Parade cardstock to the size of 1-1/8" x 4.25". I ran this through my Xyron Create a Sticker and adhered it to the base card above the washi tape.

I stamped the main image and sentiment onto Copic Marker X-Press It Blending Card cardstock using my MISTI and Memento - Tuxedo Black ink. The main image was a little short for the full width of the card so I added some double-sided tape to a couple scraps of Copic Marker X-Press It Blending Card cardstock and adhered them to both sides of the fence. The image and sentiment were then both coloured in. The image was fussy cut and U-Line double-sided tape was applied to it. I popped it up onto the card and then cut off the excess from the fence on both sides.  I cut around the sentiment and then ran it through my Xyron Create a Sticker and applied it to a piece of Recollections - Black cardstock. Once again, I used my cutter to go around the sentiment, leaving a slight border. U-Line double-sided tape was applied to the back of the sentiment and it was popped up onto the striped paper background to complete the card.

Card Recipe:

Stamps: By The Moonlight - TT047 (High Hopes Rubber Stamps)

Sentiment: Block Happy Halloween - FF049 (High Hopes Rubber Stamps)

Inks: Memento - Tuxedo Black, Tim Holtz Distress Ink - Black Soot, Villainous Potion, Seedless Preserves and Fossilized Amber

Paper: Copic Marker X-Press It Blending Card, Hammermill - Premium Colour 100 lb., Doodlebug Design Inc. - Hallowe'en Parade (6 in. x 6 in.), Recollections - Black cardstock, Stampin' UP! - Magic In This Night Designer Series Paper (12" x 12")

Tools: MISTI - Most Incredible Stamping Tool, U-Line double-sided tape, Xyron Create a Sticker

Image coloured with Copic Markers:

Black Cat: C8, C6, C4, C3, BV17, R22, R30

Mouse: W5, W3, W1, R02, R00

Bats: BV25, BV23

Fence: E49, E27, E25, E23, E21

Moon: Y00, BV20, C1, C00, Colorless Blender

Sentiment: YR04, Y17, V09, V06, V04, YG23, YG05

Hope you like it and have a fantastic week!

Check out more adorable Fall images at High Hopes Rubber Stamps!

You can find lots of inspiration from the Design Team Divas at the High Hopes blog, and the High Hopes Rubber Stamps Facebook Fan page plus you can also follow us on
Instagram, Twitter and Pinterest.


Trick or Treat!

Hello!!!
Look at this adorable bear all dressed up to go trick or treating! This is the sweet "Angel Bear Clown" from High Hopes Rubber Stamps. This cutie is the last card I made for the High Hopes Fall/Halloween theme for August. I've sure had fun playing with the adorable images from High Hopes!
I stamped my image onto Copic friendly paper using some Memento Black Ink. Using a MFT Zig Zag die, I cut the image out. Lots of designer paper layers and some banner die cuts from the Doodlebug "Ghost Town" and Candy Carnival" 6x6 collections. were used. I added some glitter pen to the wings for a bit os sparkle. The HH "Trick or Treat" sentiment ties my image and card design together.
Copics Used:
Bear: E21, E23, E25, E29, E59
Wings: B0000, B000, B00
Pumpkin: YR02, YR04, YR09
Pinks: RV04, RV06, RV09, RV55
Purple: V04, V05, V06, V09
Green: YG03, YG17
Yellow: Y35, YR23

Don't forget to head on over to the High Hopes website and see all Lora's adorable stamps! You can find more inspiration from the Design Team by visiting the High Hopes Blog and Facebook page too!
Happy Stamping!

Monday, August 29, 2022

Pumpkin Patch

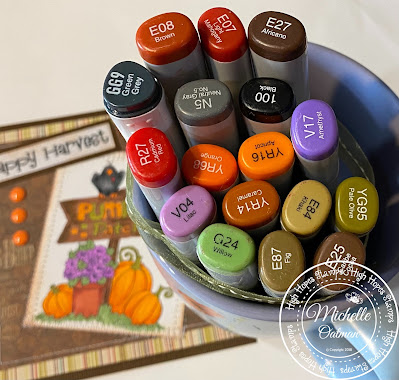
Howdy - MichelleO here today and I am trying to feel Fall! Coloring it up seems to work for now. This image is from High Hopes Stamps and is called "Pumpkin Patch" - love that potted flowers next to those pumpkins!  

 
Looking back I probably should have colored the flowers red to match the papers better, but I was really in a purple flower mood... LOL I colored with my Copics (colors below) and then went to find papers to match up (see how the red should have been my choice) The sentiment is also from High Hopes Stamps - Happy Harvest
 
Two pieces in my scraps that felt fall like. stripes from SEI and then that fun brown circle paper from Farmers. A dark brown card stock for a base, and everything is sewn down after inking around the edge of the image with Rangers Tea Dye ink. Makes that thread pop I think. After looking high and low for the pumpkin buttons I know I have - I gave up and found three orange enamel dots instead. I'll find those pumpkin buttons in winter or spring I am sure. 
 
Copic colors used -

Love this image - it just has that fall crisp air feel to it. There are so many from High Hopes that just make me feel the season. Have you visited the website and fallen in love with so many? Pop over HERE and you will I promise! 

thanks! 


Thursday, August 25, 2022

Happy Halloween

  All month long the High Hopes design team has been sharing gorgeous fall and Halloween inspiration. I can't believe I am sharing my last card for the month already! so I'm sneaking in a Halloween card featuring "Angel Bear Pumpkin Costume and Haunted House" from High Hopes Rubber Stamps. He is looking very nervous about trick or treating at this haunted house!


After stamping on alcohol marker friendly paper I coloured them with Copic markers. I didn't use all of the haunted house stamp because I wanted the house and moon to be the focus of my background. I cut to size and added a black frame I cut using a square die and popped it up with foam pop dots. 
After the background was added to a piece of patterned paper from the Spookville pad from We R Memory Keepers I glued it down on the card base. Next I added the hand fussy cut Angel Bear with pop dots to the edge of the frame. I added a die cut spider web and bats for some added spookiness. A sentiment and enamel dots finish off my spooky scene.

Card Details

Stamps - Angel Bear Pumpkin Costume (R138)Haunted House (U010) - High Hopes Rubber Stamps
Sentiment - Happy Halloween Script (F232) - High Hopes Rubber Stamps
Patterned Paper - Spookville - We R Memory Keepers

Spider and bat die - Your Next Stamp, 3D foam pop dots, enamel dots

Pumpkin - Y35 Y38 YR16 YR18 Y11 Y15 Y18
Body - E31 E34 E35 E29
Nose - T4 T6 T8
Stem - E23 E57 E59
Ears - R000 R20 R21
Bow tie - V15 V17 V99
Wings - V20 V22
Haunted House
Sky - V22 V25 BV23 BV25
Fence - C1 C2 C4 C5
Tree and Path E34 E57 E59
Bats - T4 T6 T8
Windows - Y11 Y15 Y18
House - E71 E74 E79
Moon - E40 E41 E43
Grass - G46 G28 G29 BG99

Thanks for stopping by! Have a super fantastic day!


Tuesday, August 23, 2022

Boo Pals!!

It’s Wednesday, and this week, I made a Hallowe'en card using High Hopes Rubber Stamps Boo Pals - SS007 for the image and Boo-tiful Day - E233 for the sentiment. Hallowe'en is now only a few months away! Wow! Where has this year gone? Time seems to be flying by so fast!

To make my card this week, I began with a card base of Hammermill - Premium Colour 100 lb. cardstock, cut and scored to be 5.5" x 4.25". I cut the background paper from Recollections - Black cardstock to be the same size as the base card and attached it using double-sided tape. Using My Creative Time - Rectangle Frame Layers and my Anna Griffin Empress Mini Machine, I die cut Doodlebug - Pumpkin Party cardstock. I just love these little ghosts. With a finger dauber and Tim Holtz Distress Ink - Villainous Potion, I inked around all of the edges of the die cut. U-Line double-side tape was applied to the back of this piece and I popped it up onto the base card. Using the same cutting machine, I die cut Copic Marker X-Press It Blending Card cardstock using Nestabilities Dies - Deckled Rectangles - Large.

I stamped the main image onto the Copic Marker X-Press It Blending Card die cut using my MISTI and Memento - Tuxedo Black ink and coloured it in. I created my own moon shape using a 2" circle mask that I had created earlier with a Fiskars hand punch. The eyes and nose for the cat and ghost were added in using a Sakura Glaze - Black pen. I ran the coloured image through my Xyron Creative Station and attached it to Recollections - Black cardstock. I didn't have a larger die of the same shape, so I put the piece that I had adhered together into my Brother Scan 'N Cut and created a .08" border around it. This created the small black border to make the image pop. The sentiment was stamped onto a scrap piece of Copic Marker X-Press It Blending Card cardstock using my MISTI and Memento - Tuxedo Black ink and then it was die cut using my cutting machine and Poppystamps - Christmas Quotes. Tim Holtz Distress Ink - Wilted Violet and a finger dauber were used to go around the die cut.

The card was now ready to assemble. I added U-Line double-sided tape to the back of the frame and sentiment and popped them both up onto the card to finish it off.

Card Recipe:

Stamps: Boo Pals - SS007 (High Hopes Rubber Stamps)

Sentiment: Boo-tiful Day - E233 (High Hopes Rubber Stamps)

Inks: Memento - Tuxedo Black, Tim Holtz Distress Ink - Wilted Violet, Tim Holtz Distress Ink - Villainous Potion

Paper: Copic Marker X-Press It Blending Card, Hammermill - Premium Colour 100 lb., Doodlebug - Pumpkin Party (12" x 12"), Recollections - Black cardstock

Die Cuts: My Creative Time - Rectangle Frame Layers, Spellbinders Nestabilities Dies - Deckled Rectangles Large (S4-202), Poppystamps - Christmas Quotes

Tools: MISTI - Most Incredible Stamping Tool, U-Line double-sided tape, Anna Griffin Empress Mini Machine, Sakura Glaze - Black, Brother Scan 'N Cut, Xyron Creative Station

Image coloured with Copic Markers:

Black Cat: C8, C6, C4, C3, R30, R22, (Eyes and Nose - Sakura Glaze - Black)

Ghost: BV20, C0, Colorless Blender, (Eyes and Nose - Sakura Glaze - Black)

Tombstone: W5, W3, W1, W0, 100

Grass: G99, G94, G21, YG97, YG17

Sky: BV29, BV25, BV23. BV20

Moon: BV23, BV20, C1, C0, C00, Y00, Colorless Blender

Hope you like it and have a spooktacular week!

You can find lots of inspiration from the Design Team Divas at the High Hopes blog, and the High Hopes Rubber Stamps Facebook Fan page plus you can also follow us on
Instagram, Twitter and Pinterest.


Happy Halloween!

Happy Tuesday!
Tuesday means it's my day to be here on the HH Blog! Carrying on with the Fall/Halloween theme I decided to use "Pumpkin Treat" from High Hopes Stamps. He was quick and easy to colour and makes an adorable card quickly!
To start my card today, I stamped the image using Memento ink on Copic friendly paper. Then using my Copic Sketch Markers, I coloured my image in. I chose papers from the Bella Blvd. "Spooktacular" 6x8 collection. I cut the image out using a Memory Box Stitched Scallop Circle die and popped it up using foam tape. I cut the "Happy Halloween Script" sentiment out using a die from the Studio Katia Darling Ribbon and Dotted Frames set. A scattering of enamel dots and Stickles on the yellow parts finish off my card.
Copics Used:
Pumpkin: YR14, YR15, YR16, YR18
Purple: BV02, BV04, BV08
Yellow: Y19. YR23
Green: YG63, YG67

Don't forget to head on over to the High Hopes website and see all Lora's adorable stamps! You can find more inspiration from the Design Team by visiting the High Hopes Blog and Facebook page too!
Happy Stamping!


Monday, August 22, 2022

Lg. Guard Duty Rudy

Howdy - MichelleO here today -

Coloring up a little Fall today with High Hopes Stamps - Lg. Guard Duty Rudy,  such a cute little scarecrow.  

Sweet guy is colored with my Copics (colors below) and then highlighted with white paint pen. I found some older papers from Simple Stories Generations collection. Loved the warm fall feel of these papers with the scarecrow. I sewed down the layers, inked up the edges of the image, and then added the High Hopes Stamps sentiment "Happy Fall Y'all!" - a favorite fall sentiment as it goes with so many things and I just love that font! Three enamel dots as they were on my desk and matched perfectly! 

Copic colors used -

There are so many fabulous images at High Hopes Stamps to fall in love with! They make me smile and happy when coloring. Click HERE to see the High Hopes Stamp Web Store . 


Thursday, August 18, 2022

If Friends Were Pumpkins

 Every once and awhile, I like to shake things up in my crafty brain and challenge myself to use a stamp for a different occasion then it was intended for. "Pumpkin Buddies" from High Hopes Rubber Stamps is a Halloween themed stamp but I have chosen to do something different with it and use it for a friendship card. 

Friends come in all shapes and sizes and we sometimes make friends in the most unlikely places so I have paired the pumpkin buddies with the Chubby Pumpkins stamp so it looks like they are in a pumpkin patch. 


I stamped the chubby pumpkins (twice) and pumpkin buddies on alcohol marker friendly paper and coloured them with Copic markers. I set the buddies aside, cut the pumpkins out with a stitched rectangle die and added some puffy clouds with a cloud die and distress ink to create the "pumpkin patch" background. Next I coloured the pumpkin buddies and hand fussy cut them leaving a thin white edge. 
I cut some patterned paper from the Pumpkin Spice paper pad by Simple Stories and glued down my layers after mounting them on matching card stock. Next, I masked off the sentiment, stamped each line separately, cut them and put them on matching card stock. I added some twine to the bottom of the card and glued down the sentiment piece and added the second line of the sentiment to the top of the card. Pumpkin buddies are added with foam squares to help them stand off the front of the card and enamel dots finish it off. 

 
Card Recipe 

Stamp: Pumpkin Buddies (TT020), Chubby Pumpkins (J031) - High Hopes Rubber Stamps

Sentiment - If Friends Were Pumpkins (G289) - High Hopes Rubber Stamps

Patterned Paper: Pumpkin Spice - Simple Stories 


Tuxedo Black Memento ink, Hammermill 100lb digital cover stock, stitched rectangle die - Your Next Stamp, cloud die - Quickutz, tumbled glass Distress ink, twine, enamel dots 


 Copic Markers:

Pumpkins - Y38 YR16 YR18 Y11 Y18 E34 

E35 E27 E29 YG01 YG03 YG17 BG99

Dog - E30 D31 E43 T4 T6 T8 T9

          Cat - T4 T6 T8 T10 R000 R20

Bat - N4 N6 N8

Ground - C1 C2 C4


Thanks for stopping by! Have a super fantastic day!


Wednesday, August 17, 2022

Kitty In Training!!

It’s Wednesday, and this week, I made a Hallowe'en card using High Hopes Rubber Stamps Kitty In Training - TT052 for the image and Happy Halloween Script - F232 for the sentiment. Hallowe'en is one of our favourite times of year and my husband likes to go all out decorating our front yard. I always have fun finding new animated toys to add to our decorations and love seeing the little trick or treaters faces light up when they come to our house.

To make my card this week, I began with a card base of Hammermill - Premium Colour 100 lb., cut and scored to be 5.5" x 4.25". I die cut the background paper from Pebbles - Boo! cardstock to be the same size and attached it to the base using double-sided tape. Using My Creative Time - Rectangle Frame Layers and my Anna Griffin Empress Mini Machine, I die cut Scrapbook.com - Brights Smooth Cardstock for the larger frame. Using the same machine, I die cut Copic Marker X-Press It Blending Card cardstock using My Creative Time - Rectangle Frame Dies. The thin stripes were die cut using Scrapbook.com - Rainbow Smooth Cardstock and PinkFresh Studio - Slim Stripes dies. Lastly, I cut a black strip using Recollections - Black cardstock to the size of 4.25" x 1-3/8".

I stamped the main image onto the Copic Marker X-Press It Blending Card die cut using my MISTI and Memento - Tuxedo Black ink and coloured it in. The sentiment was stamped onto a scrap piece of orange paper cardstock using my MISTI and Memento - Tuxedo Black and then it was die cut using my cutting machine and Gina K Designs - Sentiment Strips.

The card was now ready to assemble. I ran the thin strips through my Xyron Create a Sticker and adhered them to the black strip leaving small spaces in between them to be the same as the witch's socks. I ran this whole piece through my Xyron Create a Sticker again so that it would lay completely flat when I adhered it to the base card. I added U-Line double-sided tape to the backs of the rectangles and sentiment and popped up all of the layers onto the card. Tim Holtz Distress Ink - Black Soot was used to ink around all of the edges of the card and Stickles - Diamond was added to the small dots at the top of the card above the stripe lines. Gelly Roll Sparkle Pen was added to the sky to create some sparkly stars.

Card Recipe:

Stamps: Kitty In Training - TT052 (High Hopes Rubber Stamps)

Sentiment: Happy Halloween Script - F232 (High Hopes Rubber Stamps)

Inks: Memento - Tuxedo Black, Tim Holtz Distress Ink - Black Soot

Paper: Copic Marker X-Press It Blending Card, Hammermill - Premium Colour 100 lb., Pebbles - Boo! (6x6 in / 15.2x15.2 cm), Scrapbook.com - Brights Smooth Cardstock (4.25" x 5.5"), Scrapbook.com - Rainbow Smooth Cardstock (4.25" x 5.5"), Recollections - Black cardstock

Die Cuts: My Creative Time - Rectangle Frame Layers, My Creative Time - Rectangle Frame Dies, Gina K Designs - Sentiment Strips, PinkFresh Studio - Slim Stripes

Tools: MISTI - Most Incredible Stamping Tool, U-Line double-sided tape, Anna Griffin Empress Mini Machine, Xyron Create a Sticker, Stickles - Diamond, Gelly Roll Sparkle Pen

Image coloured with Copic Markers:

Blacks: N10, N9, N7, N6, N5, N4, N3

Skin: E21, E11, E04, E00, E000, R30, R20

Hair and Stripes on Socks and Hat: G19, G14, RV66, RV55, RV53, Y19, B63, Y38, Y18

Pumpkins: E07, YR18, YR16, YR15, YR12, YR08

Tree Stump: E79, E27, E25, E23, E21

Broomstick: E35, E34, E33, C5, C3, C00, Y35, Y32, Y19, YR31

Leaves and Grass: G99, G94, G21, YG97, YG17, YG63

Sky: BV29, BV25, BV23. BV20, Gelly Roll Sparkle Pen

Hope you like it and have a fantastic week!

Check out more adorable images in the new "Spring Fever Release" at High Hopes Rubber Stamps!

You can find lots of inspiration from the Design Team Divas at the High Hopes blog, and the High Hopes Rubber Stamps Facebook Fan page plus you can also follow us on
Instagram, Twitter and Pinterest.


Tuesday, August 16, 2022

Nuts About You!

Hi!
I'm popping in today to share a fun Fall themed card. We're celebrating Fall and Halloween over at High Hopes Stamps and "Little Nutty Buddy" fits the bill for sure! I'm at my cottage and this little guy reminds me of the squirrels and chipmunks I am feeding here. They love their peanuts and cram as many as they can in their mouths before running off to hide them. 
I coloured in Little Nutty Buddy with my Copic Sketch markers and then using my Brother Cut N Scan cut him out. My papers today are from the Echo Park My Favourite Fall 6x6 collection. I decided to ink the edges of my papers with Vintage Photo Distress Ink, it helps give the card some added dimension. I thought the High Hopes sentiment called "Nuts About You" was perfect for this image! My image is popped up on a MFT Zig Zag circle die cut with foam tape. Some burlap ribbon, bow, wooden leaf charm and enamel dots finish off my card.
Copics Used:
Squirrel: E30, E31, E33, E34, E35, E37, E49
Acorn: E23, E25, E29, E79, N9

Don't forget to head on over to the High Hopes website and see all Lora's adorable stamps! You can find more inspiration from the Design Team by visiting the High Hopes Blog and Facebook page too!
Happy Stamping!

Monday, August 15, 2022

Frankie and Bride

Howdy - MichelleO here today  - A little Halloween card today with a fun High Hopes Stamps! This is Frankie and Bride. Too fun! LOL Cute couple right?

 
 I colored this image with my Copics (colors below) and then cut out with a circle die cut. For my papers I used black card stock and then an couple of old Gorjuss papers  from my stash. I loved the spooky dark grass in the bottom of the purple/gray paper. The papers are all sewn with a zig zag stitch. 

The image I did a faux mat with a green copic marker. I love the faux mats... color matches with my image and well.. its fast and easy. I then went in search for a sentiment. The High Hopes Stamps "Frightfully delightful" fun for the happy couple don't you think? It is punched out with an EK Success ticket punch. 

It needed just a bit more.. so out came some dark sparkle enamel dots. Love them! 

Copic colors used - 

Was a fun Halloween card to color - although I was having a hard time with Frankie's green skin. ha! 

Hope you enjoyed - to see lots of fabulous image for your cards pop over to the High Hopes Stamps Web Store HERE

Thanks so much 


Thursday, August 11, 2022

Happy Fall

  I love having seasonal cards in my stash. The inside is left blank so I can include a sentiment for whatever the reason I am sending a card - thank you, just a note and thinking of you to name a few. When I saw the "Ryan & Ainsley" stamp in the High Hopes line up I knew they would be perfect to not only help celebrate fall but to add to my stash. How cute are these two!?!! 


I stamped these cuties on alcohol marker friendly paper, coloured them with Copic markers and cut them out using a circle die. I didn't colour the grass all the way down to the bottom of the circle so I cut the bottom of the circle off and mounted it on a piece of card stock. Patterned paper from the Fall pad from Echo Park worked perfectly for my card. After cutting a piece of the gingham paper to fit the card base, I cut a matching piece with a banner die. I didn't have the next size up to create a card stock banner to put it so I traced the outside of the banner die and cut it to size. 
Next, I cut a piece of flower paper to go in between the gingham layers and added it to matching card stock. I like putting the card stock behind each layer as I think it helps define each layer. I masked off the sentiment - it has a "y'a'll" at the end of it - with a post it note, inked and stamped it and added it to a piece of card stock. Some cotton lace ribbon and enamel dots finish off my card. 

 
Card Recipe 

Stamp: Ryan & Ainsley (S163) - High Hopes Rubber Stamps

Sentiment - Happy Fall Y'all (G086) - High Hopes Rubber Stamps

Patterned Paper: Fall - Echo Park


Tuxedo Black Memento ink, Hammermill 100lb digital cover stock, circle die, banner die - Sizzix, cotton lace ribbon, enamel dots


 Copic Markers:

Mice - N0 N2 N4 N5 R000 R20 R21

Flowers - Y21 Y23 YR23 E35 E43 

E44 E47 E49 G43 G85 BG96

          Clothing - BV23 BV25 C9 R05 R17 R46 V17 

YR30 E81 W1 YR04 YR09 YR18

Grass - G40 G43 G85 BG96


Thanks for stopping by! Have a super fantastic day!


Wednesday, August 10, 2022

Witchy and Friends!!

It’s Wednesday, and this week, I made a Hallowe'en card using High Hopes Rubber Stamps Witchy & Friends - TT019 for the image and Take Flight - HH008 for the sentiment. This little witch and her crew don't look like they could frighten anyone, but I'm sure they will have lots of fun trying! LOL!

To make my card this week, I began with a card base of Hammermill - Premium Colour 100 lb. cardstock, cut and scored to be 4.25" x 5.5". I cut the background to be the same size using Doodlebug Design Inc. - Ghost Town patterned paper and adhered it to the base card using double-sided tape. Doodlebug Design Inc. - Hallowe'en Parade patterned paper was cut to the size of 1-7/8" x 5.5" and adhered directly to the base background using double-sided tape.

I stamped the sentiment and image using my MISTI and Memento - Tuxedo Black ink onto Copic Marker X-Press It Blending Card cardstock. Using my Anna Griffin Empress Mini die-cutting Machine and Hero Arts - Infinity Die Ovals, the image was die cut. A cutter was used to cut around the sentiment. Tim Holtz Distress Ink - Villainous Potion and a finger dauber were used to ink around the base card and sentiment. The image was coloured in and then I used a Sakura Glaze - Black pen for the eyes and noses on the characters. Then, I applied a small dot of Gelly Roll Sakura #8 Pen to the eyes and also to create stars in the night sky. U-Line double-sided tape was added to the back of the coloured image and sentiment and then they were both popped up onto the card. To finish it off, I added some YNS Gumdrops - Pretty Peacock Matte.

Card Recipe:

Stamp: Witchy & Friends - TT019 (High Hopes Rubber Stamps)

Sentiment: Take Flight - HH008 (High Hopes Rubber Stamps)

Inks: Memento - Tuxedo Black, Tim Holtz Distress Ink - Villainous Potion

Paper: Copic Marker X-Press It Blending Card, Hammermill - Premium Colour 100 lb., Doodlebug Design Inc. - Ghost Town (6" x 6"), Doodlebug Design Inc. - Hallowe'en Parade (6 in. x 6 in.)

Die Cuts: Hero Arts - Infinity Die Ovals

Tools: MISTI - Most Incredible Stamping Tool, Anna Griffin Empress Mini Machine, U-Line double-sided tape, Sakura Glaze - Black, Gelly Roll Sakura #8 Pen, YNS Gumdrops - Pretty Peacock Matte

Image coloured with Copic Markers:

Skin: E21, E11, E04, E00, E000, R30, R20, Eyes (Sakura Glaze - Black, Gelly Roll Sakura #8 Pen)

Hair: RV66, RV63, RV55, G09, G05, YG03

Hat: 100, C8, C6, C4, V09, V06, V04, YR24, Y38, Y32

Cat and Spider: 100, C8, C6, C4, RV42, R30

Dress, Cape, Socks and Shoes: 100, C9, C7, C5, BV29, BV225, BV23, BV20, V17, V15, V12, V09, V06, V04, YR68, YR65, YR61, YG07, YG03, YG01

Bat: BV29, BV25, BV23 (Eyes - Sakura Glaze - Black, Gelly Roll Sakura #8 Pen)

Broom: E27, E25, E23, Y38, YR21, Y11

Pumpkin: YR09, YR07, YR04, YR02, Y08

Grass: YG99, YG97, YG95

Sky: BV31, BV25, BV23, BV20

Moon: B60, Y000, C1, C0, C00, Colorless Blender

Hope you like it and have a fantastic week!

You can find lots of inspiration from the Design Team Divas at the High Hopes blog, and the High Hopes Rubber Stamps Facebook Fan page plus you can also follow us on
Instagram, Twitter and Pinterest.


Tuesday, August 9, 2022

Witchy Poo!

Happy Tuesday!
"Sitting Witchy Poo With Pumpkin" is one of my favourite Halloween stamps from High Hopes Stamps! She's just too sweet and her little tooth poking out just makes me giggle! She's only "A Wee Bit Wicked" as she's just too cute to be wicked!
After stamping my image onto Copic Friendly paper using Memento Tuxedo Black Ink, I coloured the image using my Copic Sketch Markers. Next I cut out Wichy Poo using my Brother Cut N Scan leaving a white border. I am using papers from the Doodlebug Booville 6x6 collection.
I added the Halloween tree border behind my image and then popped Witchy Poo up with foam tape. A bit of Crystal Stickles on all the yellow areas finish off my card today.
Copics Used;
Skin: E00, E02, E11, R20
Pumpkin: YR04, YR07, YR09
Purples: V04, V05, V06, V09
Greens:YG03, YG17/ YG95, YG97
Yellows: Y17, YR23
Black: N7, N8, N9

Don't forget to head on over to the High Hopes website and see all Lora's adorable stamps! You can find more inspiration from the Design Team by visiting the High Hopes Blog and Facebook page too!
Happy Stamping!

Monday, August 8, 2022

Tommy's Fall Fun

Howdy - MichelleO here today -Raise your hands if your ready for Fall? Me Me Me... so over summer and ready for the pretty colors of Fall and the cooler weather! So I colored up a little Fall for today's card. This is a fun image from High Hopes Stamps "Tommy's Fall Fun" - Love how happy he is with those leaves! 

 
I had fun coloring those leaves! Ok Tommy too :0) - I used my Copics (colors below) then dug through my older stash and found some vintage Basic Grey papers with great fall colors. I layered and added a scalloped border from EK Success. The sentiment is also High Hopes Stamps "Happy Fall Y'all!"  love that "Y'all!" ha! Then I was looking at enamel dots, then buttons, and just couldn't find anything that felt right for a little embellishment. Then on my top shelf I saw the large maple leaf punch from Martha Stewart! Yep that would work! I punch out three leaves from some of the same Basic Grey papers, a little copic on the edges and then some Martha Steward branch punches to add to the leaves. Love them! And I love using older tools that need some attention! 

Copic colors used - 


There is so much to "Fall" in love with at High Hopes Stamps - to see all them fabulous images in the web store click HERE - any subject you can find something that will make you happy to add to your projects!
 

Thanks! 


Thursday, August 4, 2022

Fall Fun

   I grew up on a fairly large property with lots of trees. In the fall, one of our jobs was to rake the leaves. It wasn't always our favourite job but there were times where we took a break, raked the leaves into a big pile and had some fun jumping in the pile and throwing them at each other. Of course this left more raking to do to get them back in the pile to be put into bags and it also left leaves in our hair and clothes! We were sure to clean those off before going in the house! 

The "Fall Joy" stamp from High Hopes Rubber Stamps brings back some of these fun memories! Fall is my favourite time of year so I am happy to celebrate all things fall and Halloween this month.


 After stamping onto alcohol marker friendly paper I coloured this fun stamp with Copic markers and cut it out using a rectangle die. Patterned paper from two different Honey Bee pads gave me a perfect background - since the stamp is "busy" I wanted to use a more neutral back ground. I cut the paper to fit my 5.5" x 5.5" card base, inked the edges and added them to matching card stock. 

The sentiment is a combination of words from two different sentiments. To create my sentiment I masked off each stamp to get the word I wanted, lined them up and stamped them separately. When they were stamped I cut them out using an oval die, put it on matching card stock and hand cut the shape. Next, I added some twine to the patterned paper pieces, glued them down, and added the stamped image with 3D foam tape. Some leaf die cuts and enamel dots finish off my card. 

 
Card Recipe 

Stamp: Fall Joy (T041) - High Hopes Rubber Stamps

Sentiment - Happy Fall Y'all (G086), Winter Fun! (F109) - High Hopes Rubber Stamps

Patterned Paper: Autumn Afternoon, Gingham Galore Fall - Honey Bee 


Tuxedo Black Memento ink, Hammermill 100lb digital cover stock, rectangle die, oval die, leaf die - Your Next Stamp, enamel dots, twine, Close To Cocoa ink - Stampin' Up


 Copic Markers:

Raccoons - N4 N6 N8 W1 W3 W6 W7

Sky - B000 B00 B41 B52

           Grass - YG61 YG67 BG99

Leaves - Y11 Y18 Y26  G21 G24 G28 BG99

YG01 YG03 YG17 G28 R05 R17 R39

YG02 YG11 YG18 YR21 YR24 E23

Tree - E23 E25 D27 D29


Thanks for stopping by! Have a super fantastic day!