Monday, November 30, 2020

Sitting Santa

 Howdy - MichelleO here today - Ho Ho Ho! Isn't this just the cutest little round Santa? Sitting Santa from High Hopes Stamps! 


Just love him! I used my Copics to color (colors below) and then added lots of Viva Deco Sparkle to his coat and hat. I just think Santa has lots of sparkle to him. I found some pattern papers from Paper Studio that has a great little Santa pattern. I had to use it with Sitting Santa. Keep it simple and make Santa the large star of this one. I simple gingham ribbon tied on the corner. Then a High Hopes Sentiment "Merry Christmas!"

Simple... but Simply a sweet Christmas Card! 

Copic colors used - 


I hope you enjoyed Sitting Santa from High Hopes Stamps - visit the web site HERE for lots of great deals and thousands of stamps to choose from!

Thanks - 


Sunday, November 29, 2020

Cyber Monday....36 hours only!


Happy Holidays

Good morning High Hopes Friends,
Carolina here sharing another project today. Totally in LOVE with this image, I have so much fun putting together this Christmas card. 

I begin Stamping "Santa Sleigh Ride" with Memento ink and colored with alcohol markers. Used one of my largest stiches rectangles to cut my image. I Layered with the coordinated scallop die using red cardstock. For decoration I added diamond stickles, glossy accent and doodle some line with a white gelly pen. I finish my card with this sentiment called "Happy Holidays"  stamped and layered with a different scallop die. Definitely Christmas is my favorite season. Hope is your too? 

 Thank you for visit my blog today. Have a BLESS day!


Friday, November 27, 2020

Warm Winter Wishes

Welcome HH fans;

Another week has been and gone and it is now officially less than four weeks to Christmas.  The countdown is about to begin.

Today's card which is being added to the Christmas/Winter stash is featuring the adorable Hope for Peace Snowy paired with Dot Warm Winter Wishes.  Both are from High Hopes Stamps.

After stamping the image onto some XPress It Blending Cardstock, I coloured it with Copic Markers. A scallop die from Gina Marie Designs was used to cut it out.  Some Polar Blue ink from Versa Color was used to ad a bit of colour.  I then cut two more sheets of design paper to mat the image on.  Some ribbon, enamel dots a snowflake embellishment finished off the card.

Supplies used:

  • Stamps:  Hope for Peace Snowy (S227), Dot Warm Winter Wishes (H257) both from High Hopes Stamps
  • Ink:  Polar Blue Versa Ink
  • Paper:  XPress It Blending Cardstock, DP -- Silent Night (Kaisercraft)
  • Copic Markers:
    • C00 - Cool Gray No. 00, C0 - Cool Gray No. 0
    • YR15 - Pumpkin Yellow, YR16 - Apricot
    • Scarf and Mitts:  G46 - Mistletoe, G43 - Pistachio, G40 - Dim Green
    • Hat: T10 - Toner Gray No. 10, T7 - Toner Gray No. 7, T6 - Toner Gray No. 6
    • Top:  E40 - Brick White, E41 - Pearl White, E43 - Dull Ivory
    • Dove:  W2 - Warm Gray No. 2, W0 - Warm Gray No. 0, W00 - Warm Gray No. 00
    • Trees: E29 - Burnt Umber, G29 - Pine Tree Green, G28 - Ocean Green
  • Nuvo Glitter Accents:  Fresh Snowfall
  • Die:  Scallop Rectangles - Gina Marie Designs
  • Stickles:  Crystal Ice
  • Miscellaneous Ribbon and snowflake embellishment

Stop by the High Hopes Stamps website to see the many and varied fun stamps, that they have.  For some inspiration, stop by the High Hopes Stamps Blog to see what the HH Divas have been up to.  We post daily and would love it, if you stop by and visit us.  You can also follow us on Facebook, Twitter and Instagram.


Thanks for stopping by and have a great day,

Hugs,


Thursday, November 26, 2020

Black Friday SAVINGS

Happy Thanksgiving to ALL our US HH Friends & Family!!!


Snow Friends

 I try to let my friends know how much they mean to me on a consistent basis but at Christmas is one of my favourite times to remind them how special they really  are to me. 

This year Christmas will look different for all of us I'm sure and I have been missing being able to give my peeps a hug and will especially miss giving them their Christmas hugs!

"Snowy's Friends" from High Hopes Rubber Stamps just makes me smile, reminds me of my peeps and is a way for me to send a hug in a card to one of them.


I stamped these cuties, coloured them with Copic markers and cut them out using a circle die. I added some Stickles to the white on the scarves (hard to see). 
I kept my design simple and cut a matching cardstock circle using my Fiskars circle cutter. A few sprigs of pine and a sparkly snowflake cut out of a snowflake border were the perfect embellishment along with some matching sparkly ribbon. A stamped sentiment on matching cardstock and some enamel dots finish off my clean and simple design.

Card Recipe 

Stamp: Snowy's Friends - High Hopes Rubber Stamps

Sentiment: Warmth and Joy - High Hopes Rubber Stamps

Patterned Paper: A Perfect Christmas - Echo Park


Tuxedo Black Memento ink, Hammermill 100lb digital cover stock, snowflake border - Whimsy, pine branch - Tim Holtz, circle die,  Fiskars circle cutter, Star Dust Stickles, enamel dots

 Copic Markers:


Penguin - N5 N6 N10 Y11 Y15 Y17 G05 G07 G28

Bear - N5 N6 N10 E41 E42 E43 GO5 G07 G28

Snowman - N5 N6 N10 YR01 YR04 YR16 B00 G05 G07 G28 R24 R27 R37

Bird  - Y15 Y17 R24 R27 R37 G05 G07 G28


Thanks for stopping by! Have a super fantastic day!


Wednesday, November 25, 2020

Nutcracker - Seasons Greetings!!!

It’s Wednesday, and this week I'm sharing a Christmas card featuring Nutcracker - M104 from (High Hopes Rubber Stamps) paired with the sentiment Seasons Greetings - F300A (High Hopes Rubber Stamps). It's always fun to use Nutcrackers at Christmas time, that is if your parents let you play with them? LOL! Do you use your nutcrackers if you have one or are they strictly for decoration?

To create the card this week, I stamped the main image using my MISTI and Memento - Tuxedo Black ink onto Copic Marker X-Press It Blending Card. Then I die cut the image using Creative Expression Craft Dies by Sue Wilson - Noble Dies - Double Pierced Ovals and my Cuttlebug. The image was then coloured in with Copic Markers.

I stamped the sentiment using VersaMark Ink and then embossed it with Ranger - Super Fine Gold Embossing Powder. This was then heated using my Marvy Uchida - Embossing Heat Tool.  I used the same die cuts to cut the remaining ovals. I used PhotoPlay - Christmas Memories for the main background paper and cut it to 6" x 6". I edged around the main background, background patterned oval and sentiment with Tim Holtz Distress Ink - Mowed Lawn. To create the ribbon, I used some scrap red cardstock, Crafts - Sparkling Stickers - 02-3068629 - Gold and white cardstock. For the Sparkling stickers, I first attached the paper to some white cardstock to give it more stability. Once the pieces for the ribbons were created, I ran all of them through my Xyron Create a Sticker to make it easier to adhere the layers to each other.

The card was now ready to assemble, I attached the main background to a card base of 6" x 6". I layered all of the rectangles to create my ribbon and also added the sentiment to this ribbon as well. I then placed this directly onto the base card. The ovals were all popped up using 3M VHB - 2 sided tape.

Card Recipe:

Stamp: Nutcracker - M104 (High Hopes Rubber Stamps)

Sentiment: Seasons Greetings - F300A (High Hopes Rubber Stamps)

Inks: Memento - Tuxedo Black, VersaMark, Tim Holtz Distress Ink - Mowed Lawn

Paper: Copic Marker X-Press It Blending Card, Hammermill - Premium Colour 100 lb., Crafts - Sparkling Stickers - 02-3068629 - Red, PhotoPlay - Christmas Memories (6"x6"), Crafts - Sparkling Stickers - 02-3068629 - Gold

Die Cuts: Creative Expression Craft Dies by Sue Wilson - Noble Dies - Double Pierced Ovals

Embossing Powder: Ranger - Super Fine Gold Embossing powder

Tools and Miscellaneous: MISTI - Most Incredible Stamping Tool, Cuttlebug, Marvy Uchida - Embossing Heat Tool, Xyron Create a Sticker

Image coloured with Copic Markers:

Skin: E21, E11, E04, E00, E000, R22, R21, R20, C1

Hair and Beard: E49, E47, E44, E43

Hat and Outfit: R59, R39, R37, R35, G99, G21, YG67, YG17, E15, Y35, YR24, Y08, Yellow gem

Boots: C10, C8, C7, C6, C5, C3

Hope you like it and have a fantastic week!

You can find lots of inspiration from the Design Team Divas at the High Hopes blog, and the High Hopes Rubber Stamps Facebook Fan page plus you can also follow us on
Instagram, Twitter and Pinterest.


Three Kings

 Happy Wednesday HH Fans!

Today I'm adding to my Christmas card stash with High Hopes Three Kings image.  I have paired this sweetie with the sentiment called Adore Him.

When I colored up this image I hadn't chosen my paper yet so it was a bit of a challenge to find papers I was happy with.  I ultimately chose the Bazzil Basics Nordic 6 x 6 pad.  It was out on my craft desk because I'm using it for another image I'm working on.  Then the light bulb went off and I realized it worked for Three Kings as well.  Funny how things like that can happen.

I'm really liking using multiple patterned papers on my cards lately.  Don't know why but I sort of just like the different look.  I die cut the image with a Gina Marie Designs die.  After I cut the mat I didn't care for the space between the image & the mat so I cut different pieces of patterned paper to also use as mats.  I'm happy with how they look, hope you think so too.

Copic Combos

Shoes - C10, C08

Middle King - YR23, Y19, Y15, B39, B37, B34, YG97, YG95, YG93, R59, R56, R46, N3, N1, N0

Skin - E000, E00, E01, E04

Left King - V09, V06, V05, YR23, Y19, Y15. W7, W5. W3, YG95, YG93, YG91

Right King - V09, V06, V05, YR23, Y19, Y15, E27, E25, E23, YG95, YG93, YG91, R59, R56, R46

Thanks for popping by today!

Crafty Hugs,


Tuesday, November 24, 2020

Canadian Christmas Greeting in Creative Scrapbooker

Happy Tuesday HH fans!

I'm always delighted to share when one of our Diva's is published...it makes my heart so happy!

Creative Scrapbookers new Winter 2020 Issue is now out & we can share Donna Rudy's latest published card using Canadian Christmas Greeting.  Congrat's Donna!!!


Donna paired this adorable stamps with our  Bold Merry Christmas, Eh? sentiment. 
 
If you are ever published using a High Hopes Rubber Stamp please let me know.  I would love to share with everyone.
 
Crafty hugs,


Gingerbread Dreams!

Hi!
I haven't made a "stair step" card in forever and decided that this would be perfect to pair with the High Hopes Stamp "Gingerbread Friends" and "Gingerbread House" images. This brings back memories of my Mom making Gingerbread Houses every year with my girls. I have to admit that ours never looked this pretty, more "goopy" and loaded with anything and everything LOL. But they sure had fun doing them.
To start, I stamped and coloured all my images to match the papers in the Doodlebug "Christmas magic" 6x6 collection. Next using my Brother Cut N Scan machine I cut out the images. Then I pulled out my Cameo and a svg file and created the Side Stair Step card base. I enlarged the file to fit the larger Gingerbread Friend image. I added a fence die cut in front of the Gingerbread House to create a little scene. The lollipops have some Clear Glitter Pen added to them and of course I had to add some Crystal Stickles to "icing" parts on both images.
Here's a side view where you can see the "stair steps" better. I thought the High Hopes "Gingerbread Dreams"sentiment went perfectly with my card theme!
I stamped an extra house and coloured in just the lollipops and little gumdrops, fussy cut them out with scissors and added on the first "step" to help create a more dimensional look.
Copics Used:
Gingerbread: E33, E35, E37
Reds: R24, R27, R29
Greens: G28, YG17, YG23, YG25
Yellows: Y21, Y23, Y26
Pinks: RV02, RV04, RV06, RV09
Blue Greens: BG13, BG18, BG34

Thanks for stopping by today and don't forget to head on over to the High Hopes website and see all Lora's adorable stamps! You can find more inspiration from the Design Team by visiting our Blog and Facebook page too!
Happy Stamping!


Monday, November 23, 2020

Gingerbread House

 Howdy - MichelleO here today and this week for High Hopes Stamps I went yummy! Just love how fun this Christmas image "Gingerbread House" is! Just Yummy! 


Coloring with my Copics (colors below) and then added some "snow" with a Marvy Snow Marker. The lollipops needed a bit of sparkle so I added some Viva Decor glitter to them. Lollipops do need sparkle right? Now it is rare for me to color before knowing what pattern paper I am using, but I was just into coloring this cute little house I forgot to look for paper, but then I found a Paper Studio Candy Cane paper that just seemed to made for my card. A red card stock base for sure. Then I die cut a scalloped square for behind the image. Now at the time weaving a red and white gingham ribbon in that die cut seemed to be a great idea.... OMG... it took forever to do! The ribbon was too big for the tiny holes so I had to be very careful. But finally I got it done, and so glad I stuck with it! A ribbon at the bottom to tie it all off. Love how this little note card came out! Yummy right? 

Copic colors used - 


For LOTS of yummy images to color up you just must visit the High Hopes Stamps website! I guarantee you will find lots to fill a cart! Get there quick HERE


Sunday, November 22, 2020

Christmas Dogs

Welcome, High Hopes Fans!
My card for today features a fabulous old but super cute stamp called "Dog Trio Block" from High Hopes Stamps.

I stamped my image with memento tuxedo black and coloured with Copic markers. I used my trimmer to cut it and layered over silver cardstock. I used my White Gelly Roll pen and added crystal stickles. The paper is from my stash. To finish my card I adhesive a few sequins and stitched ribbon. Hope you have enjoy my creation today. 

Thank you for visit my blog today!
Have a BLESS day.


Friday, November 20, 2020

Happy Holly-days!

Welcome HH Fans;

It is Friday and the end of the work week for me.  It has been a busy one and doesn't seem to be ending.  It looks like Santa and his Reindeer are eager to get home also.

For today's card, I used the adorable Reindeer Games stamp and paired it with Happy Holly-days!, both from High Hopes Stamps.

After colouring the image with Copic Markers, I used the Double Stitched Rectangle Die from Gina Marie Designs.  I added some Polar Blue ink (Versa Color) for the sky, and then added some Faux Snow from Art Glitter.  I was hoping to create some falling snow, but I'm not sure if it really worked.  It has been a while since I used this product.  Some ribbon and glitter finished off the card.

Supplies used:

  • Stamps:  Reindeer Games (S108), Happy Holly-day (G106) -- both from High Hopes Stamps
  • Paper:  XPress It Blending Cardstock, DP - Hello Christmas (Carta Bella)
  • Ink:  Polar Blue (Versa Colour)
  • Copic Markers:
    • Santa:  E0000 - Floral White, E000 - Pale Fruit Pink, N7 - Neutral Gray No. 7, N4 - Neutral Gray No. 4, C00 - Cool Grey No. 00, R46 - Strong Red, R29 - Lipstick Red, R27 - Cadmium Red
    • Reindeer & Sleigh:  N6 - Neutral Gray No. 6, N5 - Neutral Gray No. 5, N4 - Neutral Gray No. 4, R00 - Pinkish White, E35 - Chamois, E33 - Sand, E31 - Brick Beige, E0000 - Floral White, E000 - Pale Fruit Pink, G43 - Pistachio, G46 - Mistletoe, E29 - Burnt Umber, E27 - Africano, E25 - Caribe Cocoa, T2 - Toner Gray No. 2, T3 - Toner Gray No. 3, T5 - Toner Gray No. 5
  • Die:  Double Stitched Rectangle - Gina Marie Designs
  • Stickles:  Crystal Ice (Trim on Santa's outfit)
  • Nuvo:  Glitter Accents - Fresh Snowfall
  • Faux Snow Art Glitter
  • Miscellaneous:  Ribbon

Stop by the High Hopes Stamps website to see the many and varied fun stamps, that they have.  For some inspiration, stop by the High Hopes Stamps Blog to see what the HH Divas have been up to.  We post daily and would love it, if you stop by and visit us.  You can also follow us on Facebook, Twitter and Instagram.


Thanks for stopping by and have a great day,

Hugs,


Thursday, November 19, 2020

Let Heaven and Nature Sing

  When I was younger used to participate in Christmas carol singing with some friends. We would go to seniors homes, gather on their front porch or yard and sing Christmas carols for them. My favourite stop was my Grand parents house. They would come to do the door and listen to us sing and they always had huge smiles on their faces and Grandma always had a little snack or treat for us. 

Mudzie and Chopper Caroling from High Hopes Rubber Stamps are doing the same, spreading some Christmas cheer with some singing and have brought back some fun memories for me! 


After stamping Mudzie and Chopper I hand fussy cut them and used a black marker around the stamp edges to cover any white I may have left. I set them aside and cut my patterned paper and cardstock to fit my base. 
The card size is 4" x 5" and is a new base size for me. My crafty friend Cheri introduced me to this size - thank you Cheri! - and it is perfect for this stamp. 
I used a border, lampost, fence and music note die to cut the pieces for my scene. 
Next I stamped and sized the sentiment and put it on matching cardstock. Enamel dots finish off my card.

Card Recipe 

Stamp: Mudzie and Chopper Caroling - High Hopes Rubber Stamps

Sentiment: Heaven Sing - High Hopes Rubber Stamps

Patterned Paper: Vintage Artistry Noel - 49 Market


Tuxedo Black Memento ink, Hammermill 100lb digital cover stock, fence and lamp post die - YNS, stitched hills die - Whimsy, mini music notes - Gina Marie Designs


 Copic Markers:


Mudzie - E41 E42 E43 C1 C2 C4 E25 E27 E29 E34 E35 E20 

Chopper - E25 E27 E29 N5 N6 N10

Scarf, mittens, ear muffs - R24 R27 R37 R59

Box  - E41 E42 E43    


Thanks for stopping by! Have a super fantastic day!


Wednesday, November 18, 2020

Unassembled Snowman

 Happy Wednesday HH fans!

Today I'm popping in to share this adorable image from High Hopes called Unassembled Snowman.  I love to color scenes and this cutie was no exception.  It was very quick and easy...might look complicated but it's not.  One rule when using red is "use it last" lol.  I don't know if you do this or not but I like to color my background in before most of the other elements in the scene.  I find it makes the other images pop out & sort of speak to me in a way.  I find picking my colors is easier.  Of course this is just my method I'm sure you have your own.  The other benefit to coloring your background first is you won't accidentally drag another color into the scene.  Just my 2 cents worth lol.

After I finished coloring this cutie I took my White Sharpie & did a bunch of snow dots for dimension.  Now some of my little dots came out a little bigger than expected but that's okay I guess.  I used my favorite Stardust Stickles for sparkle on a few places.  The snowflakes are done with a really old punch, I don't even know the brand because it's not on the punch.  I used some YNS Blue Raspberry enamel dots for the centre of each snowflake & the 2 corners.

That lovely patterned paper is from a company called Studio Light in the Netherlands.  My friend brought it back for me when she went to visit her son in Holland......thanks guys for taking my pal shopping!

Copic Combos

Sky Background - B000, B0000

Red - R59, R56, R46 (my fav red combo)

Blue/Green - BG09, BG07, BG05

Hat & Boots - C10, C8, C6

Ground & Snowman - C0, C00 with 0 Blender

Penguin - C8, C6, C4

Snowman Nose & Penguin Beak - YR27, YR24

Pants, Sweater, Mitts & Tie - E44, E43, E42

Snowman Arms - E37, E35

Hair - E27, E25, E23

Skin - E000, E00, E11, E04

Thanks so much for popping in today...hope to see you again soon!

Crafty hugs,


Santa in the Chimney!!!

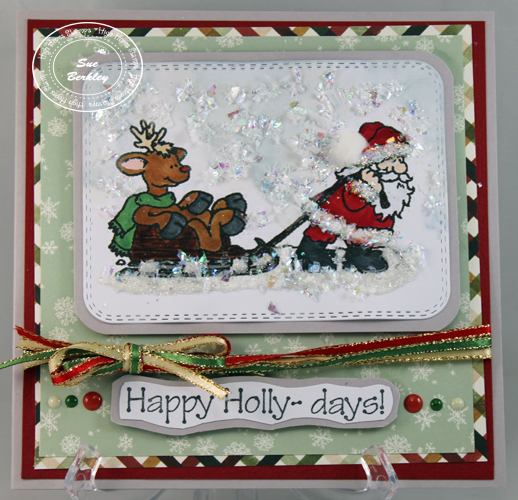
It’s Wednesday, and this week I'm sharing a Christmas card featuring Santa in Chimney - S202 from (High Hopes Rubber Stamps) paired with the sentiment Bold - From One Flake - K201 (High Hopes Rubber Stamps). December is almost here and Santa is on his way to deliver all of the goodies to everyone. Hope your not on the naughty list. LOL!


To create the card this week, I stamped the main image and then coloured it in with Copic Markers. I stamped the image again and used it as a mask. I have a magnetic cutting mat, so I just used a very strong magnet to hold the mask down. Then I used multiple Tim Holtz Distress Inks to create the sky.


Once the sky was created, I removed the mask and used My Creative Time - Rectangle Frame to die cut the image. I added the sentiment using the top half of the sentiment stamp only. To do this, using my MISTI to get a good clean stamped image, I used VersaMark Ink and then embossed it with Ranger Embossing Powder White – Extra Fine Detail. This was then heated using Marvy Uchida - Embossing Heat Tool.

To finish off my background, I added in some snowflakes and stars using Gelly Roll Sakura #10 Pen and Gelly Roll Sakura #5 Pen. For the eyes and notches on the belt, Sakura Glaze - Black ink was used. For the snow on the roof top, Gina K Designs - Glitz Glitter Gel was applied with a little sprinkle of Martha Stewart Crafts - Crystal Fine Glitter. Stickles was added to the hat, collar and cuffs of Santa's outfit.

To create the layers, I first die cut Hot Buy Craft Smart - Holiday Glitz Glitter Paper with My Creative Time - Rectangle Frame Layers and then the dark blue panel with My Creative Time - Rectangle Frame dies. For the card, I used Hammermill - Premium Colour 100 lb. paper, which was cut at 8.5" x 5.5" and then scored at 4.25" and to create a base card of 4.25" x 5.5".

To assemble the remainder of the card. I placed the dark blue layer directly to the base using double-sided tape. The silver layer was applied the same way. The coloured image was then popped up using 3M VHB - 2 sided tape.

Card Recipe:

Stamp: Santa in Chimney - S202 (High Hopes Rubber Stamps)

Sentiment: Bold - From One Flake - K201 (High Hopes Rubber Stamps)

Inks: Memento - Tuxedo Black, Tim Holtz Distress Inks - Black Soot, Dusty Concord, Blueprint Sketch and Chipped Sapphire, VersaMark

Paper: Copic Marker X-Press It Blending Card, Hot Buy Craft Smart - Holiday Glitz Glitter Paper 12" x 12", Dark Blue Cardstock, Hammermill - Premium Colour 100 lb.

Die Cuts: My Creative Time - Rectangle Frame Layers, My Creative Time - Rectangle Frame Dies

Embossing Powder: Ranger Embossing Powder White – Extra Fine Detail

Glitter: Martha Stewart Crafts - Crystal Fine Glitter, Gina K Designs - Glitz Glitter Gel, Stickles

Tools and Miscellaneous: MISTI - Most Incredible Stamping Tool, Cuttlebug, Marvy Uchida - Embossing Heat Tool

Image coloured with Copic Markers:

Skin: E21, E11, E04, E00, E000, R22, R21, R20

Hair and Beard: W3, W2, W1, W00

Hat and Outfit: R59, R39, R37, R35, Stickles

Belt: C9, C7, C5, C4, E15, YR24, Y35, Y08

Mitts: C9, C7, C4

Sack: G94, G28, G09, G07, G05, YG67, YG63, YG61

Chimney: E99, E97, E13, E08, T5, T3, T1

Hope you like it and have a fantastic week!

You can find lots of inspiration from the Design Team Divas at the High Hopes blog, and the High Hopes Rubber Stamps Facebook Fan page plus you can also follow us on
Instagram, Twitter and Pinterest.


Tuesday, November 17, 2020

Holiday Greetings!

Greetings!
What a cute Santa and reindeer, don't you think?! This is the adorable "Christmas Pals" red rubber stamp from High Hopes. It's hard to believe that it's November already and Christmas is right around the corner! This will be a cute addition to my Christmas card stash!
I stamped "Christmas Pals" onto Copic Friendly paper and coloured it in using my Copic Sketch Markers. Next I fussy cut out my image and added a black marker to the edges for a finished look. My papers today are from the Memory Box "Christmas Plaid" 6x6 collection. I've had the SSS Birch Tree Window for a while and finally found the perfect design to use it on. I cut it out and using some Delicata Golden Glitz ink and a sponge dauber, added some gold to the cut out edges to match the gold stripe in the paper. Santa is popped up with some foam squares for added dimension. The sentiment is also from High Hopes and is called "North Pole Greetings". I added some Stampendous Spoonful of Snow for Santa and the Reindeer to stand in. Some Stickles on Santa's fur trim and gold enamel dots finish off my card.
Copics Used:
Skin: E11, E21, R20
Beard: C0, C1, C2, C3
Reindeer: E34, E35, E57, E79/ W1, W3
Reds: R37, R59, R89
Greens: G21, G94, G99
Blacks: T6, T7, T9

Thanks for stopping by today and don't forget to head on over to the High Hopes website and see all Lora's adorable stamps! You can find more inspiration from the Design Team by visiting our Blog and Facebook page too!
Happy Stamping!


Monday, November 16, 2020

Callie Christmas Kitty

 Howdy - MichelleO here today and I just adore this image! Fabulous image for a fun Christmas Card! This is Callie Christmas Kitty -


Too cute right? I colored with my Copics (colors below). I am not sure why but 99% of all cats I color are striped cats. They are just fun to create the stripes and I love kitties with white feet. I added the sentiment directly on my image paper. High Hopes Stamps "Meowy Christmas" Just PUURRRFECT! Ha! I felt doodling was the way to go with this image so I did a wiggle "stitch" doodle around the edge. But on the top right corner I added three red enamel dots. My papers are stacked they are from Paper Studio. Fun Christmas wish. 

Copic colors used - 


I love fun images of animals. And Holiday images with sweet animals are even better. High Hopes Stamps has so many to choose from - visit the website HERE to see them all. 

Thanks - 


Sunday, November 15, 2020

Christmas Mouse

Hello & happy Sunday HHS!
I'm having a blast creating Christmas card this weekend.
 Christmas is one of my favorite season of the year. Which season is your favorite?

For today I'm sharing "Lg.Chris Mouse" and "Holly Jolly" from Highhopesstamps.com 

Stamped image with Memento Tuxedo black and colored with alcohol markers. Next used a few of my hearts dies and created a few layers. The patter paper is my stash. Love this sentiment a lot, very pretty right! 

Image is colored with Copics;
mouse body W1 W3 W5
mouse ears C1 C3
mouse nose C7 C9
Christmas lights R27 R39 Y11 Y13 YG95 YG97

Here is a close up!
 I added glossy accent to the Christmas lights and light string. Finally draw some doodles with a white jelly pen here and there on my image. 

To finish my card I stamped the sentiment and layered wit green glitter cardstock. Hope you enjoyed my card today.

Thank you for visit my blog today!
Have a BLESS day.


Friday, November 13, 2020

Little Nicholas & Rodney Reindeer

 Happy late Friday night to all our HH fans!

Phew what a week!  So many things to do & not a lot of crafty me time.  I actually was able to finish up this card earlier today but ran out of time to get it up earlier.  Meet Little Nicholas with Rodney Reindeer & the Fun Merry Christmas sentiment all from High Hopes of course lol.

Last night over on the High Hopes Facebook page I posted my WIP of the images.  I wasn't 100% sure what I was going to do with them at that point but after fussy cutting the images out the light bulb went off.


I chose Photo Play's Christmas Cheer pad for these images.  I am in love with all the colors in this pad, great for masculine cards....can't wait to make more cards with these fab papers.  I picked out 3 different papers before I started to color just to give me some guidance while choosing my Copic colors.

I matched the brown cardstock base to the brown in the plaid paper & went with a Vanilla for the matting.  I picked up the cream with gold twine on clearance at a Winners store a couple of years ago in their after Christmas sale.  I knew one day I would use it.  I cut out the Fun Merry Christmas sentiment with a die & added some self adhesive dots.  I also used some Nuvo Snowflake Glitter on the pom pom & the fur on Nicholas's hat...just a bit of bling.

Copic Colors for Little Nicholas

Skin - E000, E00, E11, E21, E04

Hat - R89, R59, R56

Pants & Patches on Jacket - E44, E43, E42

Jacket & Patches on Pants - E19, E17, E15

Boots, Mitts & Belt - W8, W6, W4, W2, W0

Beard & Hat Trim - C1, C00

Hair - E25, E23

Copic Colors for Rodney Reindeer

Body - E27, E25, E23

Antlers - E25, E23, E21

Nose - E25, E23, E21, R21

Hooves - W8, W6, W4

Harness - R89, R59, R56, W6, W4, E27, E25

Thanks so much for popping by & hope to see you again soon!

Crafty hugs,